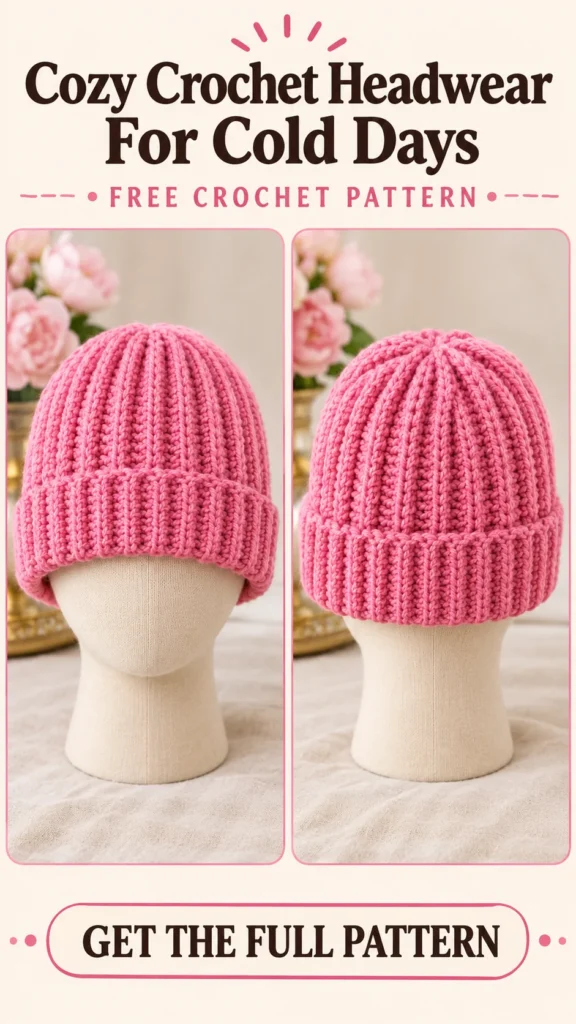
Create a warm, flexible hat featuring a traditional ribbed feel and a soft folded brim with this easy Crochet Rib Beanie Free Pattern. Because it utilizes fundamental crochet stitches worked in rows, this project is ideal for novices looking to refine their ribbing techniques while crafting a functional accessory for chilly weather. The following guide provides the necessary materials, suggested yarns, size information, and detailed steps required to crochet and finish your ribbed beanie.
Color Palette
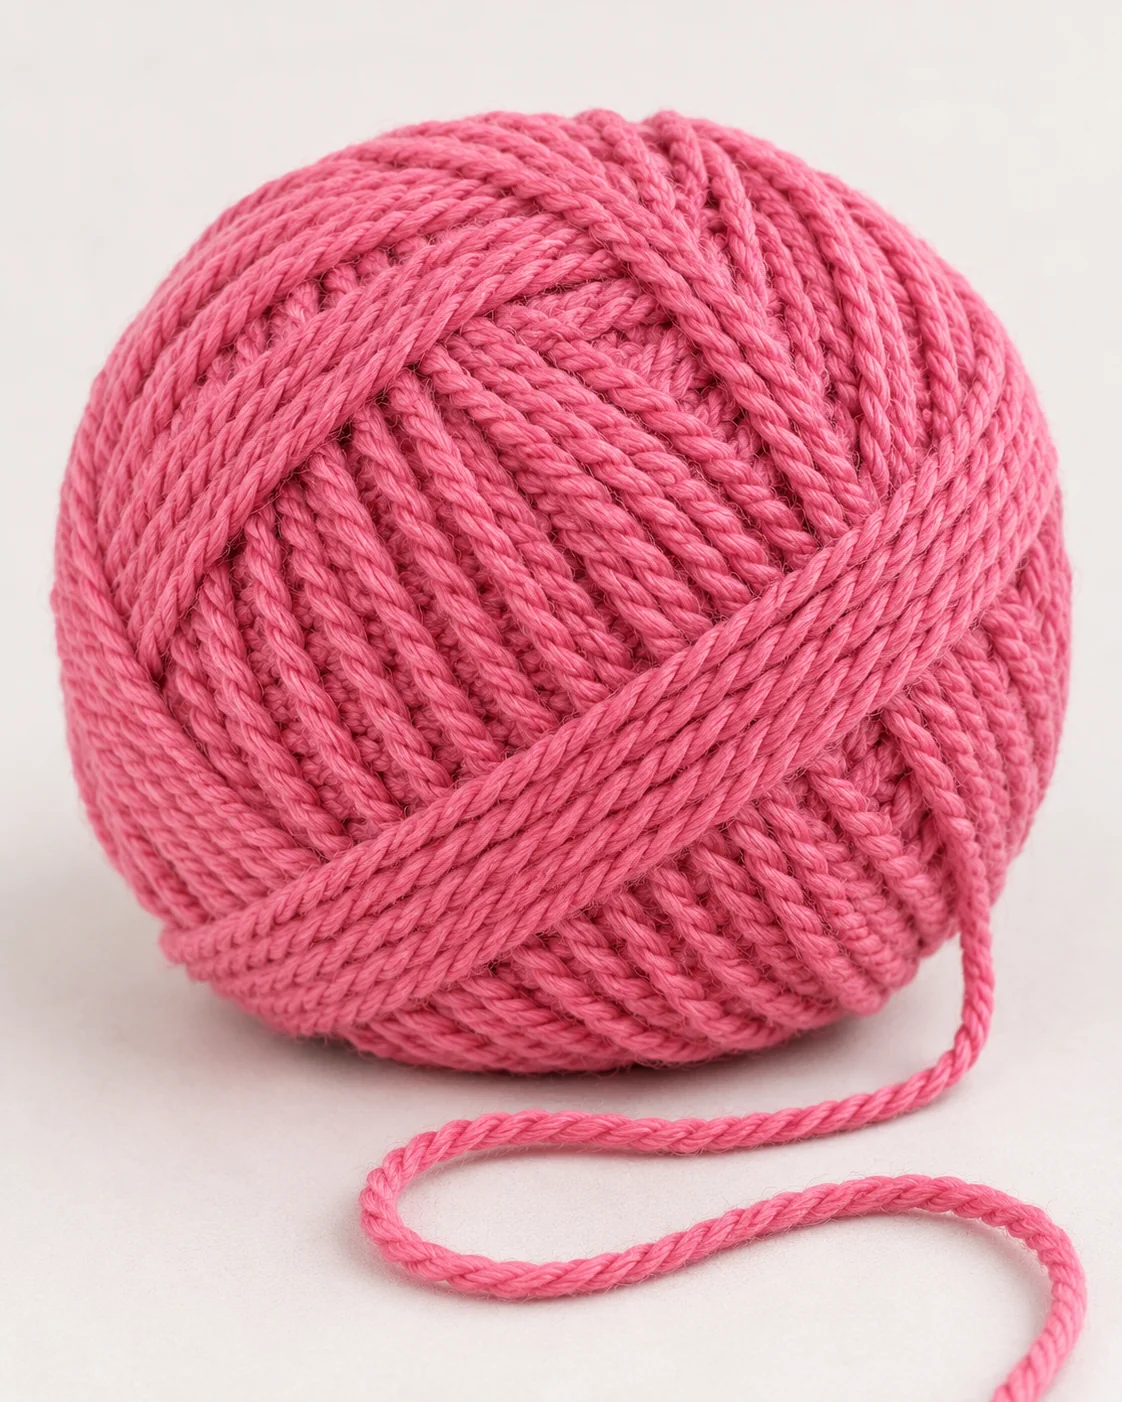
This version features a single, stunning shade of pink. This choice brings a soft, romantic energy to the piece, ensuring the overall look remains elegant and harmonious. Because the palette relies on this solitary hue, the color provides a consistent and serene visual experience that feels both natural and polished. The singular use of pink creates a cohesive aesthetic where the tone complements itself, radiating a gentle warmth throughout the entire design.
Table of Contents
Required Supplies and Dimensions for the Crochet Rib Beanie Free Pattern
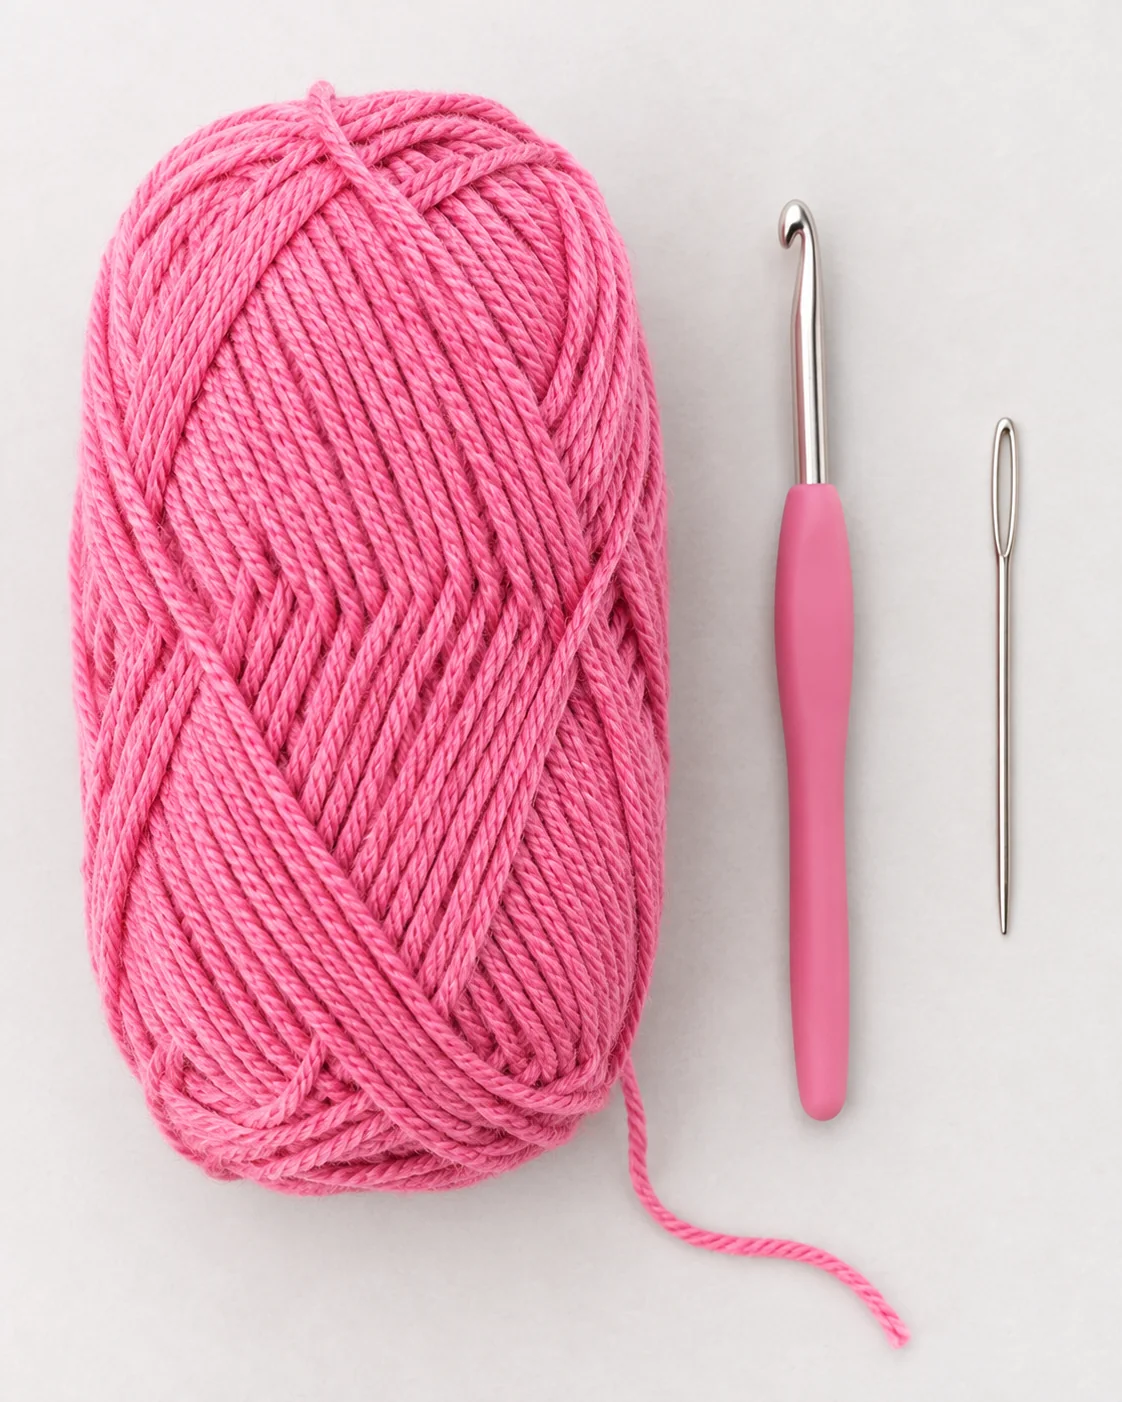
Collect your basic tools, crochet hook, and yarn before beginning this Crochet Rib Beanie Free Pattern. To create the traditional beanie form, you will crochet a basic rectangle using half double crochet stitches in the back loop only, subsequently gathering the top and sewing the short edges. The folded brim provides added warmth for the ears, and the stretchy, comfortable feel comes from the ribbed texture.
Required Tools and Materials
Creating this ribbed beanie requires only a handful of essential crochet tools. To ensure a comfortable, snug fit, select a yarn with a soft texture and sufficient elasticity.
| Material | Recommended Details |
|---|---|
| Yarn | Light DK or Category 3 yarn |
| Yarn quantity | Approximately 150–200 yards |
| Crochet hook | 5.0 mm (H-8) |
| Yarn needle | 1 tapestry needle for sewing and weaving ends |
| Scissors | 1 pair |
| Stitch marker | 1–2 markers, optional |
| Measuring tape | 1 flexible measuring tape |
| Pom-pom | Optional, for decoration |
Yarn recommendation: To achieve crisp ribbing and a cozy feel, try an acrylic-wool blend, merino wool, or soft acrylic. While a medium-weight yarn is an option for colder winter weather, remember to verify your gauge and modify the stitch count as needed.
Required Yarn Based on Beanie Size
Factors such as the thickness of your yarn, the head circumference, and the inclusion of a pom-pom will determine how much yarn is needed.
| Size | Approximate Head Circumference | Estimated Yarn |
|---|---|---|
| Baby | 14–16 inches | 70–100 yards |
| Toddler | 16–18 inches | 90–120 yards |
| Child | 18–20 inches | 110–150 yards |
| Teen | 19–21 inches | 130–170 yards |
| Adult Small | 20–22 inches | 150–180 yards |
| Adult Medium | 21–23 inches | 160–190 yards |
| Adult Large | 22–24 inches | 180–220 yards |
This guide provides instructions for an adult beanie designed for a head circumference of approximately 20–24 inches. To ensure you have enough for the finishing touches, the brim, and a possible pom-pom, it is recommended to have roughly 200 yards of yarn.
Completed Hat Dimensions
Ensuring a proper fit is essential for a ribbed crochet hat. The resulting rectangle must provide a comfortable stretch around the head, avoiding excessive tightness.
| Measurement | Adult Size |
|---|---|
| Head circumference | 20–24 inches |
| Rectangle height before seaming | 8–9 inches |
| Finished hat height | Approximately 8–9 inches |
| Folded brim depth | 2–2.5 inches |
| Foundation chain | Approximately 60 chains |
| Construction | Rectangle worked in rows |
| Top finish | Gathered and secured |
Important sizing note: Because crochet fabric has natural stretch, the rectangle should be slightly smaller than the actual head circumference of the wearer. Before seaming the edges, check the rectangle’s fit against the head and modify the row count as needed for comfort.
US Crochet Terms and Abbreviations
Beginners familiar with fundamental crochet stitches will find this pattern accessible, as it employs standard US terminology.
| Abbreviation | Meaning |
|---|---|
| ch | Chain |
| st | Stitch |
| sts | Stitches |
| sl st | Slip stitch |
| sc | Single crochet |
| hdc | Half double crochet |
| BLO | Back loop only |
| FO | Fasten off |
| Rep | Repeat |
Design and Assembly
To achieve the characteristic vertical ribbing of this beanie, work half double crochet stitches exclusively through the back loop rather than the full stitch.
| Pattern Detail | Instructions |
|---|---|
| Main stitch | Half double crochet |
| Ribbing technique | Back loop only (BLO) |
| Working direction | Back and forth in rows |
| Starting chain | Chain 60 for the adult sample |
| First row | 59 hdc |
| Main construction | Rectangular crochet panel |
| Assembly | Sew the short edges together |
| Crown shaping | Gather the top edge |
| Brim | Fold the lower edge upward |
Tension and Gauge
To ensure the beanie fits properly, it is recommended to create a small sample swatch prior to beginning the main project.
Create a piece consisting of 10 rows, with roughly 15 half double crochet stitches in the back loop only per row. Take your measurements while the swatch is relaxed.
| Gauge Detail | Target |
|---|---|
| Stitch | HDC BLO |
| Width | Approximately 4 inches |
| Height | Approximately 4 inches |
| Tension | Even and moderately stretchy |
Your individual tension and the specific yarn used may cause gauge to differ. Use a smaller hook if the resulting fabric is too loose, or a larger hook if your stitches are too tight.
Project Difficulty and Timeframe
| Detail | Information |
|---|---|
| Difficulty | Beginner |
| Techniques | Chain, HDC, BLO, seaming, gathering |
| Construction | Rectangle worked in rows |
| Estimated time | 2–4 hours |
| Best season | Fall and winter |
| Customization | Different colors, folded brim, optional pom-pom |
Advice for a Successful Project
- Select a soft yarn: For winter gear that feels warm and cozy, wool blends or acrylic are great choices.
- Maintain steady tension: To ensure your ribbing looks crisp and professional, keep your stitches consistent.
- Stitch into the back loop only: The characteristic raised vertical ribs are achieved by working specifically into the back loop.
- Verify dimensions frequently: Before you sew the edges together, confirm the length and height of your rectangle.
- Retain a generous yarn tail: Ensure you have plenty of yarn left over for gathering the top and stitching the side seam.
- Account for the brim fold: To ensure the beanie fits comfortably, verify the rectangle has sufficient height for the fold.
You can start building the ribbed rectangle and crocheting your foundation chain as soon as your measurements are set and your supplies are gathered.
Constructing the Ribbed Beanie Main Section
To begin the main part of your Crochet Rib Beanie Free Pattern, you will create a basic rectangular piece. By utilizing half double crochet stitches in the back loop only (HDC BLO), you will produce the characteristic vertical ridges that provide the beanie’s traditional appearance and elasticity.
To achieve a proper adult fit, follow these steps to ensure your panel is uniform. Once complete, this rectangle is sewn into a tubular shape and gathered at the top to create the crown.
Step 1: Make the Foundation Chain
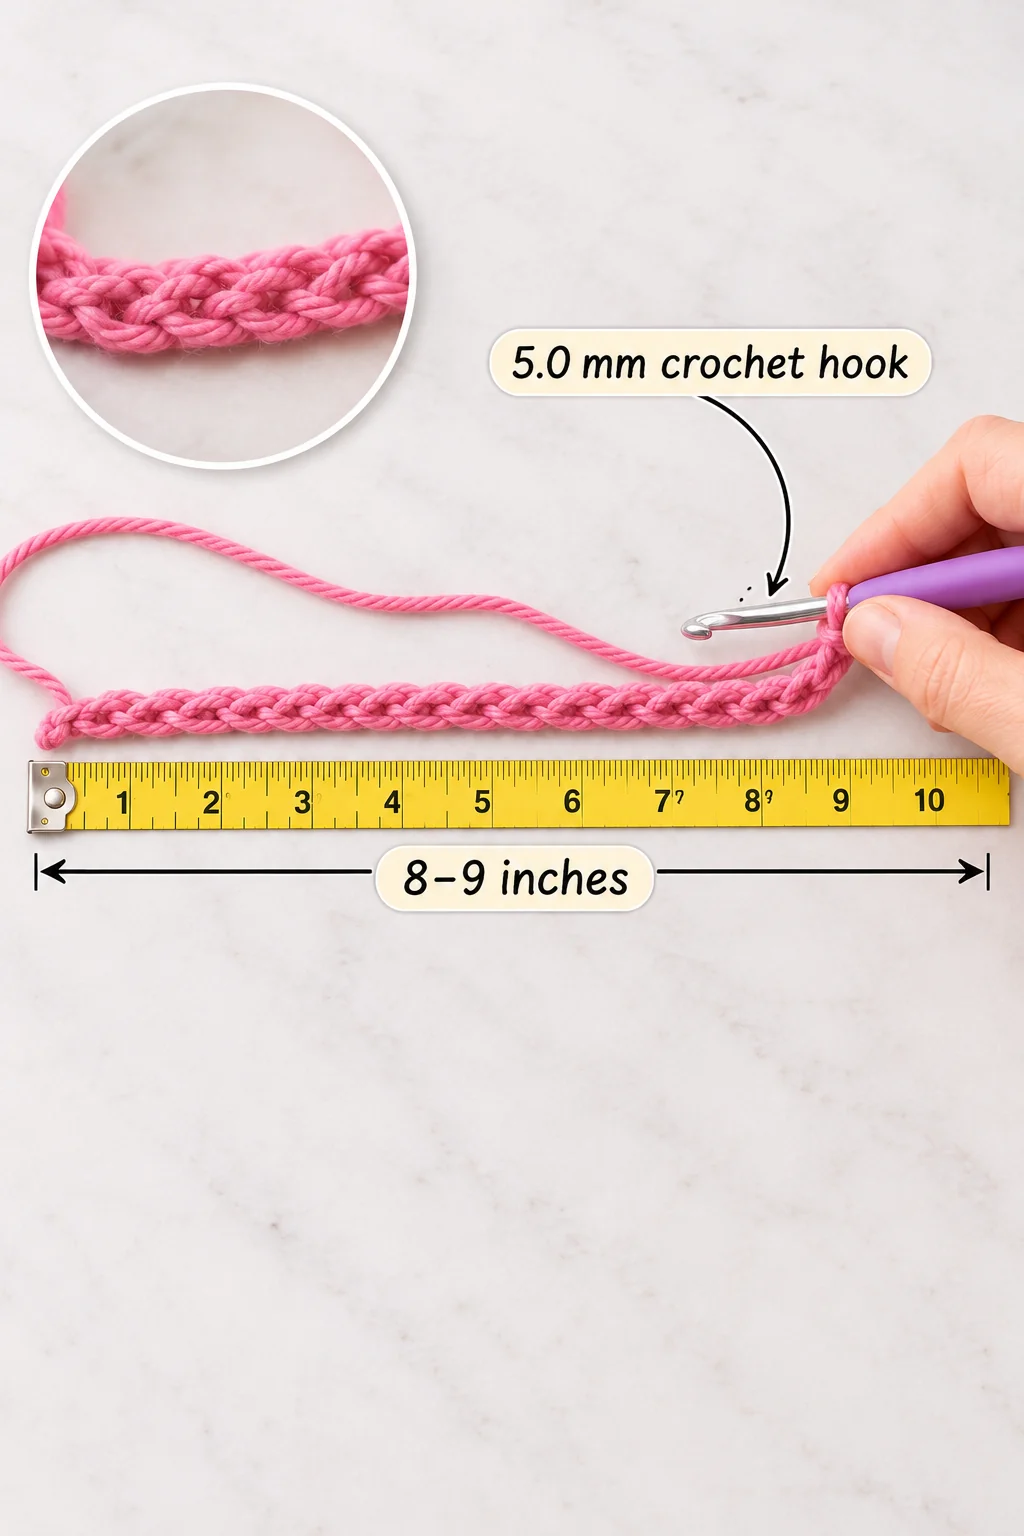
Start with your chosen yarn and a 5.0 mm crochet hook.
- Make a slip knot and place it on your hook.
- Chain 60 stitches.
- Keep your foundation chain relaxed rather than pulling it too tightly.
- Check that the chain measures approximately 8–9 inches.
Foundation: Ch 60.
This chain determines the height of the beanie before folding the brim. If you want a deeper hat, add a few chains. For a shorter beanie, reduce the chain length.
Step 2: Crochet the First Row
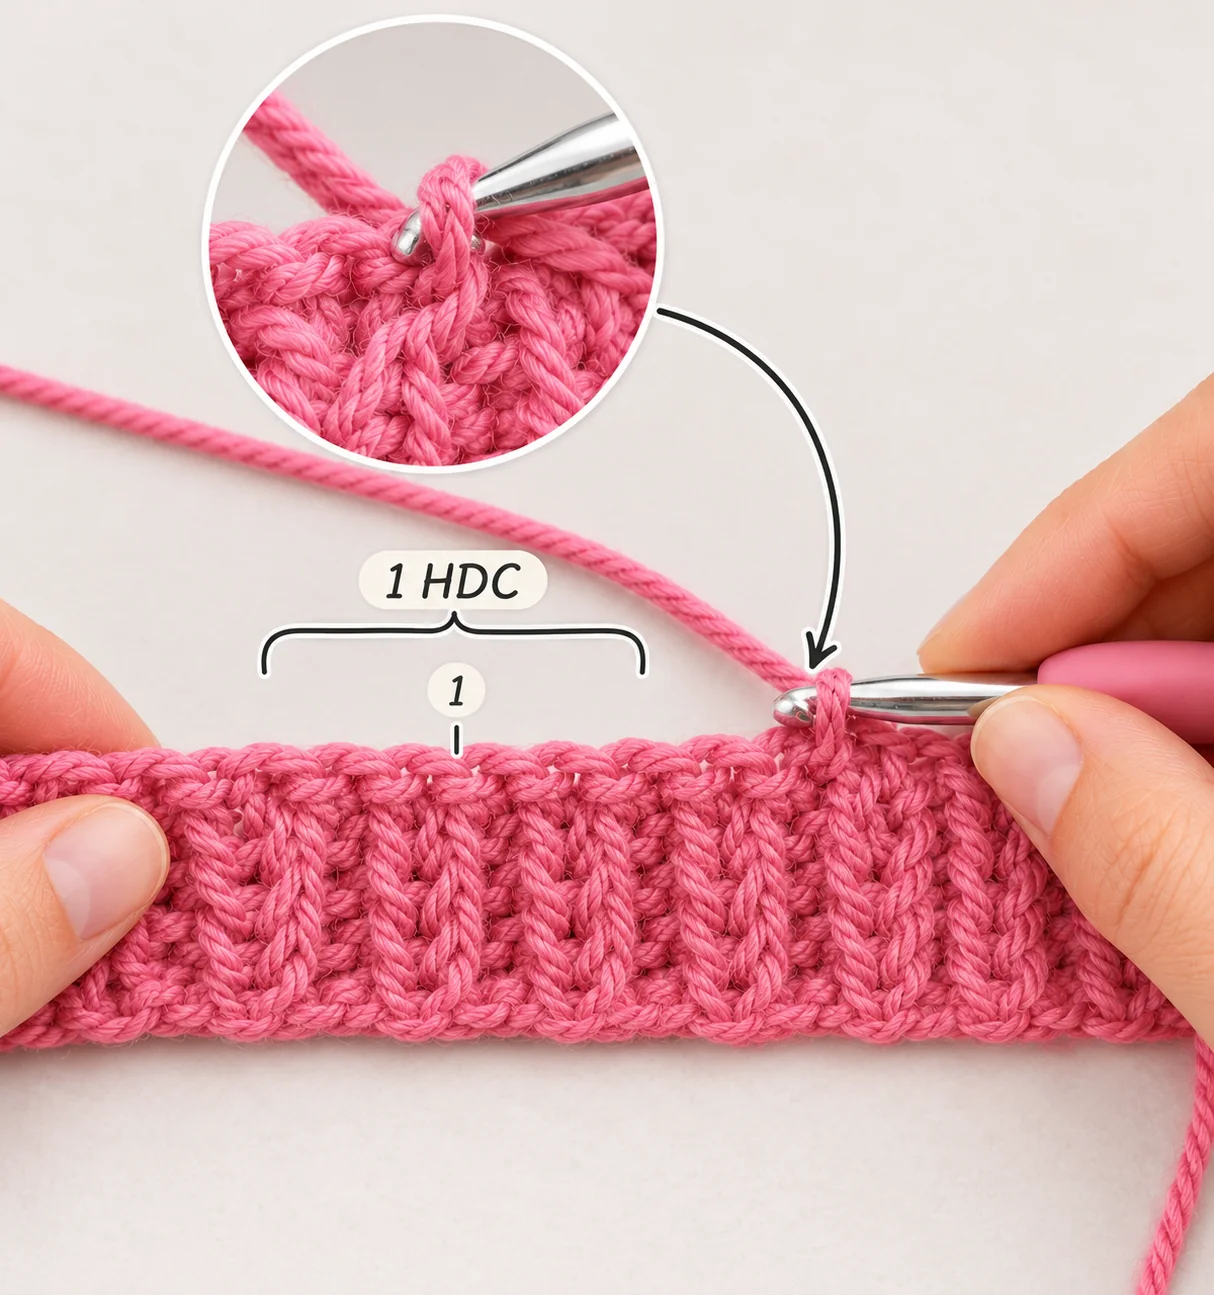
Work the first row of half double crochet stitches across the foundation chain.
- Chain 1 and turn your work.
- Insert your hook into the second chain from the hook.
- Yarn over and pull up a loop.
- Yarn over again and pull through all three loops on your hook.
- Repeat the HDC stitch across the foundation chain.
Row 1: Ch 1, 1 HDC in each chain across. (59 stitches)
The turning chain does not count as a stitch.
Step 3: Create the Ribbed Texture
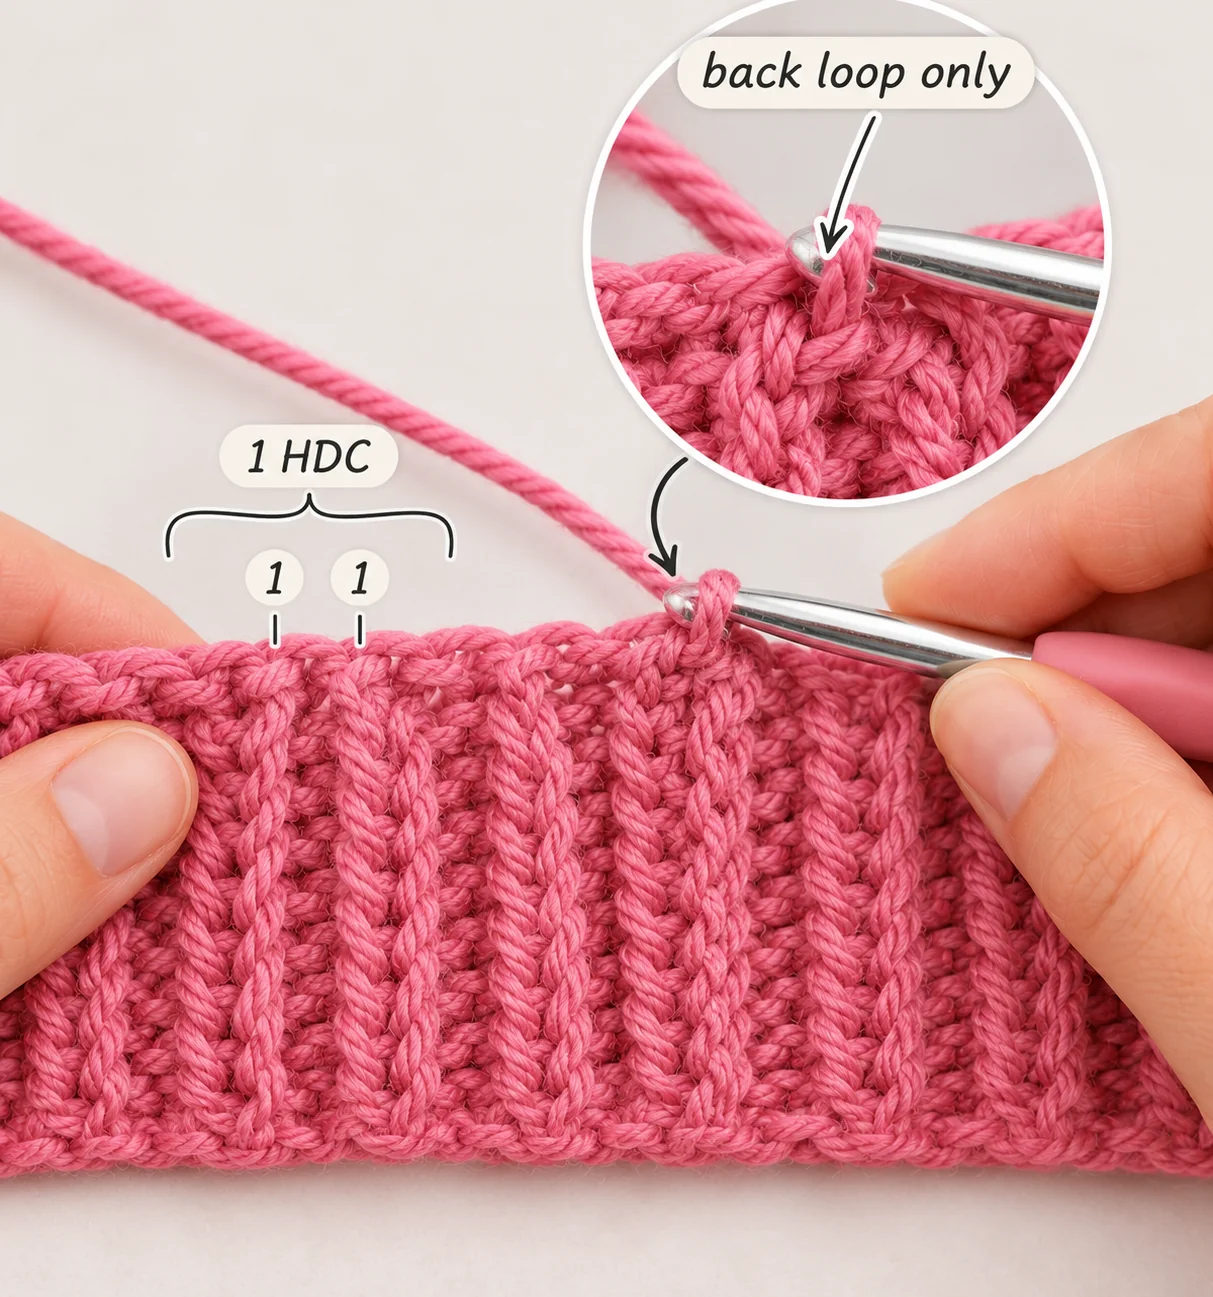
The ribbed effect is created by working into the back loop only of every stitch.
To identify the back loop, look at the top of your stitches. You’ll see two loops forming a small V shape. The loop furthest away from you is the back loop.
Row 2:
- Chain 1 and turn.
- Insert your hook under the back loop only of the first stitch.
- Work 1 HDC.
- Continue working 1 HDC BLO in every stitch across.
- Make sure you have 59 stitches at the end.
Row 2: Ch 1, 1 HDC BLO in each stitch across. (59 stitches)
Step 4: Repeat the Ribbed Rows
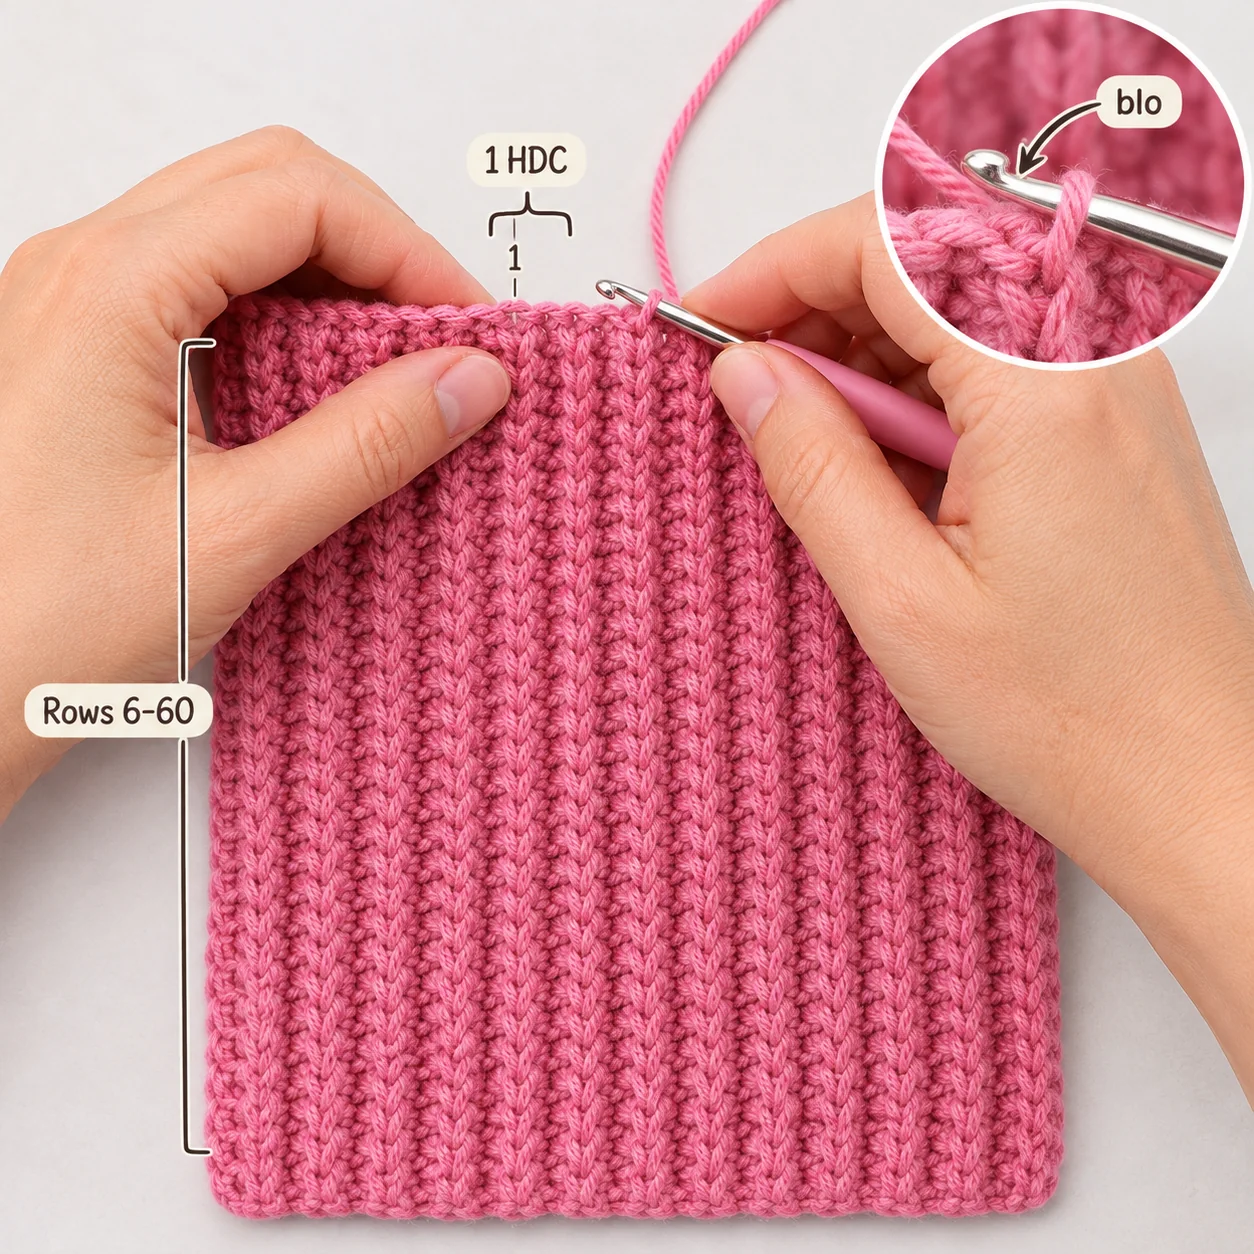
Continue repeating Row 2 until the panel reaches your desired circumference.
| Row | Instructions | Stitch Count |
|---|---|---|
| Row 1 | HDC in each chain | 59 |
| Row 2 | HDC BLO across | 59 |
| Row 3 | HDC BLO across | 59 |
| Row 4 | HDC BLO across | 59 |
| Row 5 | HDC BLO across | 59 |
| Rows 6–10 | Repeat HDC BLO | 59 per row |
| Rows 11–20 | Repeat HDC BLO | 59 per row |
| Rows 21–30 | Repeat HDC BLO | 59 per row |
| Rows 31–40 | Repeat HDC BLO | 59 per row |
| Rows 41–50 | Repeat HDC BLO | 59 per row |
| Rows 51–60 | Continue if needed | 59 per row |
The number of rows you need will depend on your yarn, hook size, and tension. Do not rely on the row count alone; measure the panel as you work.
Step 5: Measure the Ribbed Panel
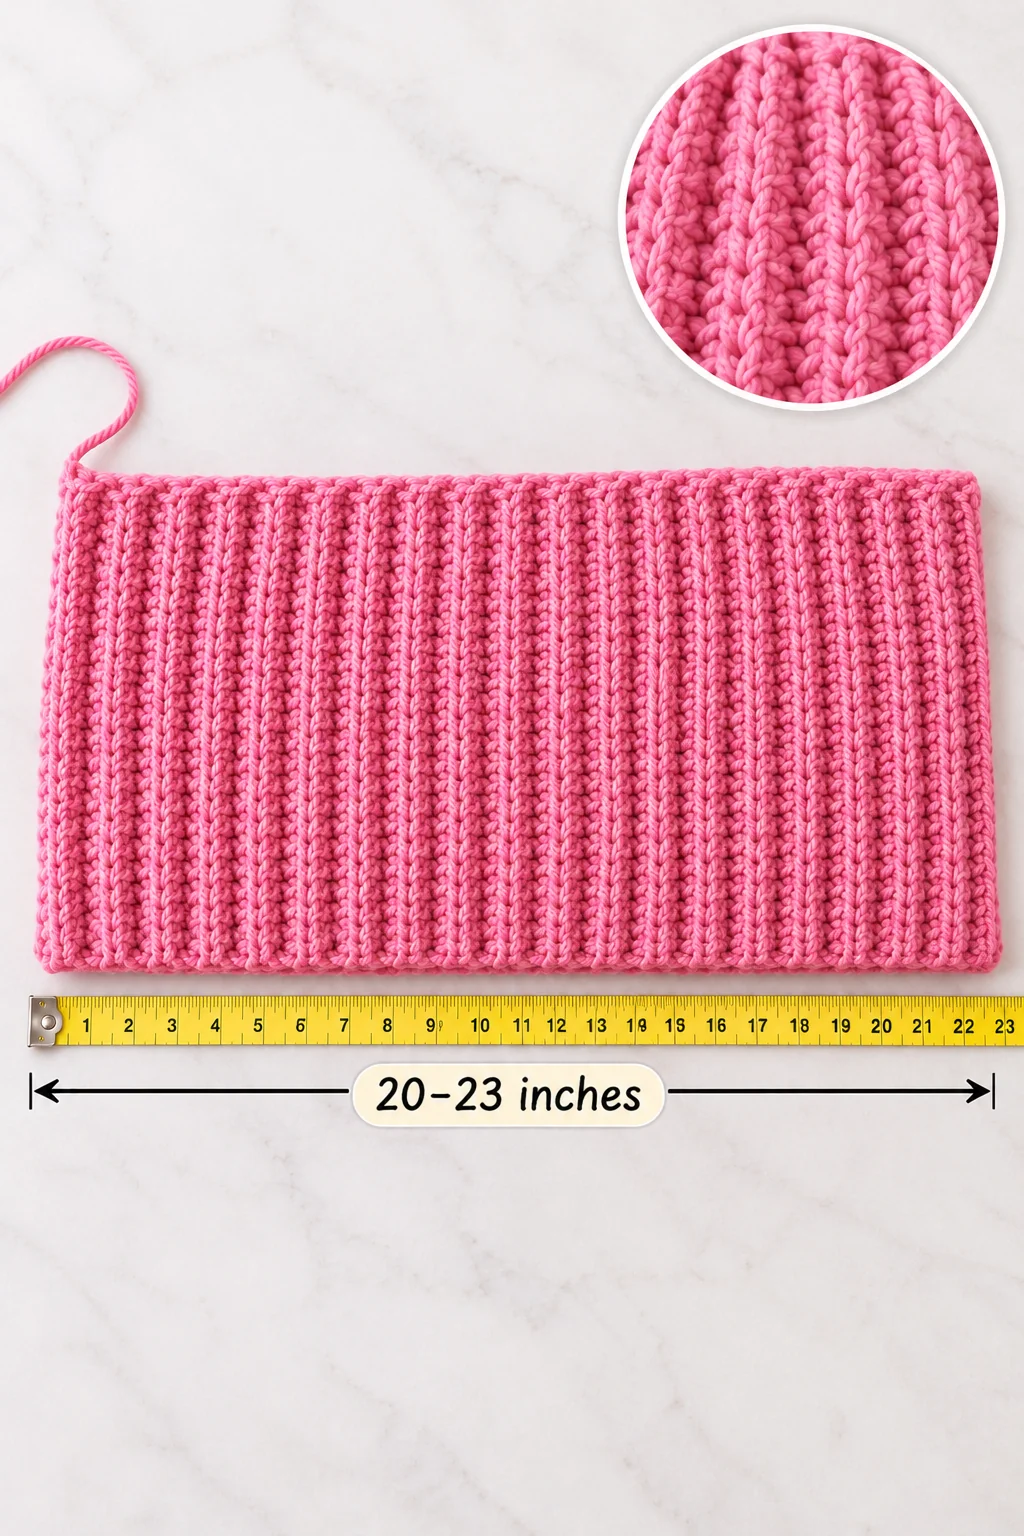
For an adult beanie, the panel should measure approximately 20–23 inches in length before joining, depending on the intended fit.
| Measurement | Recommended Size |
|---|---|
| Panel height | 8–9 inches |
| Panel length | 20–23 inches |
| Stitch count per row | 59 |
| Folded brim | 2–2.5 inches |
| Shape | Rectangle |
The panel should be slightly shorter than the head circumference because crochet ribbing naturally stretches.
Step 6: Check Your Stitch Tension
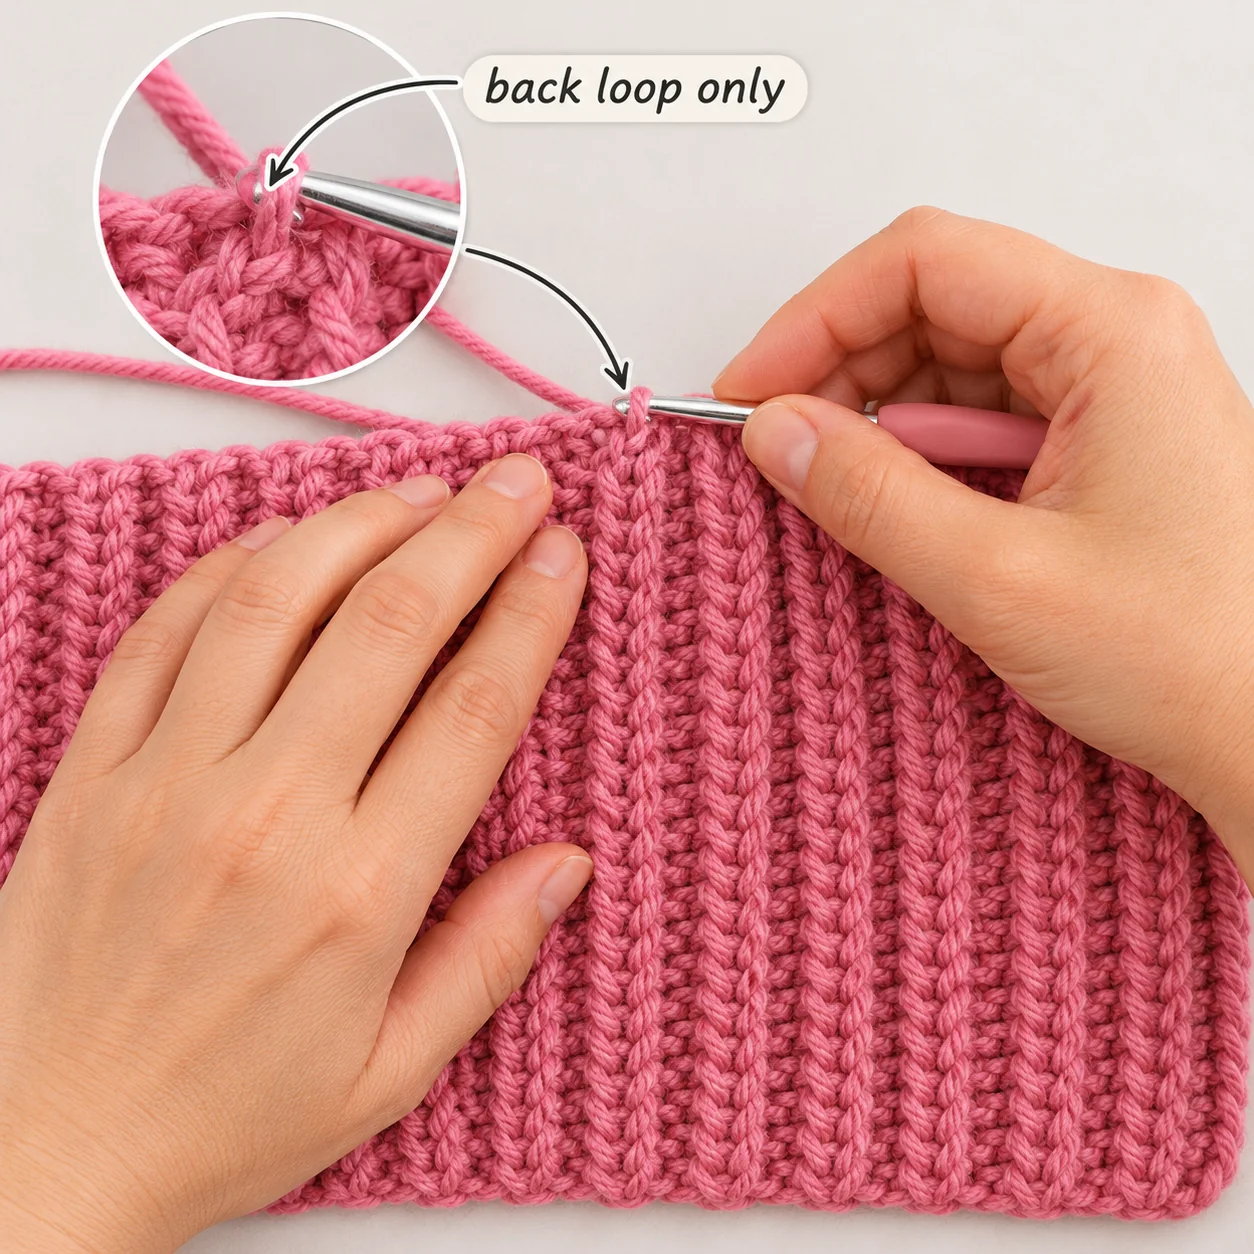
Before finishing the panel, check that the ribbing looks even from top to bottom.
- If the panel is too narrow: Try a larger hook or adjust your tension.
- If the panel is too wide: Use a smaller hook or reduce the number of rows.
- If the edges look uneven: Make sure you are working into the first and last stitches of every row.
- If the ribbing is not visible: Check that you are inserting your hook through the back loop only.
Step 7: Finish the Rectangle
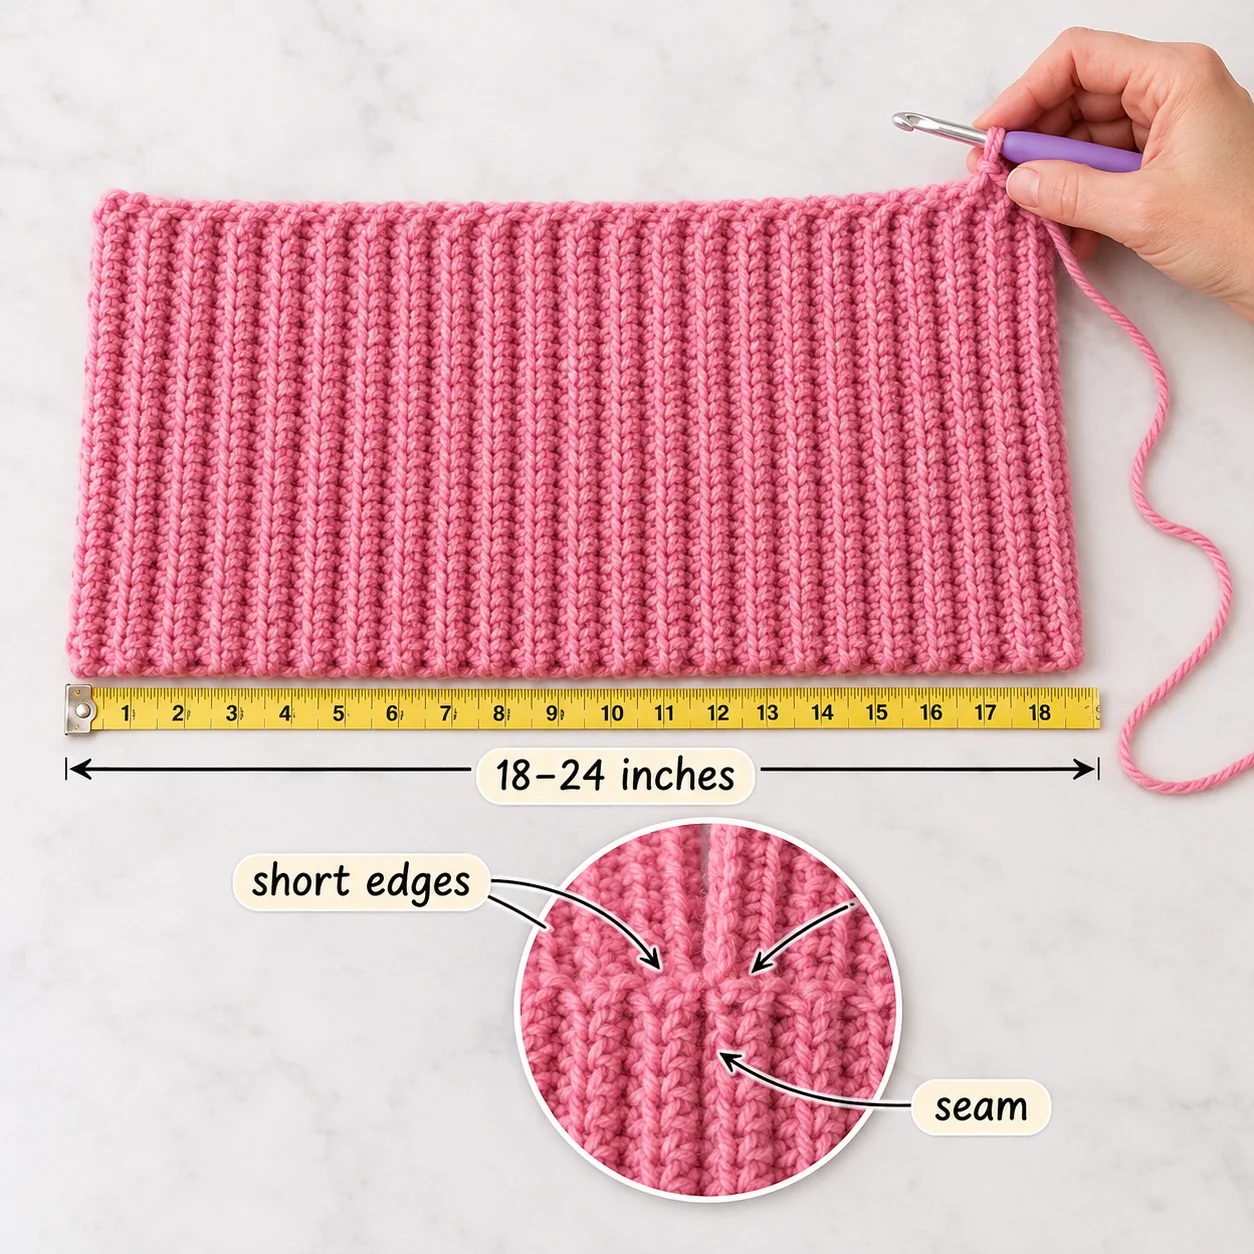
Once your panel reaches the desired length, complete the final row and fasten off.
Leave a long yarn tail of approximately 18–24 inches. You’ll use this tail to sew the side seam and gather the top of the beanie.
Lay the panel flat and gently stretch it to check its dimensions. Make sure the ribbed texture is consistent and that the edges are straight.
Pattern checkpoint: You should now have a rectangular crochet panel measuring approximately 8–9 inches high and 20–23 inches long, with clearly defined vertical ribs. In the next section, you’ll join the short edges to form the beanie and prepare the crown for gathering.
Part 3: How to Shape and Assemble the Crochet Rib Beanie
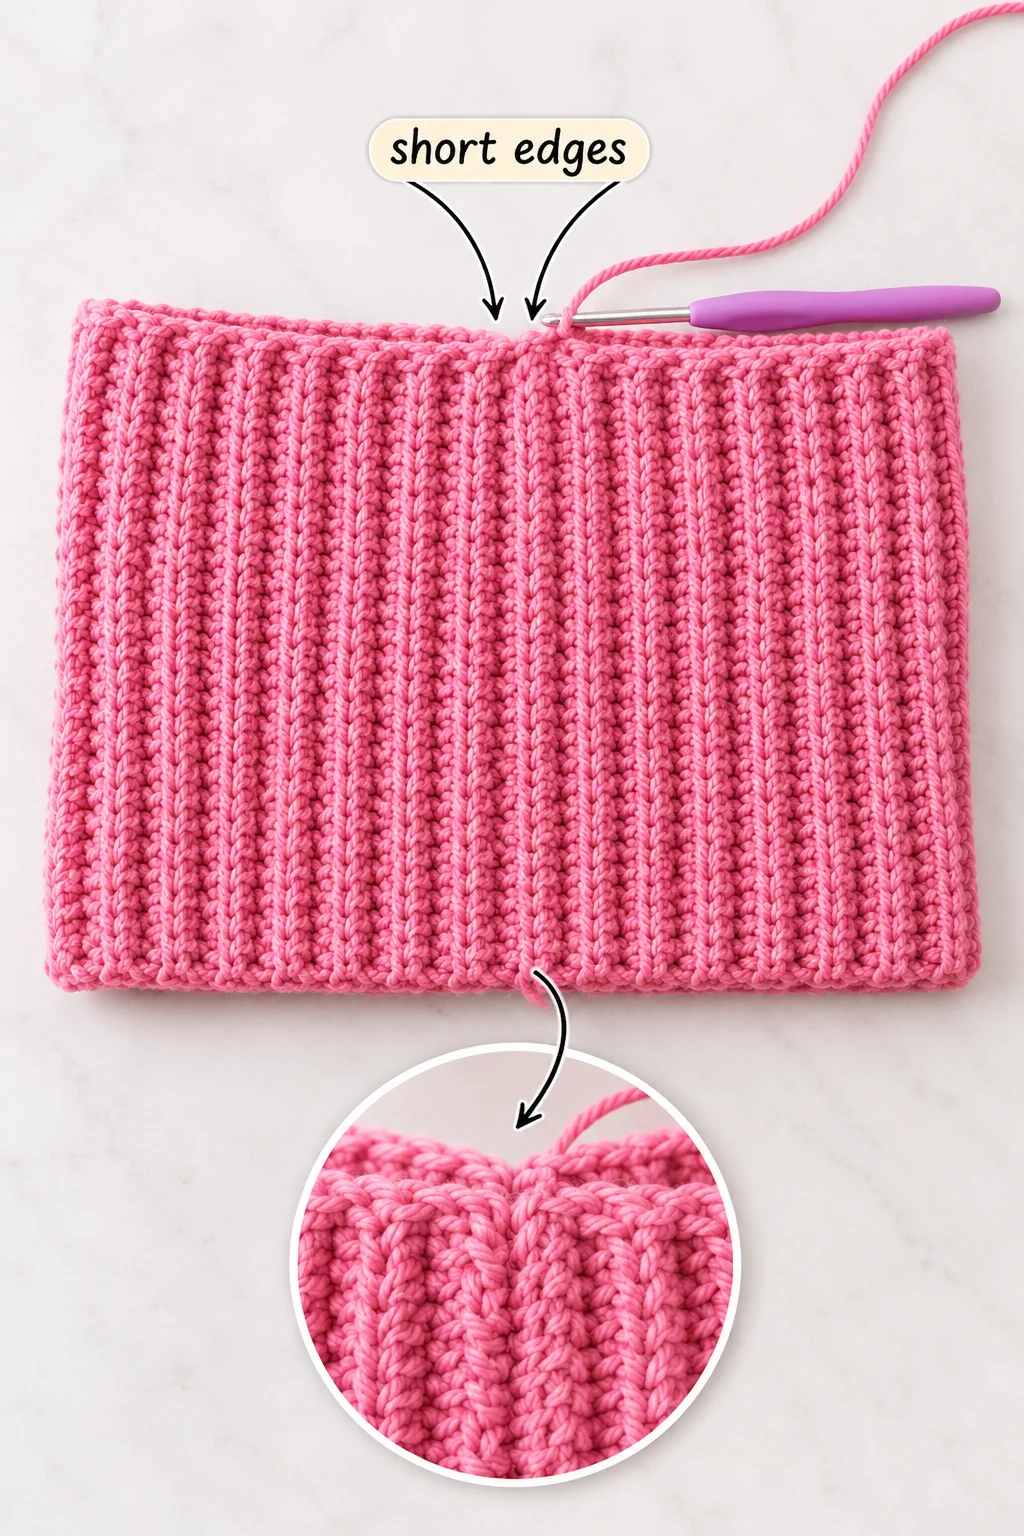
Once your ribbed rectangle is complete, it’s time to transform it into a beanie. In this section, you’ll join the short edges to create the hat’s tube shape, gather the top opening, and prepare the folded brim. The raised ribbing will run vertically around the finished hat, giving it a classic stretchy appearance.
Step 1: Fold the Crochet Rectangle
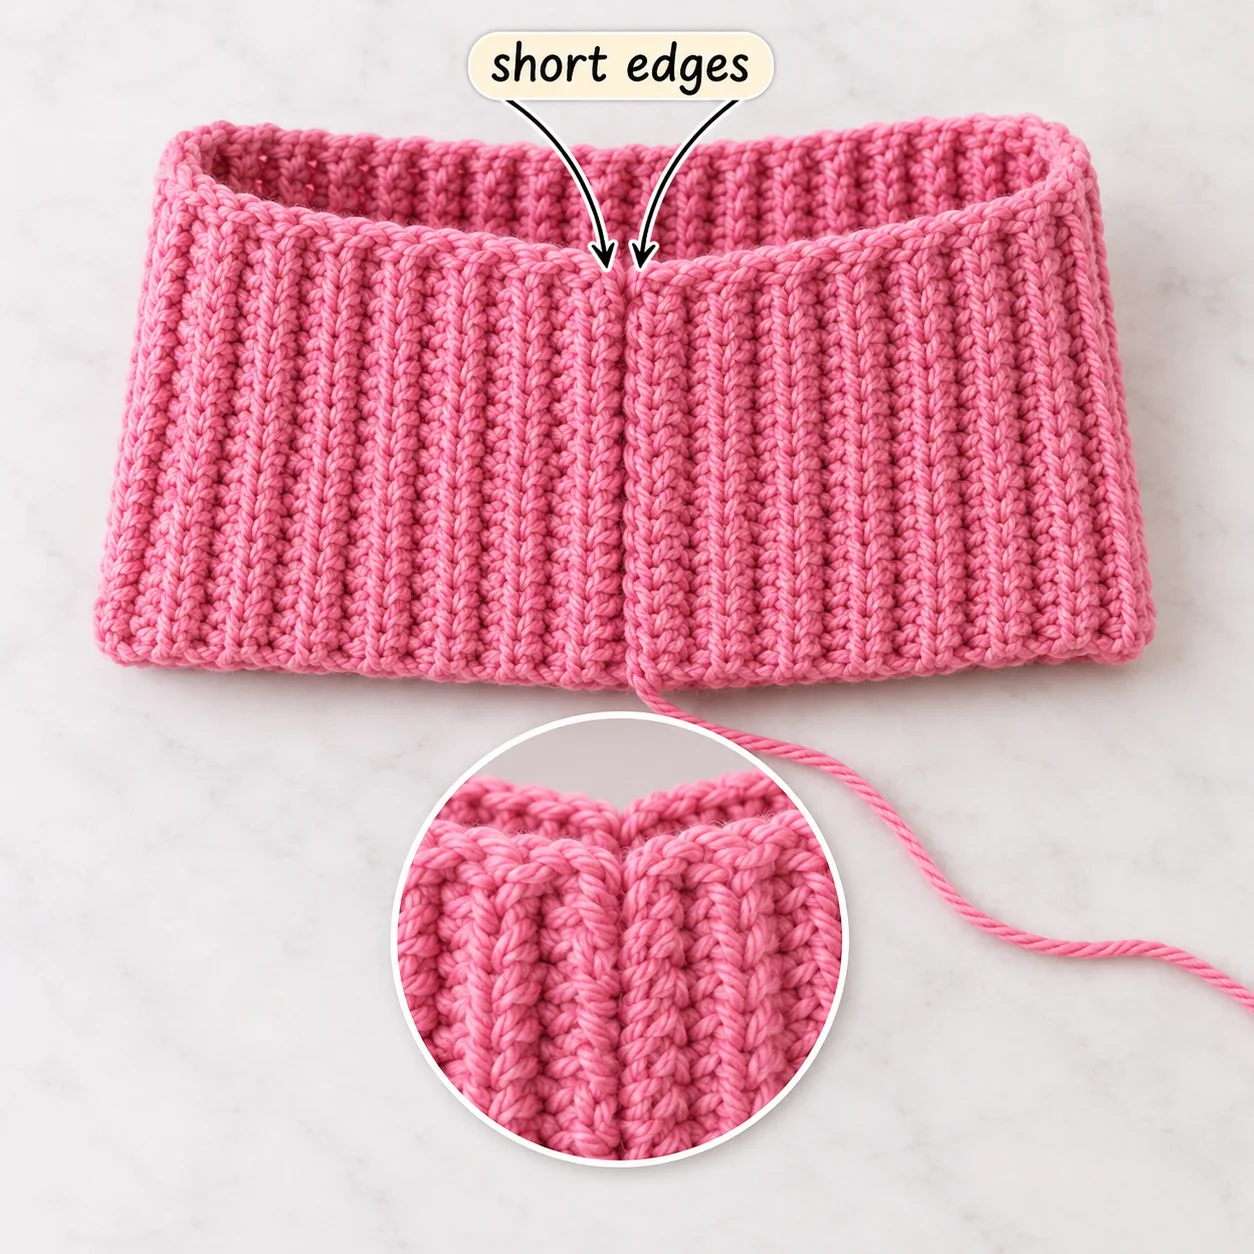
Lay your crochet panel flat with the ribbed texture facing upward.
- Bring the two short edges together.
- Make sure the first and last rows line up evenly.
- Fold the rectangle in half so the wrong side faces outward.
- Check that the bottom and top edges are aligned.
The panel should now form a tube when the side edges are joined.
Step 2: Sew the Side Seam
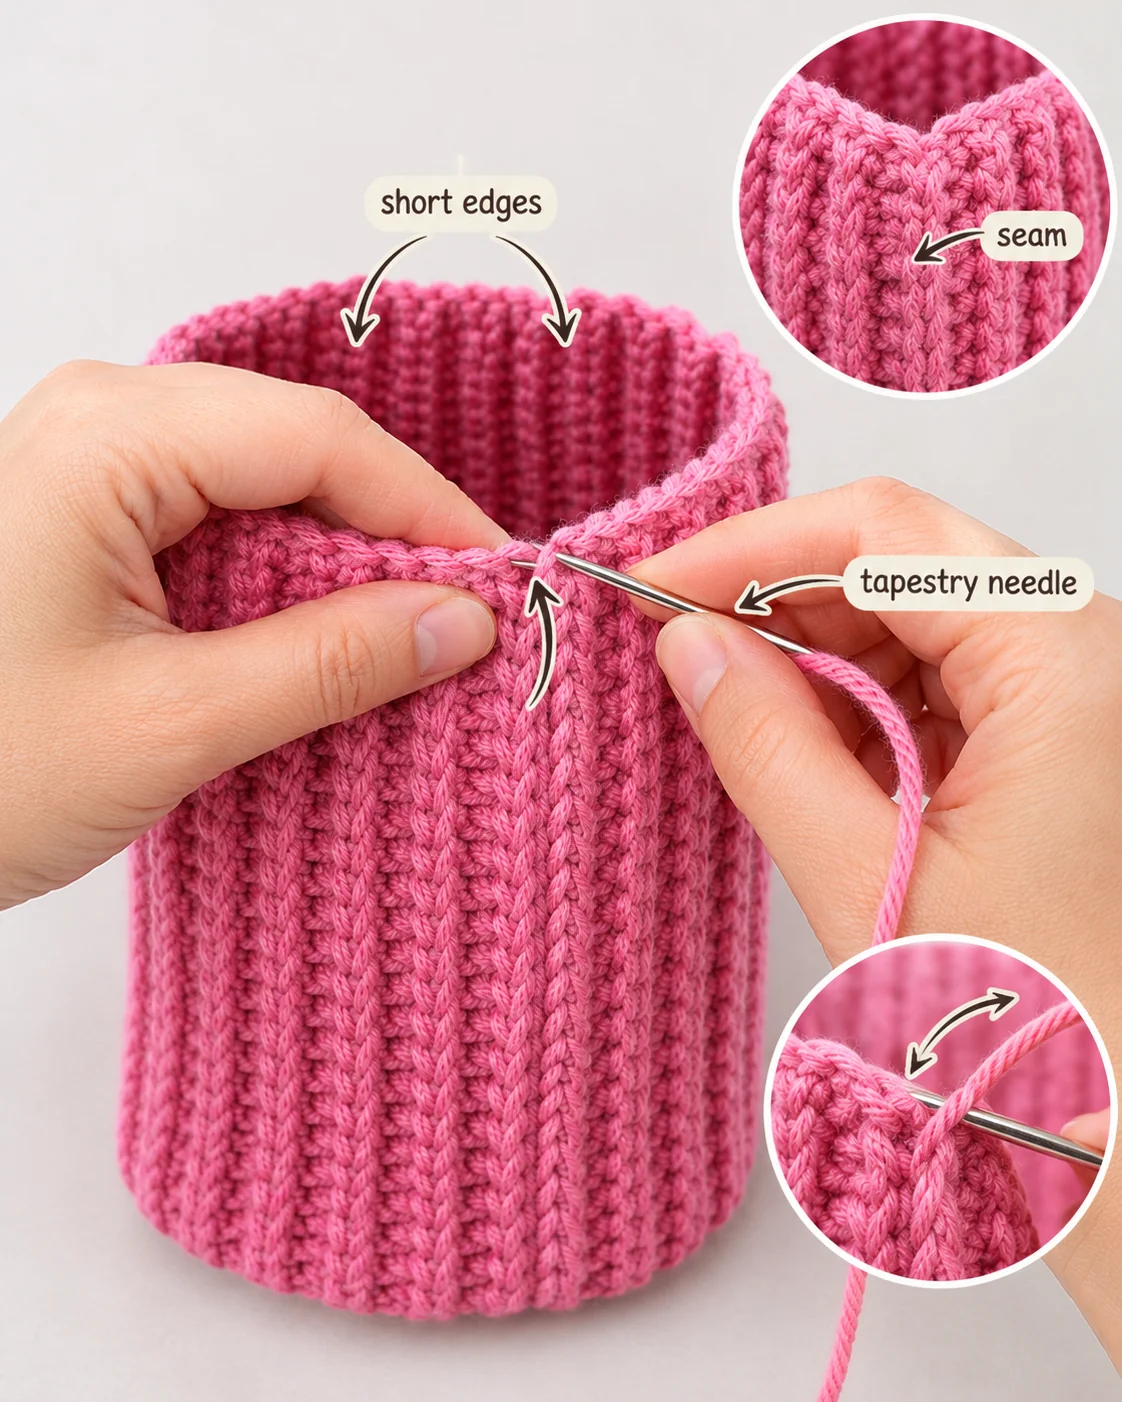
Use the long yarn tail you left at the end of the rectangle.
- Thread the yarn tail through a tapestry needle.
- Insert the needle through the corresponding stitches along both short edges.
- Sew the edges together using a mattress stitch or whip stitch.
- Continue from the bottom edge to the top edge.
- Keep the seam secure but avoid pulling too tightly.
- Fasten off and weave in any loose ends.
Tip: A mattress stitch creates a neat seam with minimal bulk. Try to match the rows carefully so the ribbed texture remains consistent around the beanie.
Step 3: Prepare the Top Opening
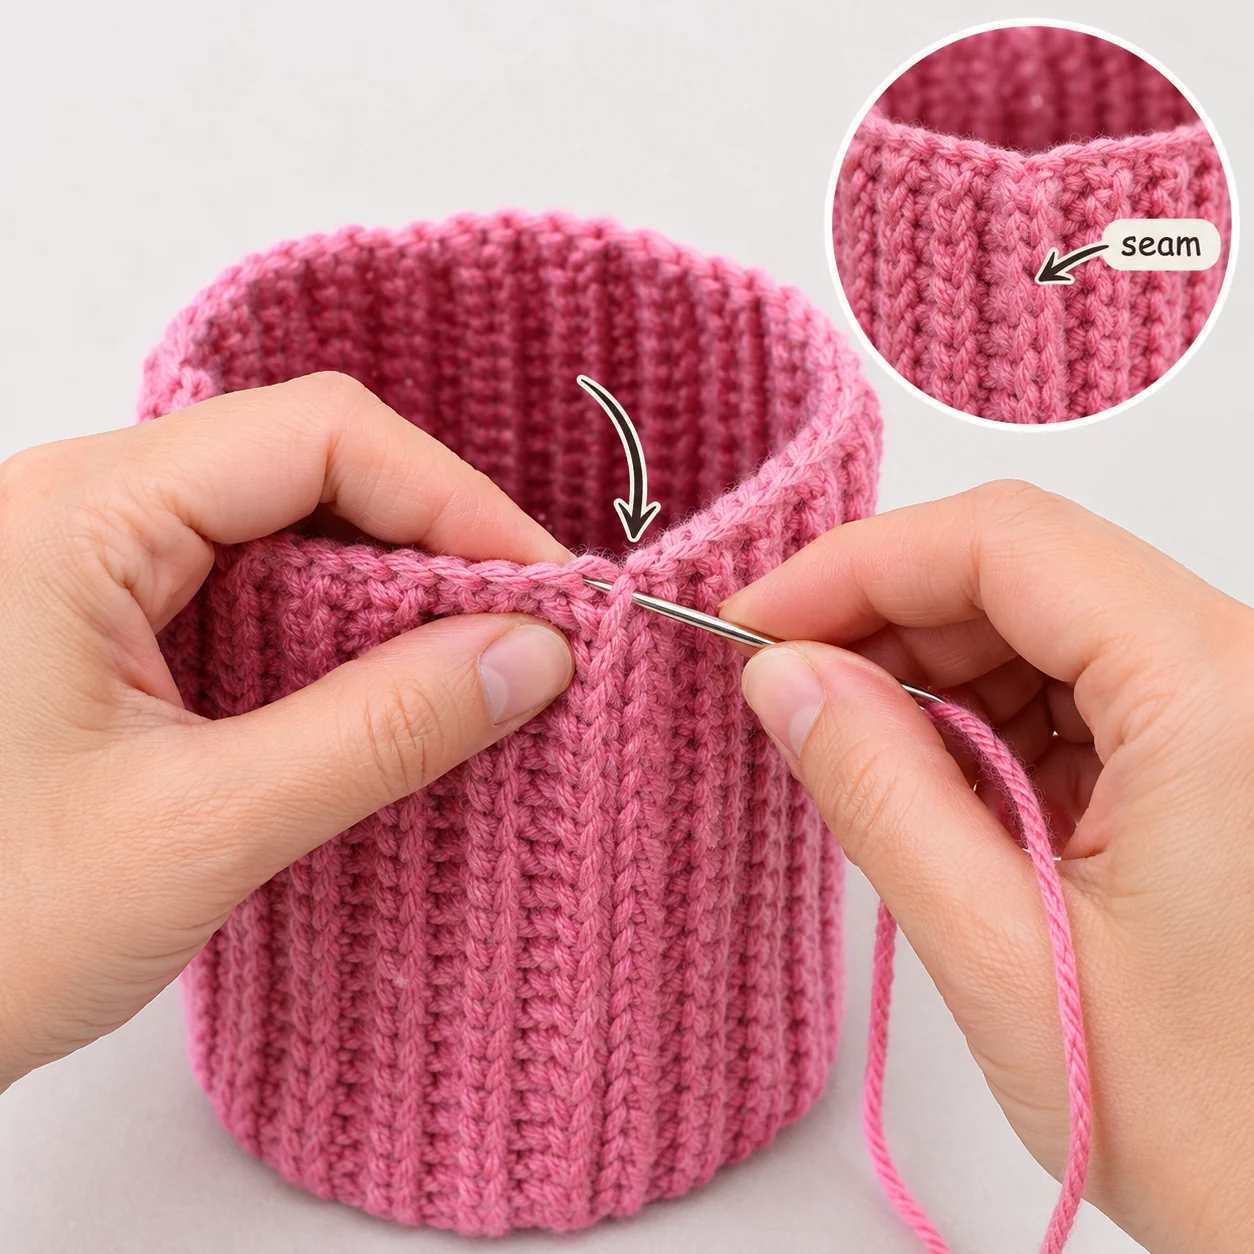
After sewing the side seam, you’ll have a crochet tube with an open top and bottom.
Turn the tube so the right side of the crochet fabric faces outward.
Choose one opening as the top of the beanie. Make sure the side seam is straight and that the stitches around the opening are accessible.
Step 4: Gather the Top of the Beanie
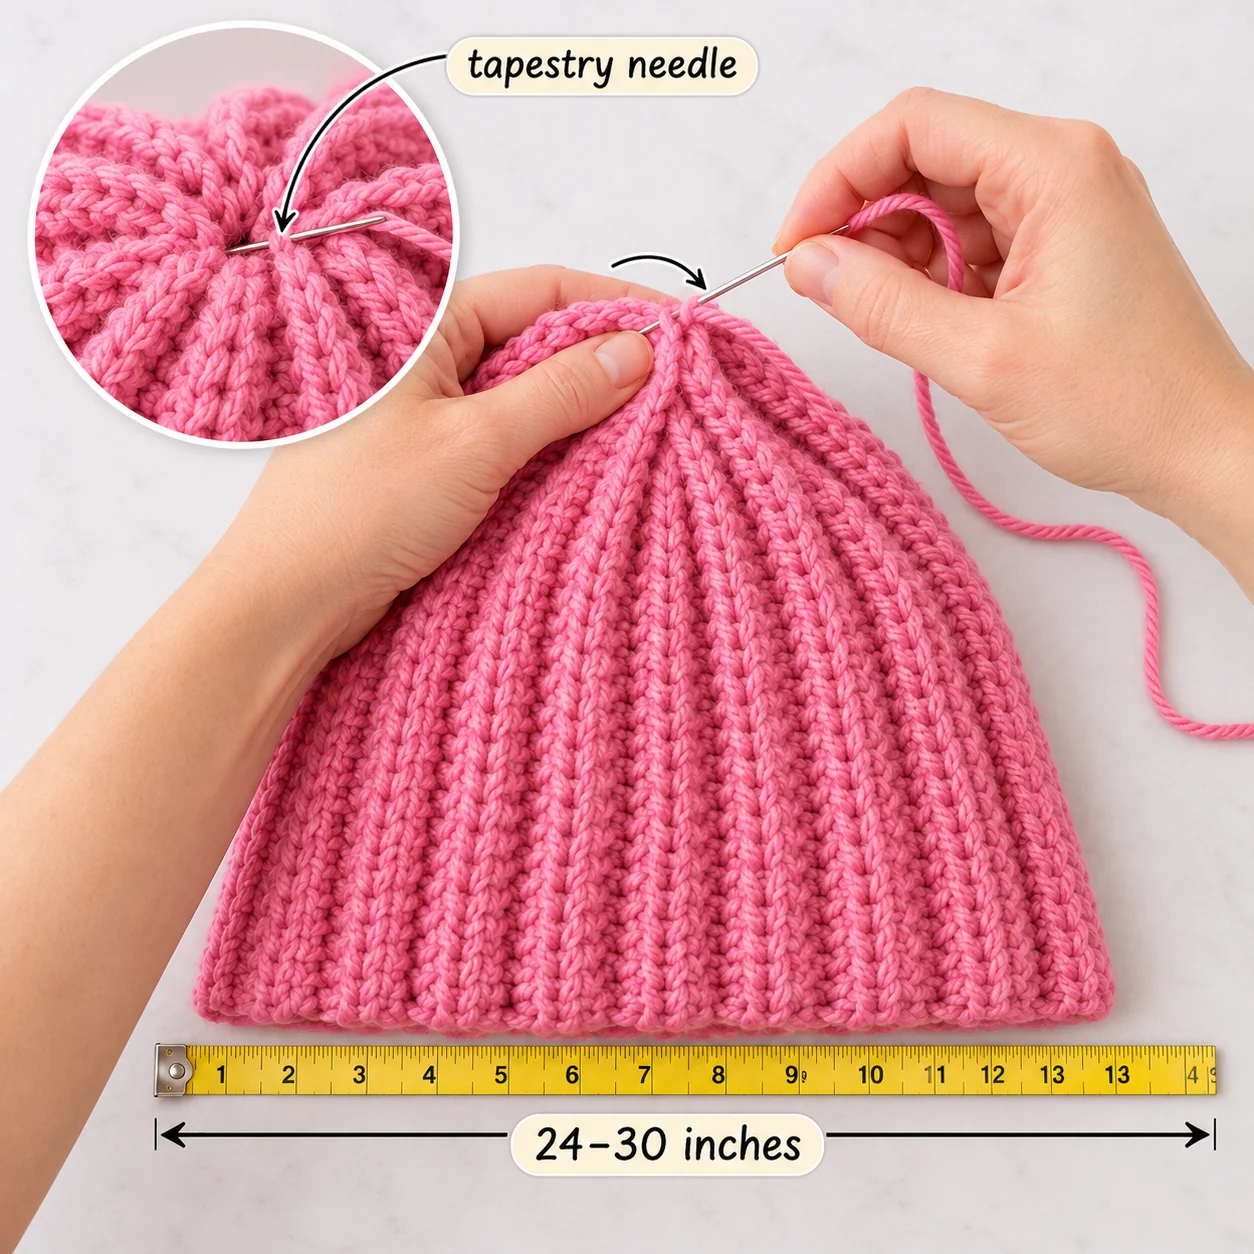
Use a separate piece of matching yarn approximately 24–30 inches long.
- Thread the yarn through your tapestry needle.
- Insert the needle through the top edge of the beanie, passing under the stitches along the opening.
- Continue sewing around the entire circumference.
- Gently pull both ends of the yarn to gather the opening.
- Adjust the gathers until the hole closes completely.
- Secure the opening with several small stitches through the gathered fabric.
- Tie a firm knot on the inside of the beanie.
For extra security, pass the needle through the gathered center several times. This helps prevent the crown from opening during regular use.
Step 5: Check the Beanie Shape
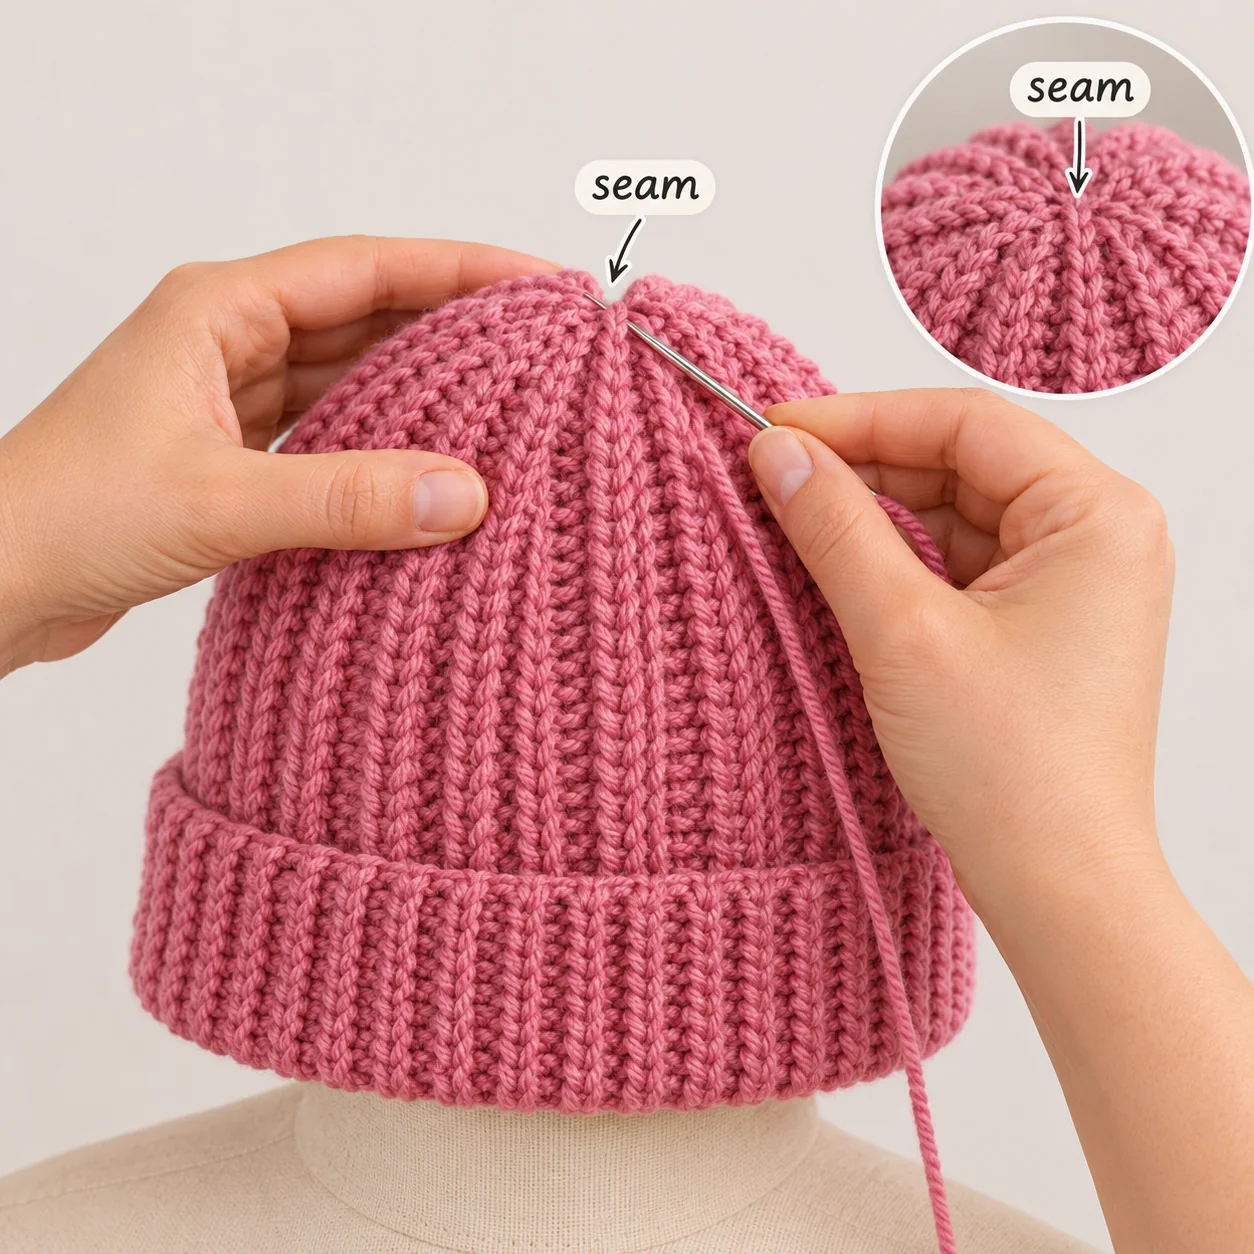
Turn the beanie right side out and check the gathered crown.
| Feature | What to Check |
|---|---|
| Crown | Completely closed |
| Side seam | Straight and secure |
| Ribbing | Even vertical texture |
| Opening | No visible large gaps |
| Fit | Comfortable and stretchy |
If the crown looks bulky, gently redistribute the gathered fabric before securing the yarn completely.
Step 6: Prepare the Folded Brim
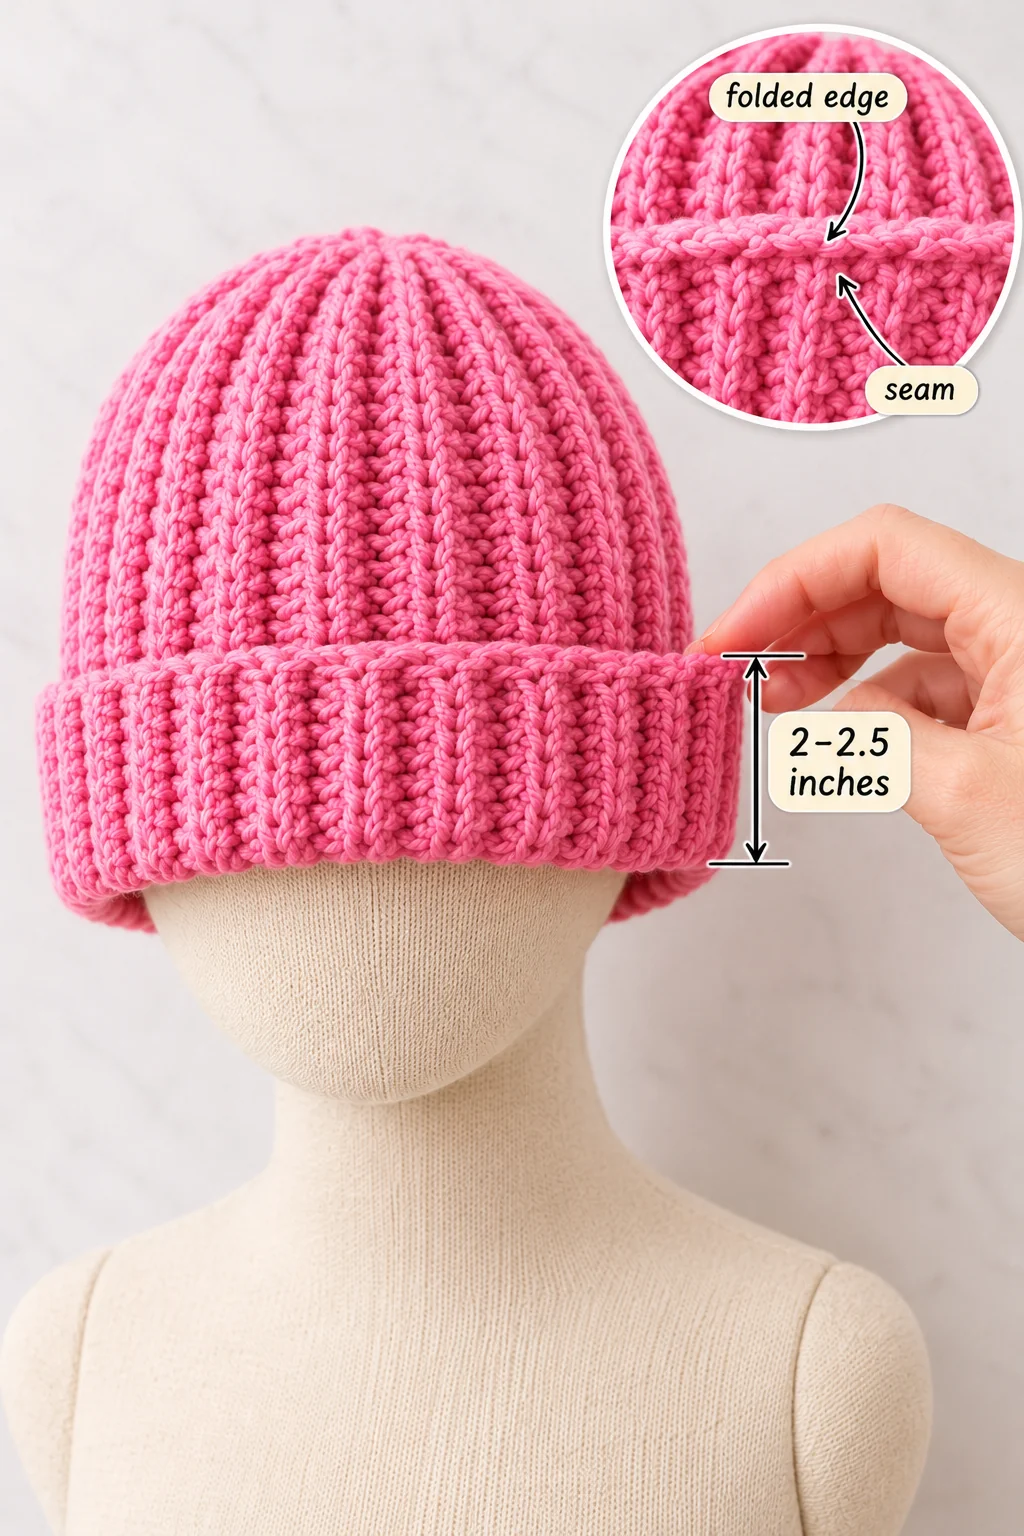
The lower edge of the beanie will become the folded brim.
- Turn the lower edge upward by approximately 2–2.5 inches.
- Adjust the fold evenly around the entire circumference.
- Check that the folded edge sits at the same height on both sides.
- Try the beanie on or measure it against your intended head size.
- Leave the brim folded naturally if you prefer an adjustable finish.
The folded brim adds thickness around the forehead and ears while giving the beanie a clean, finished appearance.
You Did It!
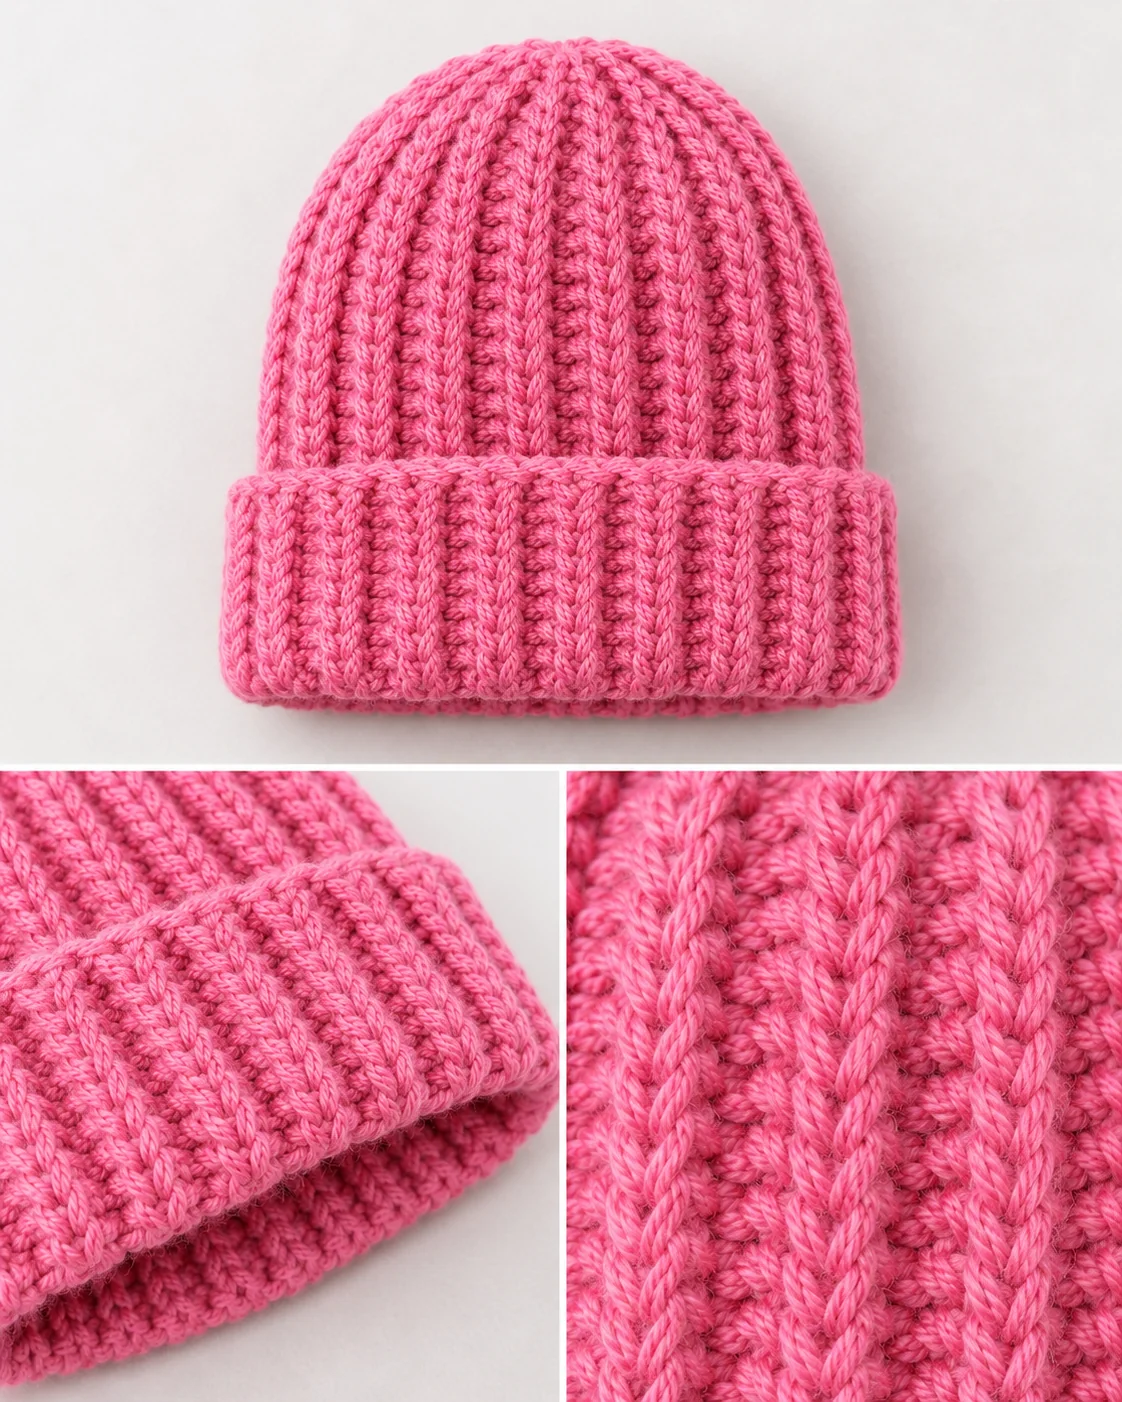
Congratulations on finishing your cozy pink ribbed beanie! Take a moment to compare your work with the final photo to see how your overall shape and ribbed details turned out. Enjoy wearing your new handmade hat!
Assembly Measurements
| Part | Recommended Measurement |
|---|---|
| Side seam | 8–9 inches |
| Top opening | Fully gathered |
| Gathering yarn | 24–30 inches |
| Folded brim depth | 2–2.5 inches |
| Finished hat height | Approximately 8–9 inches |
Fixing Common Assembly Issues
- The seam looks bulky: Avoid pulling the seam too tightly and use a thinner yarn needle.
- The crown has a small hole: Work a few extra securing stitches through the gathered center.
- The beanie feels too tight: Allow for the natural stretch of the ribbing and check the original rectangle length.
- The folded brim is uneven: Adjust the fold before finishing by measuring it at several points.
- The side seam is visible: Match the corresponding rows more carefully and try mattress stitch.
Pattern checkpoint: Your ribbed rectangle should now be a complete beanie shape, with a securely gathered crown and a neatly folded brim. In the next section, you’ll add the final finishing details and optional decorations to complete your crochet beanie.
Common Inquiries
1. What is the process for beginners to crochet a ribbed beanie?
Beginners can create a ribbed beanie by first crafting a rectangular section. Use half double crochet stitches worked through the back loop only (HDC BLO) to achieve the characteristic stretchy ribbing. Once the panel is long enough to fit the head circumference, fold it and stitch the short sides together. Shape the crown by gathering the top opening, then fold up the lower edge to form a cozy brim.
2. Which yarn works best for a ribbed crochet beanie?
For a crochet ribbed beanie, acrylic-wool blends, merino wool, and soft acrylic yarn are top recommendations. Because they offer comfort and warmth, these materials allow ribbed stitches to stretch with ease. Many people prefer medium-weight yarn when crafting winter hats. Before beginning, verify the yarn label for the suggested hook size and ensure the material is soft enough for skin contact.
3. Instructions for Creating a Folded-Brim Crochet Beanie
Begin by crocheting a rectangular piece with sufficient height to allow for the fold. Once you have gathered the top and joined the short edges, flip the hat to the right side. Create a fold of roughly 2–2.5 inches at the bottom edge, ensuring it is balanced all the way around. To ensure the brim stays put, you may either let it sit naturally or use a few hidden stitches on the interior to secure it.
4. Determining the stitch count for a ribbed crochet beanie
Factors such as your personal tension, the size of the crochet hook, the weight of the yarn, and the intended fit of the hat all influence the required stitch count. For the adult version of this pattern, start with a foundation chain of 60 stitches, which results in 59 half double crochet stitches across the first row. The beanie’s circumference is controlled by the total number of rows. Because different yarns vary and ribbed textures are stretchy, you should consistently measure your crochet panel during the process.
Final Thoughts
Creating a warm and cozy hat with a timeless ribbed feel and an elegant folded brim is easy with this Crochet Rib Beanie Free Pattern. By utilizing basic half double crochet stitches worked in the back loop only, you can achieve a flexible fit without needing complex shaping methods.
You can personalize this piece by choosing various yarn colors, modifying the dimensions for a more precise fit, or attaching a pom-pom for extra flair. This ribbed crochet beanie makes a wonderful handmade winter present or a great addition to your own wardrobe.