
A crochet hooded cape is a versatile garment that combines a cloak with a built-in hood. These designs range from light, open-work styles to denser fabrics, making them a rewarding project for those looking to move beyond simple scarves or hats.
Choosing the right style depends on the look you want and the techniques you are comfortable with. This guide explores various stitches and textures to help you identify which design elements suit your skill level and vision.
Key Takeaways:
- Choose yarn based on the drape and care needs of the garment.
- Work a gauge swatch to ensure the cape fits the wearer.
- Select stitches that match the desired fabric density and weight.
- Follow the yarn label for washing and drying instructions.
- Use a tested pattern for exact measurements and stitch counts.
- Quick Reference: Styles at a Glance
- Why is a Hooded Cape a Great Project for Beginners?
- What Materials Should You Use?
- How Do You Handle Sizing and Fit?
- Crochet Hooded Cape Styles to Try
- 1. Plain Single Crochet Cape
- 2. Lace Mesh Hooded Cape
- 3. Shell Stitch Border Cape
- 4. Puff Stitch Textured Cape
- 5. Back Loop Only Ribbed Cape
- 6. Tapestry Crochet Pattern Cape
- 7. Granny Square Assembled Cape
- 8. Double Crochet Flowing Cape
- 9. Half Double Crochet Hooded Cape
- 10. Treble Crochet Open Cape
- 11. Two-Tone Striped Cape
- 12. Cable-Look Textured Cape
- 13. V-Stitch Openwork Cape
- 14. Waffle Stitch Hooded Cape
- 15. Cluster Stitch Detailed Cape
- How Do I Care for My Crochet Cape?
- Common Beginner Mistakes to Avoid
- How Can I Improve My Skills?
- Frequently Asked Questions
- Final Thoughts on Crochet Hooded Capes
Quick Reference: Styles at a Glance
| Style | Look | Main technique | What to check |
|---|---|---|---|
| Plain Single Crochet Cape | Solid | Visual style only | Yardage |
| Lace Mesh Hooded Cape | Airy | Lace/mesh | Gap size |
| Shell Stitch Border Cape | Scalloped | Shell stitch | Skip count |
| Puff Stitch Textured Cape | Bumpy | Puff stitch | Yarn weight |
| Back Loop Only Ribbed Cape | Ridged | Back loop only | Stretch direction |
| Tapestry Crochet Pattern Cape | Patterned | Tapestry | Fit/Stretch |
| Granny Square Assembled Cape | Modular | Granny squares | Joining method |
| Double Crochet Flowing Cape | Flowing | Visual style only | Turning chain |
| Half Double Crochet Hooded Cape | Balanced | Visual style only | Turning chain |
| Treble Crochet Open Cape | Open | Visual style only | Turning chain |
| Two-Tone Striped Cape | Linear | Visual style only | Color joins |
| Cable-Look Textured Cape | Braided | Visual style only | Yarn quantity |
| V-Stitch Openwork Cape | Rhythmic | Visual style only | Stitch placement |
| Waffle Stitch Hooded Cape | Grid-like | Visual style only | Fabric weight |
| Cluster Stitch Detailed Cape | Grouped | Visual style only | Cluster closure |
Why is a Hooded Cape a Great Project for Beginners?
Many hooded cape designs rely on basic shapes and repetitive stitches. This allows you to practice consistency over a larger piece of fabric.
At a Glance:
- Practices repetitive stitch work
- Less restrictive fit than sweaters
- Introduces basic garment assembly
- Allows for experimentation with yarn
Because capes often have a looser fit than fitted sweaters, there is more room for error in the overall dimensions. You can focus on mastering the stitch patterns before worrying about complex tailoring.
The combination of a cape and a hood teaches you how to join different sections of crochet. You will learn how to transition from a flat piece to a three-dimensional shape.
What Materials Should You Use?
The choice of yarn significantly changes how a cape hangs and feels. All stitch names used in these descriptions follow US crochet terms.
At a Glance:
- Cotton: breathable and firm
- Acrylic: washable and easy-care
- Wool: warm but prone to shrinking
- Bamboo: soft and drapey
Cotton is breathable but lacks stretch, while acrylic is easy to wash and maintain. Wool provides warmth but may shrink if washed in hot water. Bamboo offers a soft, drapey quality that works well for flowing garments.
Always check the yarn label for the recommended hook size. You can adjust the hook size up or down to change the tension of your fabric.
Yarn Selection Tips:
- Check the label for fiber content
- Match the hook to the yarn weight
- Consider the drape of the fiber
- Verify the wash instructions
Teacher Tip: Work a swatch to see how the yarn behaves with your chosen stitch.
How Do You Handle Sizing and Fit?
Since capes are worn over other clothing, you must measure the wearer carefully. Measure around the shoulders and the length from the neck to the desired hemline.
At a Glance:
- Measure the wearer's shoulders
- Determine the desired length
- Create a gauge swatch
- Prioritize a loose, comfortable fit
Working a gauge swatch is essential. A swatch is a small test square that tells you how many stitches fit into a specific measurement, ensuring the final cape is not too small or too large.
If you are making a cape for a child, keep the fit comfortably loose. Avoid any designs that are too tight around the neck or chest.
Crochet Hooded Cape Styles to Try
This list is organized by stitch technique and visual texture. Whether you prefer a light, open-work look or a dense, textured fabric, these ideas highlight different ways to build a cape.
1. Plain Single Crochet Cape
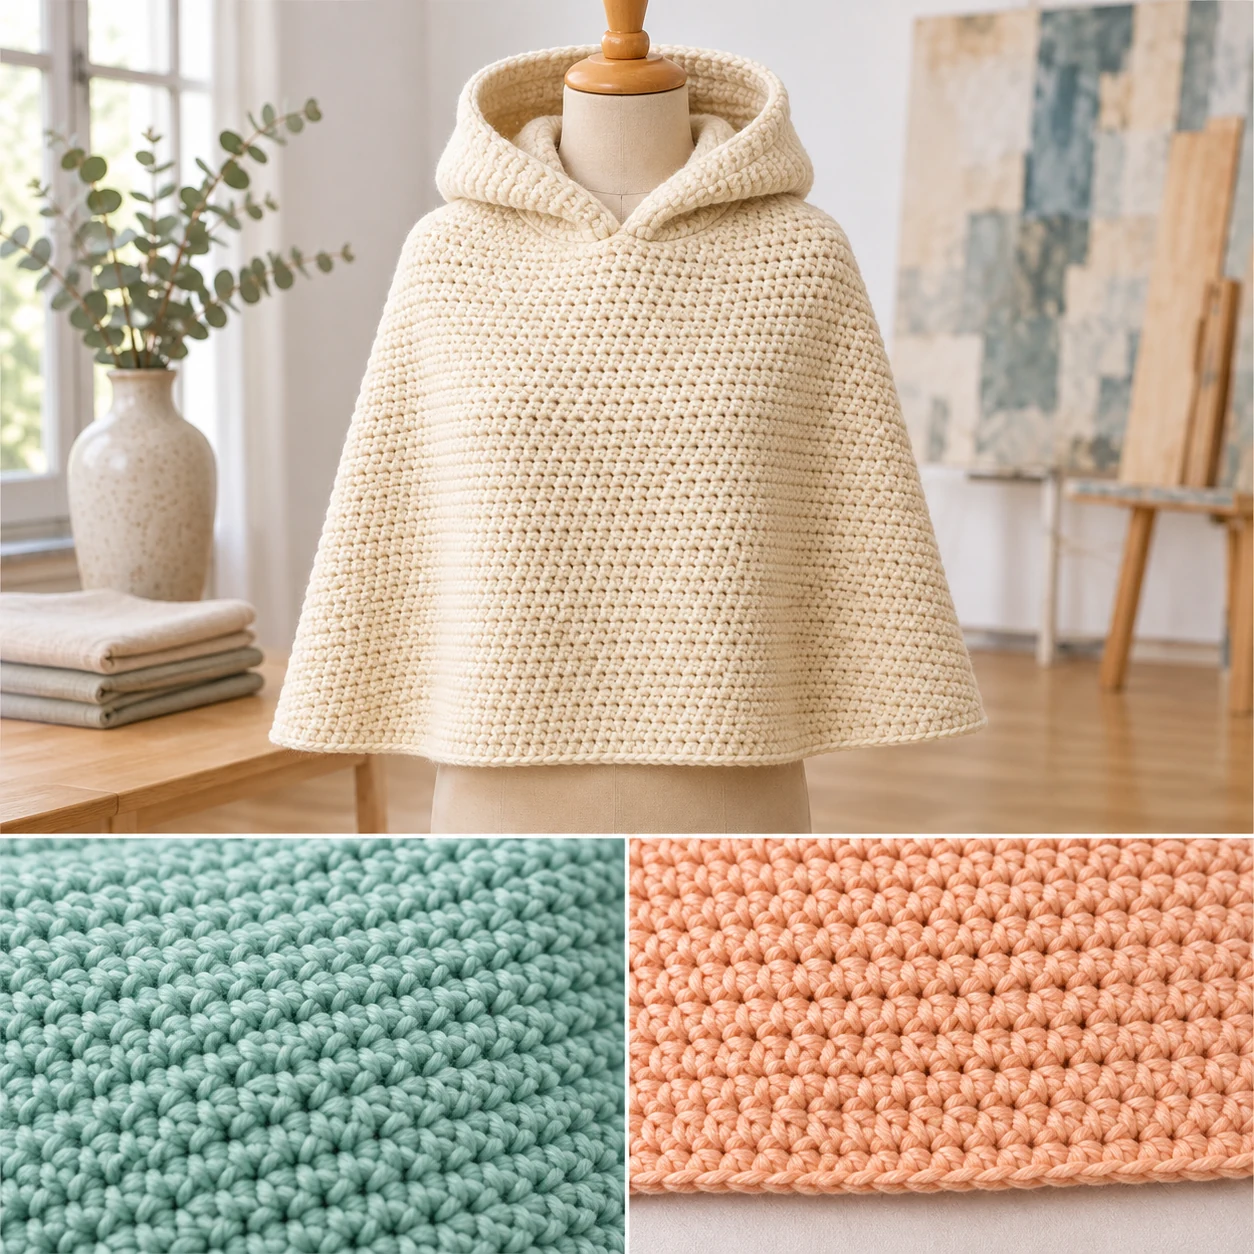
This design features a solid, uniform look in a soft cream color. It uses the single crochet stitch to create a dense and consistent fabric that provides full coverage.
The single crochet produces a thick texture that is more stable than taller stitches. This makes it a reliable choice for a garment that needs to hold its shape without sagging.
Because the fabric is denser, it uses more yarn than an open-work design. You should check the yardage on your yarn label to ensure you have enough for the full length of the cape.
Beginners often find this style helpful because it focuses on the most basic stitch. It is a good way to practice maintaining a straight edge over many rows of work.
When choosing a yarn for this style, consider the weight. A very heavy yarn combined with single crochet can make the cape feel quite heavy on the shoulders.
Project Checks:
- Verify total yardage
- Check edge straightness
- Confirm hook size
2. Lace Mesh Hooded Cape
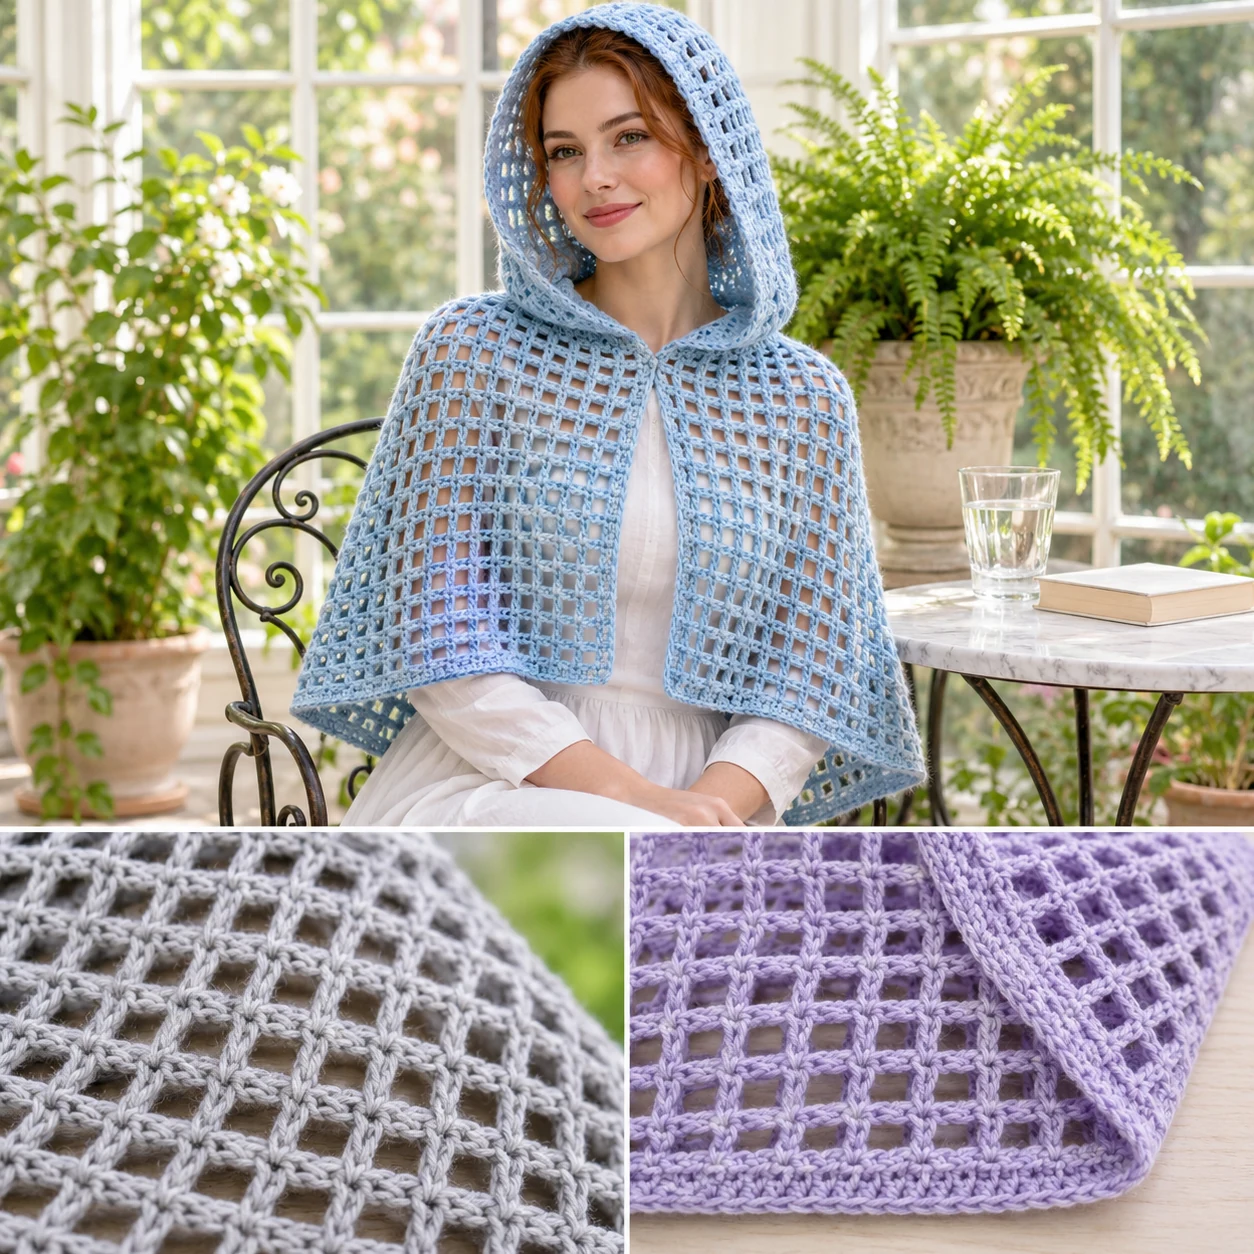
This style creates an open, airy appearance in pale blue. It uses a lace or mesh technique where double crochets alternate with chain spaces and skipped stitches.
The result is a lighter fabric that drapes easily over the shoulders. This makes the garment feel less heavy than a solid crochet piece and allows for more movement.
When choosing a pattern for this style, check the size of the chain spaces. If the gaps are too large, they can catch fingers or jewelry, which is a safety concern for children.
This design is a great way to learn how to manage skipped stitches. It requires careful counting to ensure the mesh pattern remains symmetrical across the entire width.
Bamboo or cotton yarns often work well here to enhance the flowing quality of the mesh. Check the yarn label to ensure the fiber provides the drape you want.
Safety Note: Keep chain spaces small to prevent fingers from catching in the fabric.
3. Shell Stitch Border Cape
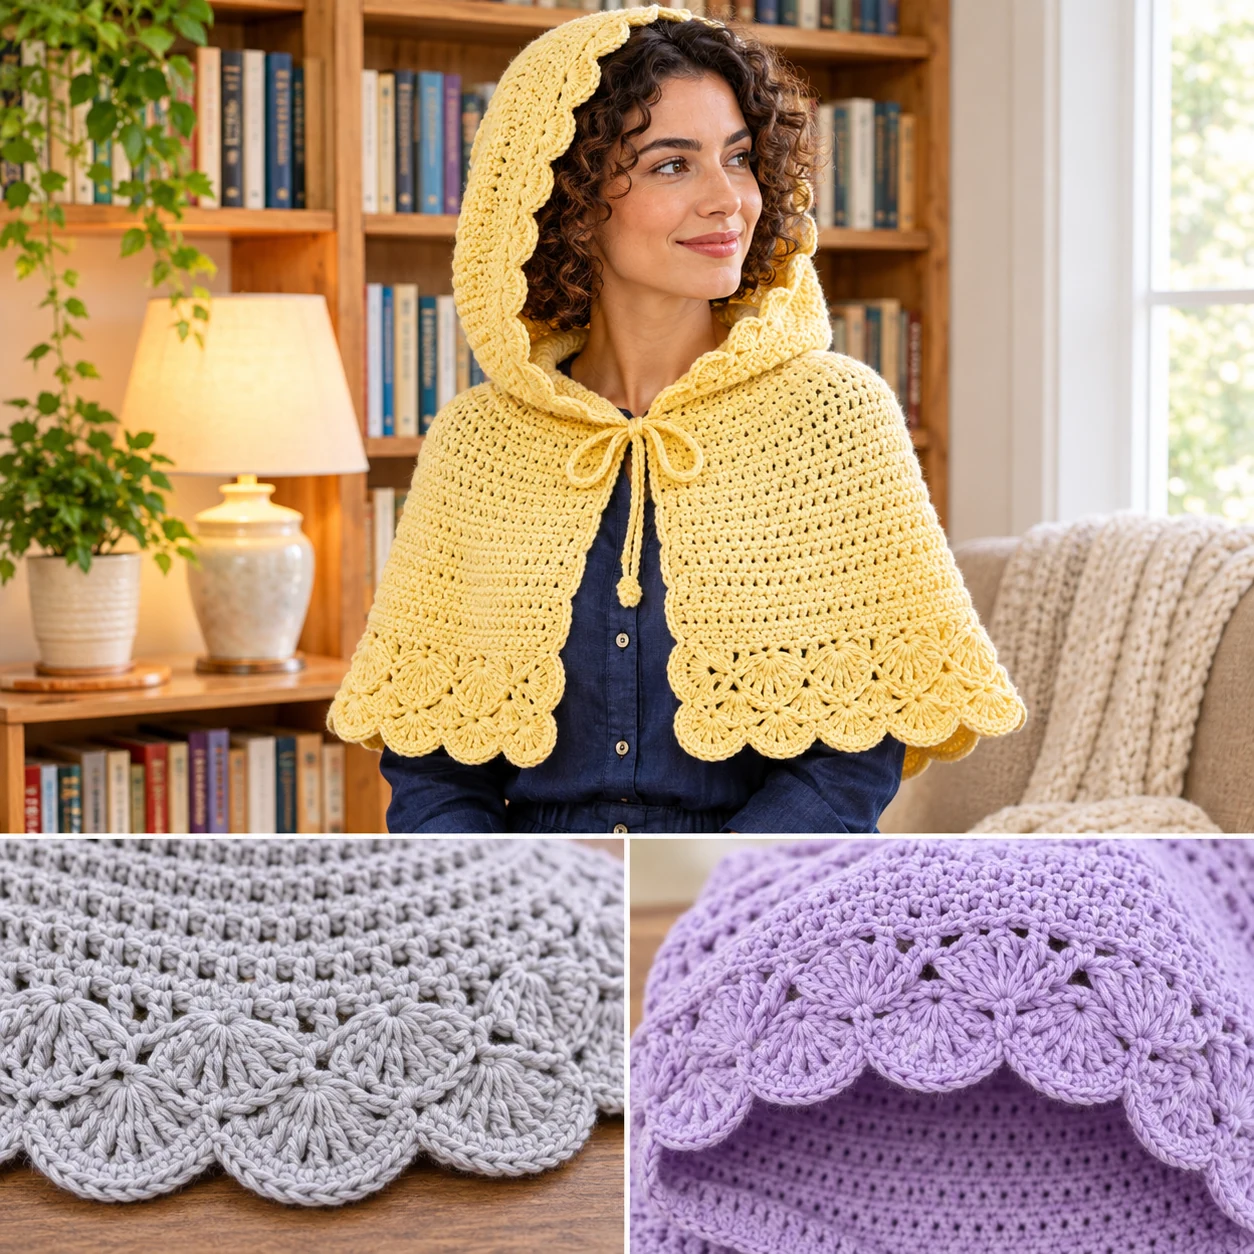
A soft yellow color highlights the decorative scalloped edges of this design. The border is created by the shell stitch, which involves working several double crochets into one stitch.
The shell stitch typically skips two stitches on each side to keep the fabric flat. This creates a rounded edge that contrasts with the main body of the cape.
This technique adds visual interest without requiring complex color changes. It is an effective way to add a professional finish to the hem and the opening of the hood.
New crocheters should ensure they work all double crochets into the same space. If the stitches are spread out, the shell will not form the characteristic curve.
Check the pattern to see if the shell stitch is used only for the border or throughout the body. Using it as a border keeps the main garment lightweight and simple.
Design Details:
- Check skip-stitch count
- Verify shell symmetry
- Review border placement
4. Puff Stitch Textured Cape
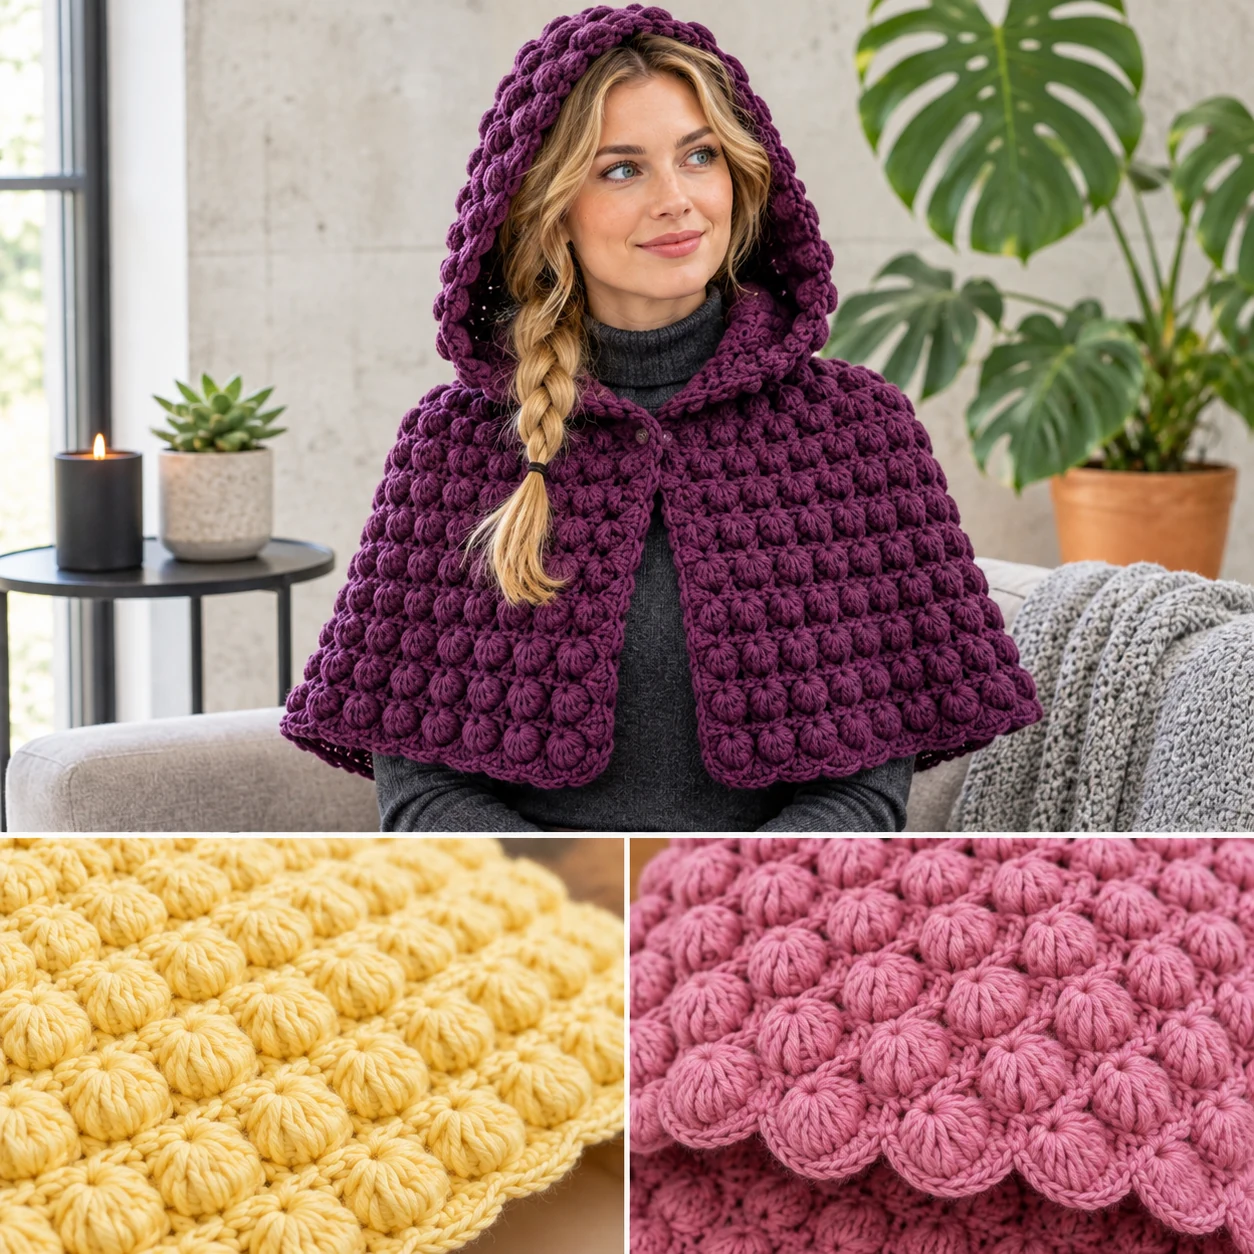
Deep plum yarn emphasizes the bumpy, three-dimensional texture of this design. It utilizes the puff stitch to create raised clusters across the fabric.
The puff stitch is made by pulling up multiple loops in one stitch before closing it with a chain. This results in a soft, thick fabric with significant depth.
Because puff stitches use more yarn than standard stitches, this cape will be heavier. Bamboo or acrylic yarns can be used to manage the weight of the garment.
A common mistake is pulling the closing chain too tight. This can distort the puff and make the fabric feel stiff rather than soft and bouncy.
When selecting a pattern, check if the puff stitches are worked in rows or as scattered accents. Full rows of puff stitches create a very dense, tactile fabric.
5. Back Loop Only Ribbed Cape
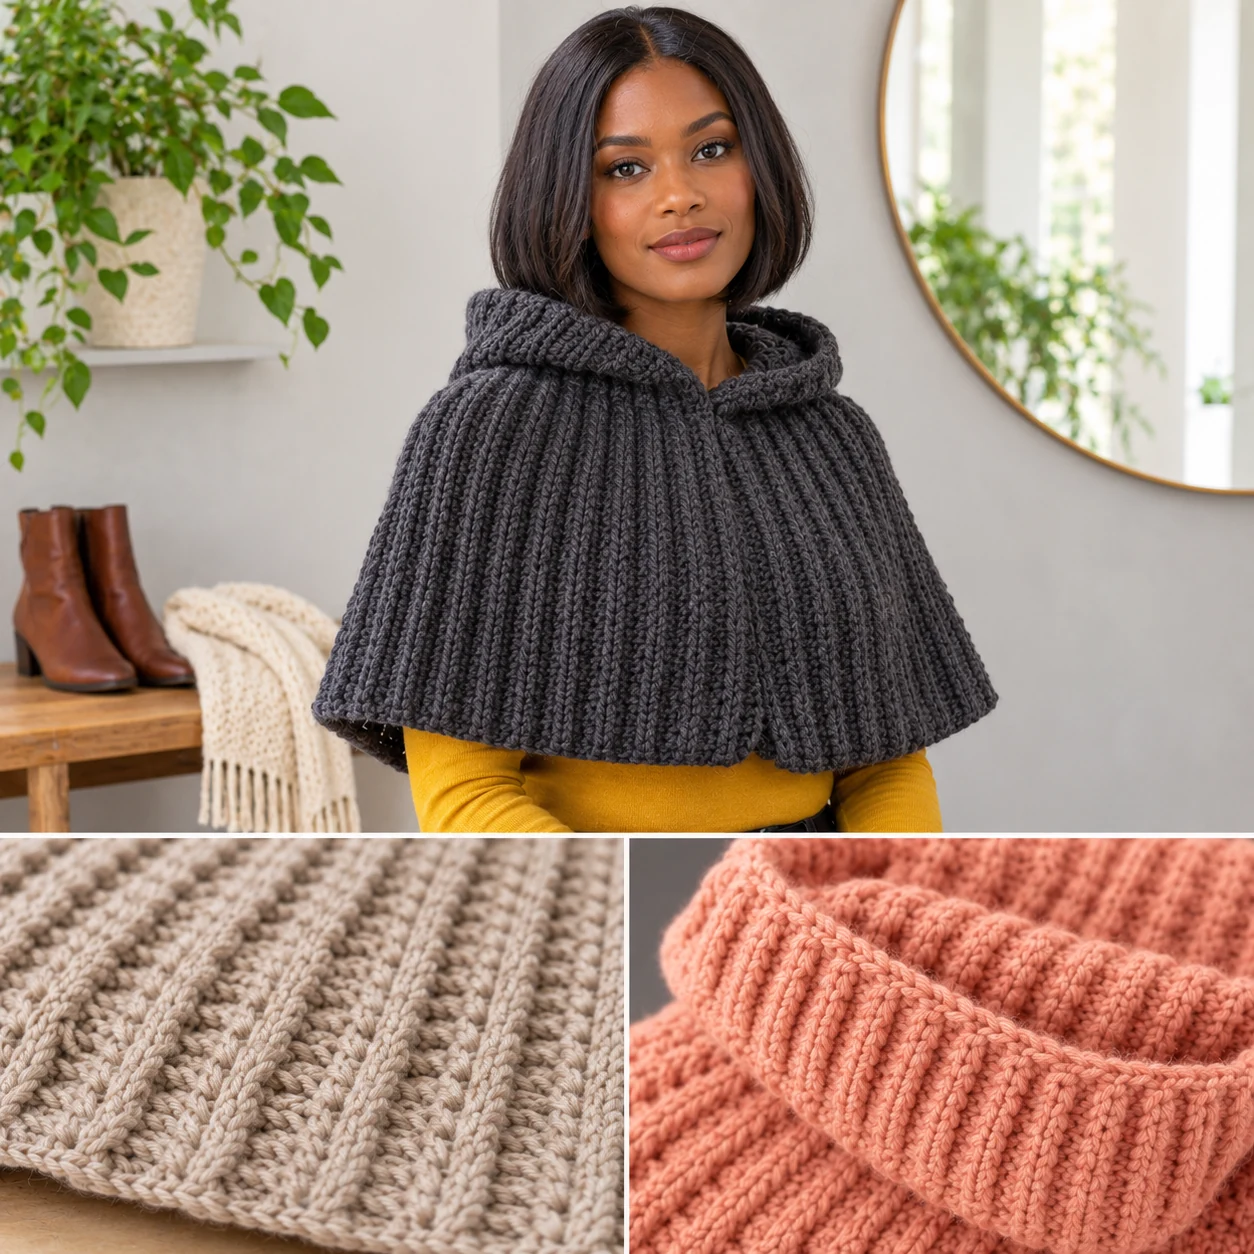
Vertical ridges that resemble knit ribbing define this design in charcoal. This effect is achieved by using back loop only (BLO) single crochet.
The BLO technique creates a stretchy fabric. In a cape, this can be used for the collar or the hood edges to allow for a more flexible fit around the neck.
The stretch in BLO fabric runs along the row. When planning your project, check if the ribbing is intended to be vertical or horizontal to ensure the fit is correct.
This style differs from the plain single crochet cape by adding texture and elasticity. It is a useful technique for areas of the garment that need to expand.
Ensure you are consistently inserting the hook into the back loop only. Missing a loop can break the ridge pattern and make the texture look uneven.
Technical Checks:
- Identify loop placement
- Check stretch direction
- Verify ridge consistency
6. Tapestry Crochet Pattern Cape
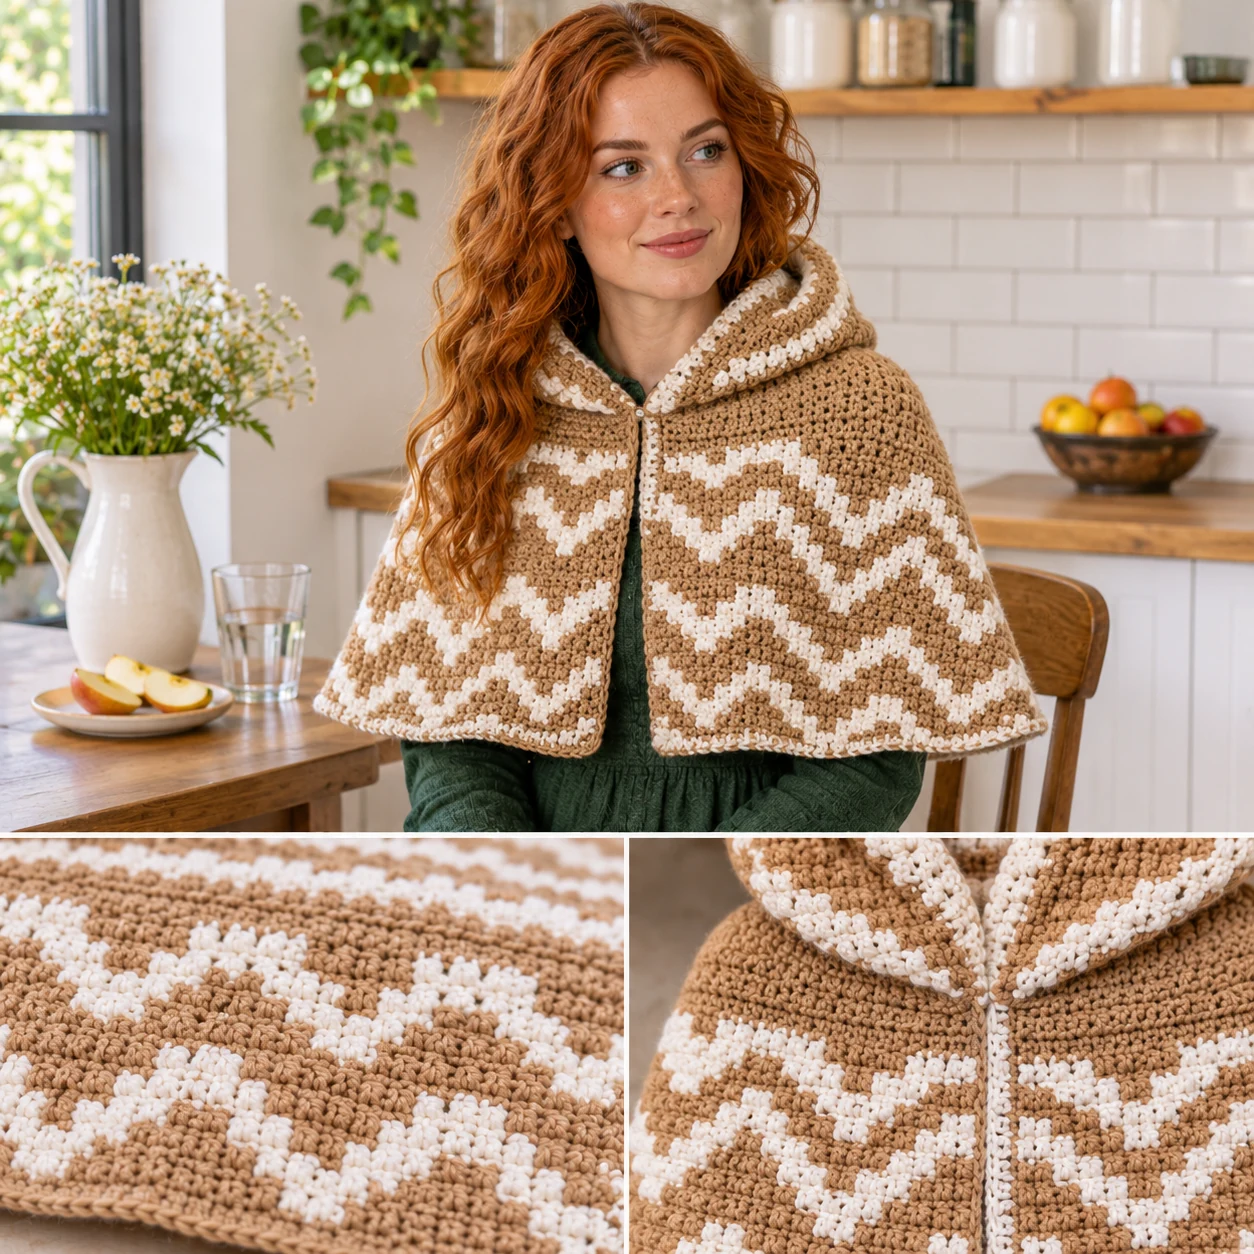
Tan and white yarn are used to create a graphic pattern in this design. It employs tapestry crochet, where an unused color is carried inside the stitches.
Tapestry crochet results in a thicker and firmer fabric. This makes the cape more structured and less prone to stretching out of shape over time.
Because the fabric is firmer, it has less stretch than a single-color cape. You must measure the wearer carefully to ensure the garment is not too tight.
Beginners should be careful not to pull the carried yarn too tight. If the hidden yarn is too tight, the fabric will pucker and lose its flat appearance.
Check the pattern for the complexity of the image. Simple geometric shapes are easier for beginners than detailed figures when using tapestry techniques.
7. Granny Square Assembled Cape
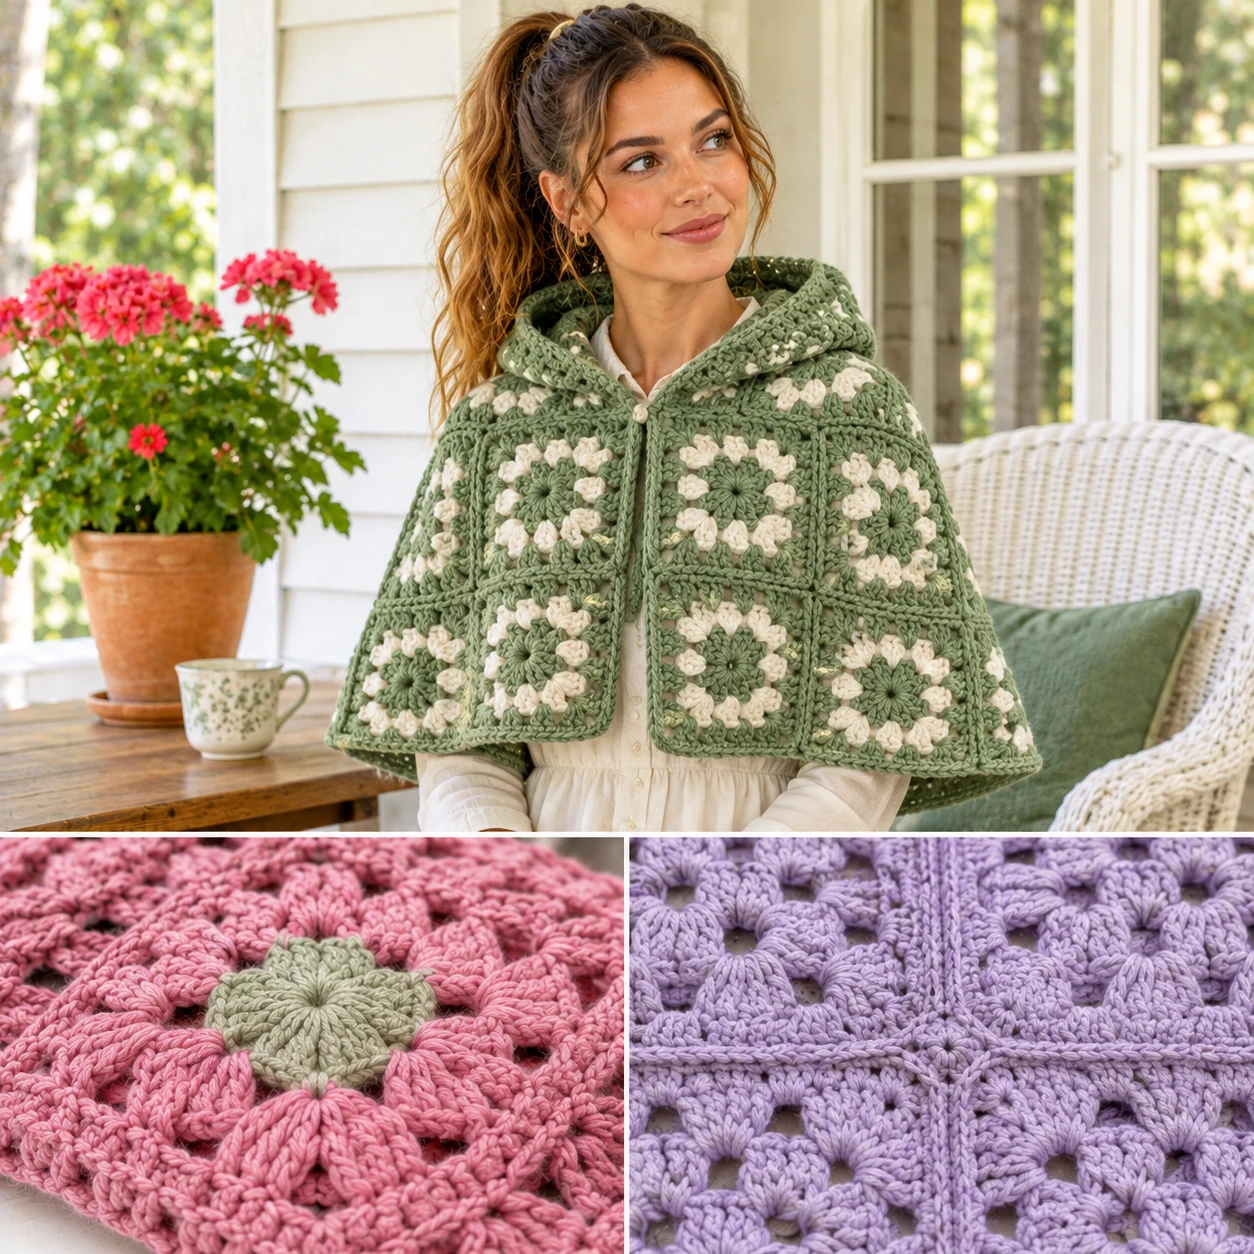
This design in soft sage green is constructed from several individual granny squares. Each square is worked in rounds from a center point.
The squares are joined together using a slip stitch or a sewn seam. This creates a modular look that allows for a variety of color combinations.
Since the squares are joined, the resulting fabric is more rigid than a piece worked in one piece. This design has very little stretch at the seams.
When choosing a pattern for this style, check how the squares are arranged. The layout determines the final shape of the hood and the drape of the cape.
Because joined squares create a seamed construction, they have little stretch. Ensure the cape is worked to be comfortably loose to avoid a restrictive fit.
Assembly Tips:
- Check square consistency
- Choose a joining method
- Plan the square layout
8. Double Crochet Flowing Cape
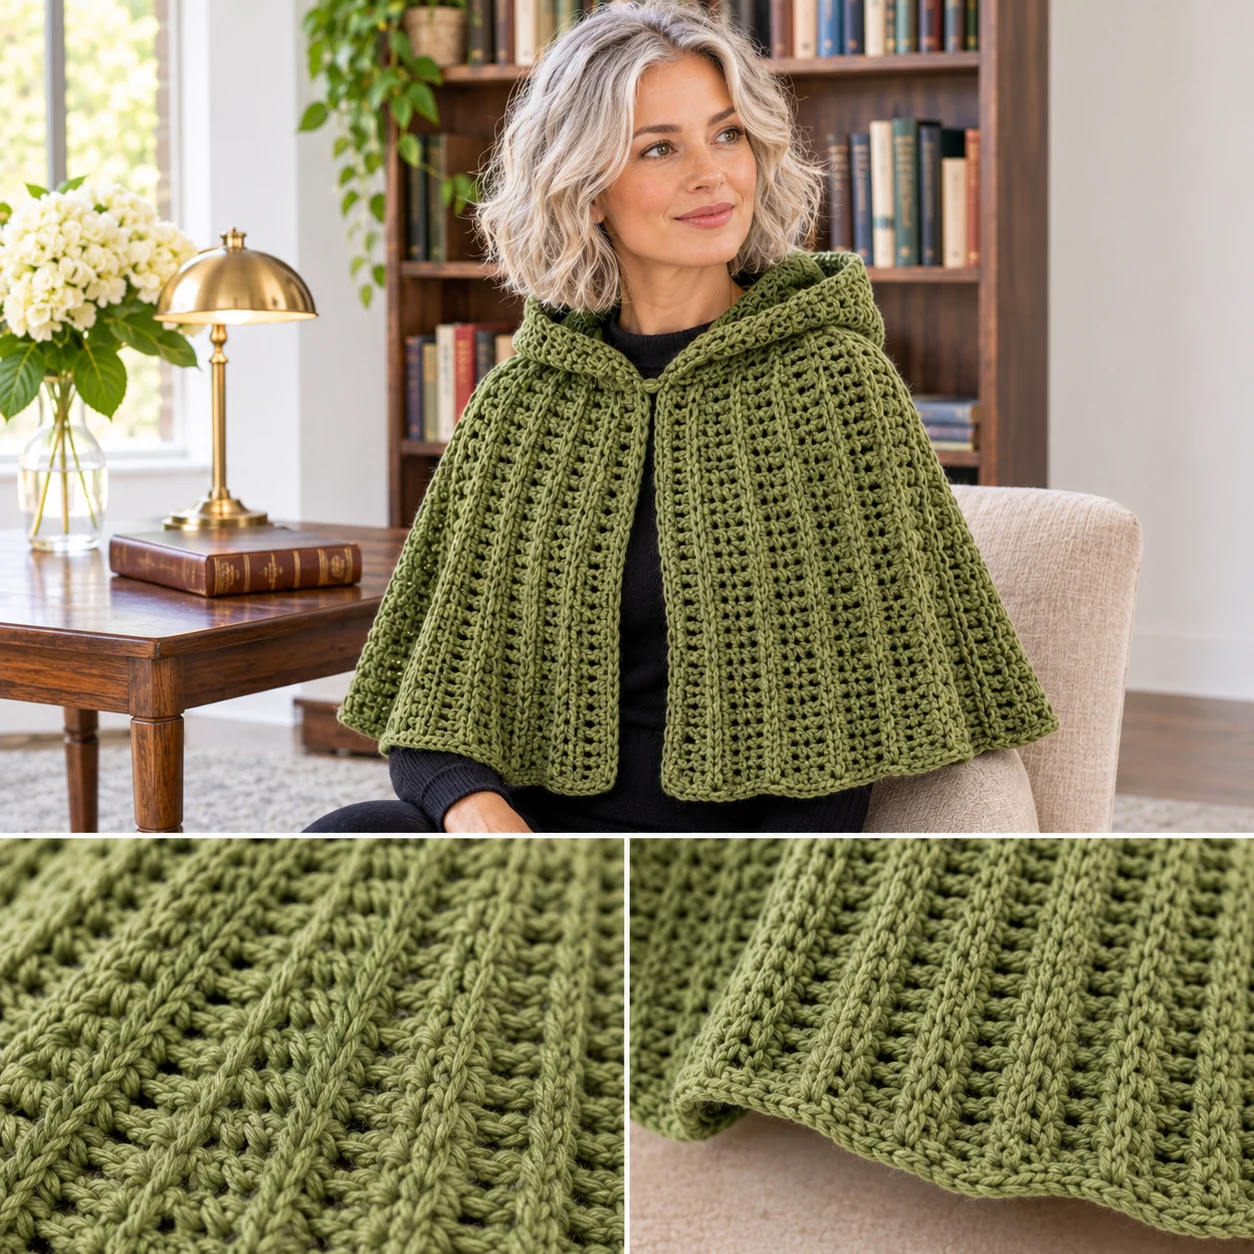
An olive green color complements the smooth, flowing drape of this design. It is worked primarily using double crochet stitches, which are taller than single crochet.
The height of the double crochet stitch allows the garment to grow faster and creates a fabric that is less stiff. This is a good choice for a long, sweeping cape.
Standard double crochet usually uses a turning chain, though some patterns vary. Check your specific pattern for the preferred turning chain count to ensure the edges remain straight.
A common beginner mistake is missing the last stitch of the row. Because the double crochet is tall, it can be easy to miscount the final stitch.
To maintain a consistent drape, keep your tension even. If the stitches are too tight, the cape may lose its flowing quality and feel more rigid.
9. Half Double Crochet Hooded Cape
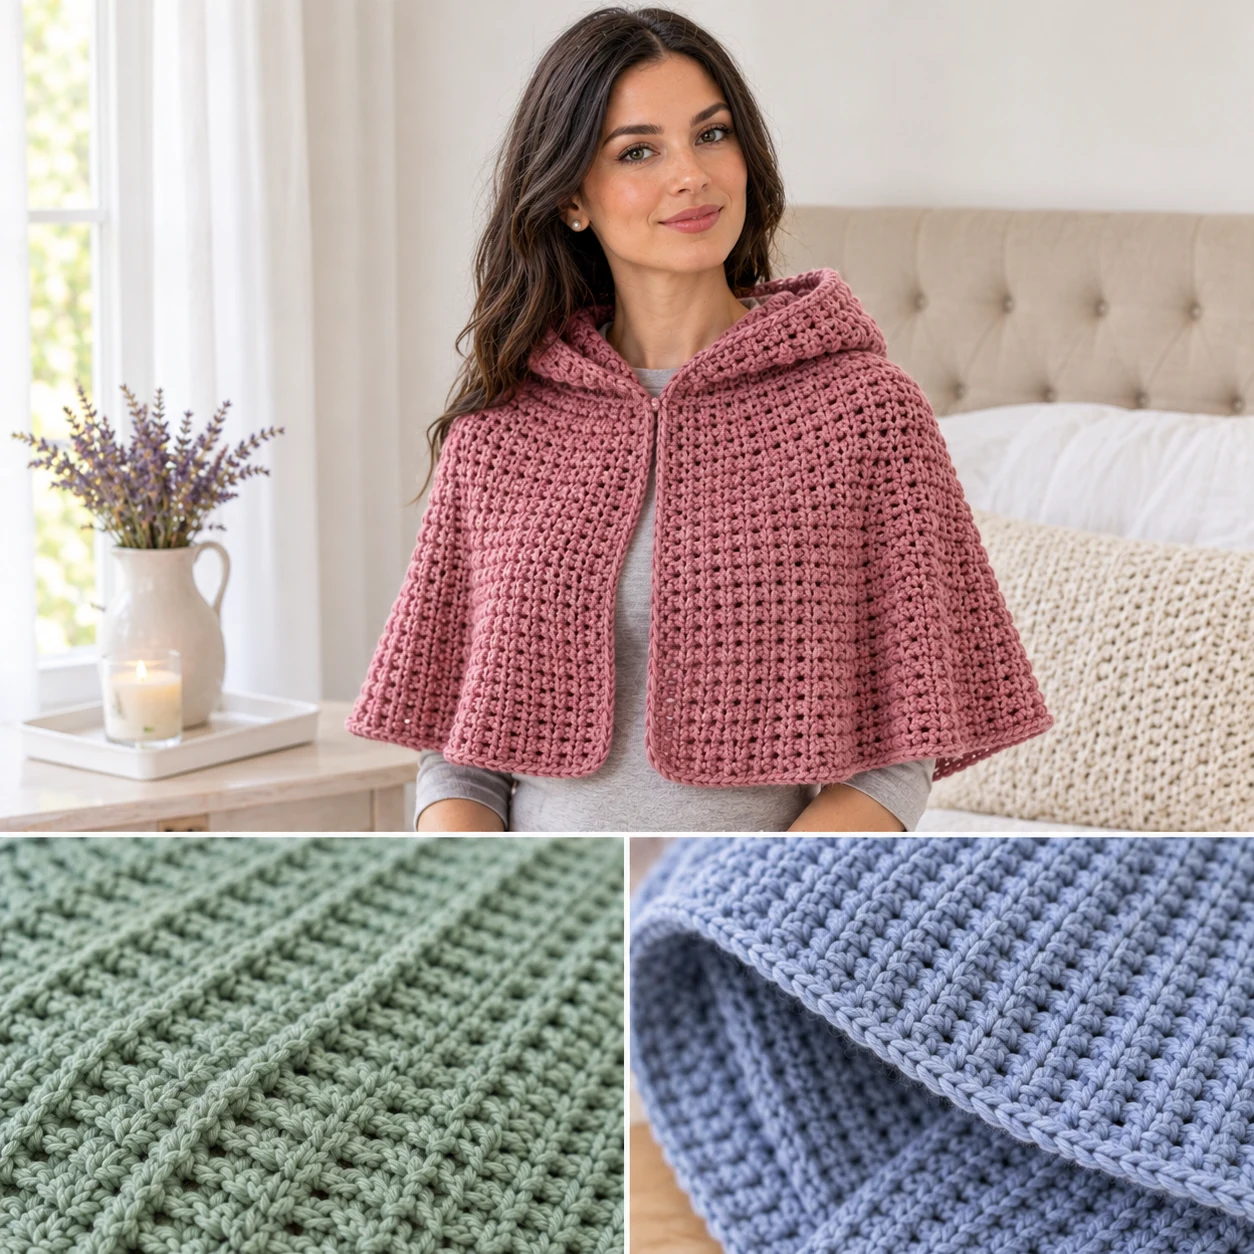
Dusty rose yarn provides a soft look for this design, which balances the density of single crochet and the height of double crochet using the half double crochet stitch.
The fabric produced is slightly softer than a single crochet cape but more substantial than a double crochet one. This creates a balanced weight for the hood.
In US terms, a half double crochet usually requires a specific turning chain. Check your pattern to see if this is the method used for the rows to maintain the correct height.
This style is an excellent middle ground for those who want a solid fabric that still has a bit of flexibility and a faster work-up time.
When working the hood, check how the half double crochet stitches are placed. Consistent placement ensures the hood maintains a rounded shape.
Stitch Checks:
- Verify turning chain count
- Check fabric thickness
- Ensure consistent tension
10. Treble Crochet Open Cape
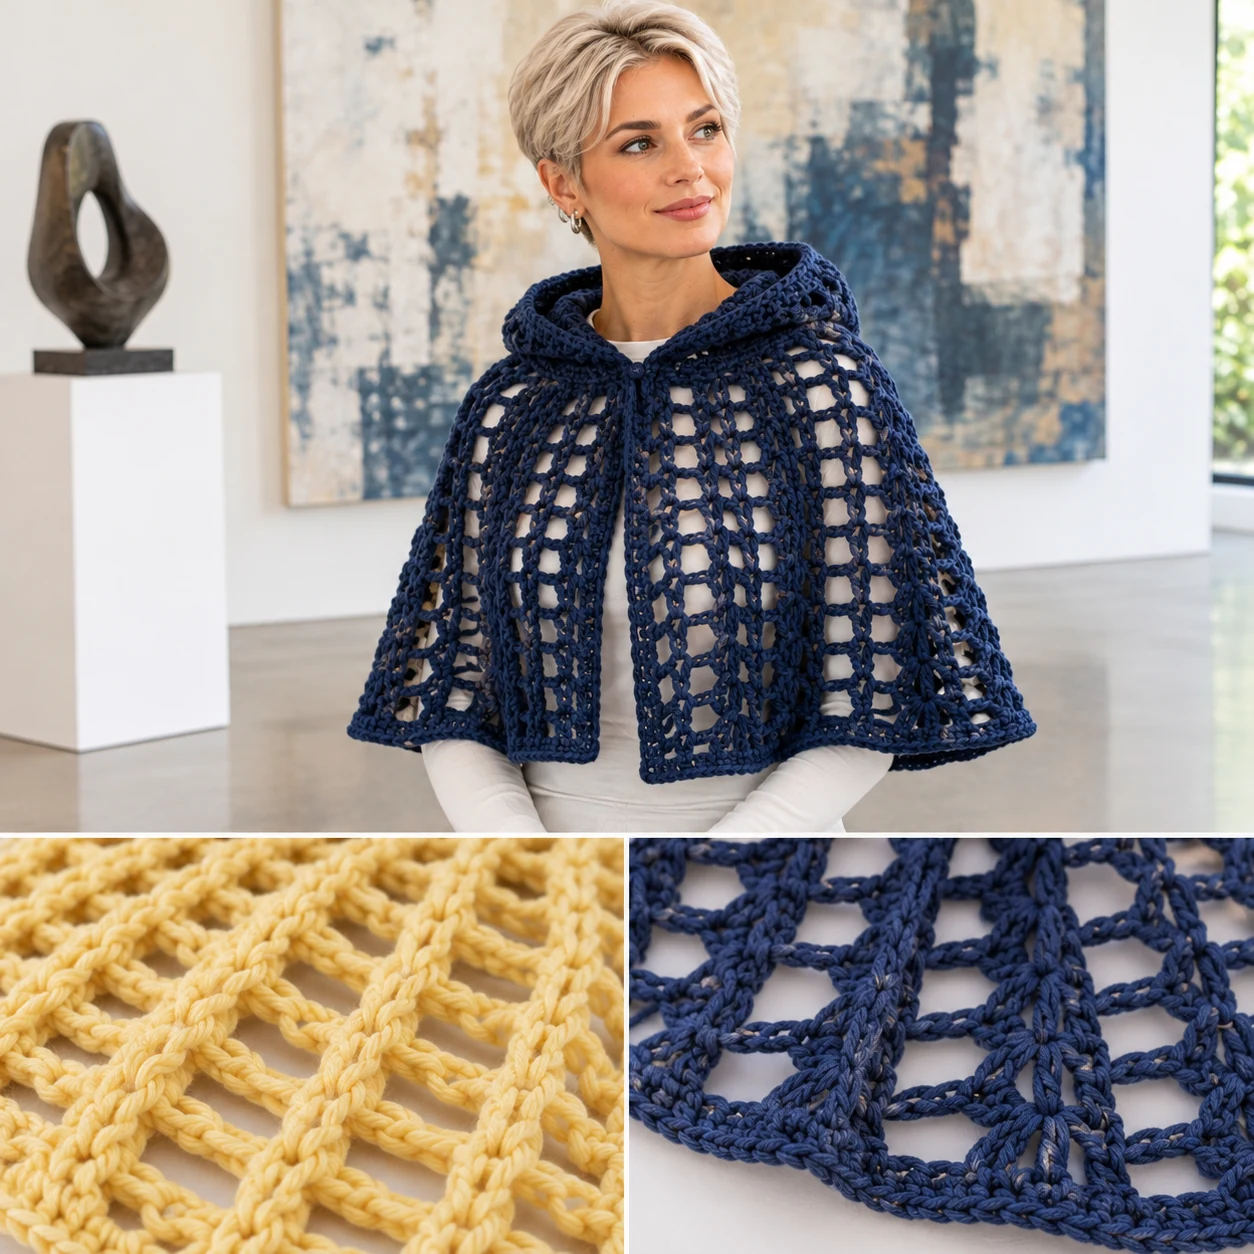
Midnight blue yarn defines this design, which features a very open and tall stitch. It is worked using treble crochet to create a loose, airy fabric.
The treble crochet stitch grows quickly, making it a good choice for very large capes. However, it creates larger gaps in the fabric than other stitches.
A treble crochet typically requires a taller turning chain. This height can make the edges of the cape look more pronounced and distinct.
Because the stitches are so tall, the fabric can be less stable. Using a firmer yarn like cotton can help the garment maintain its structure.
Check the pattern for how the treble stitches are grouped. Some designs alternate them with shorter stitches to add stability to the garment.
11. Two-Tone Striped Cape
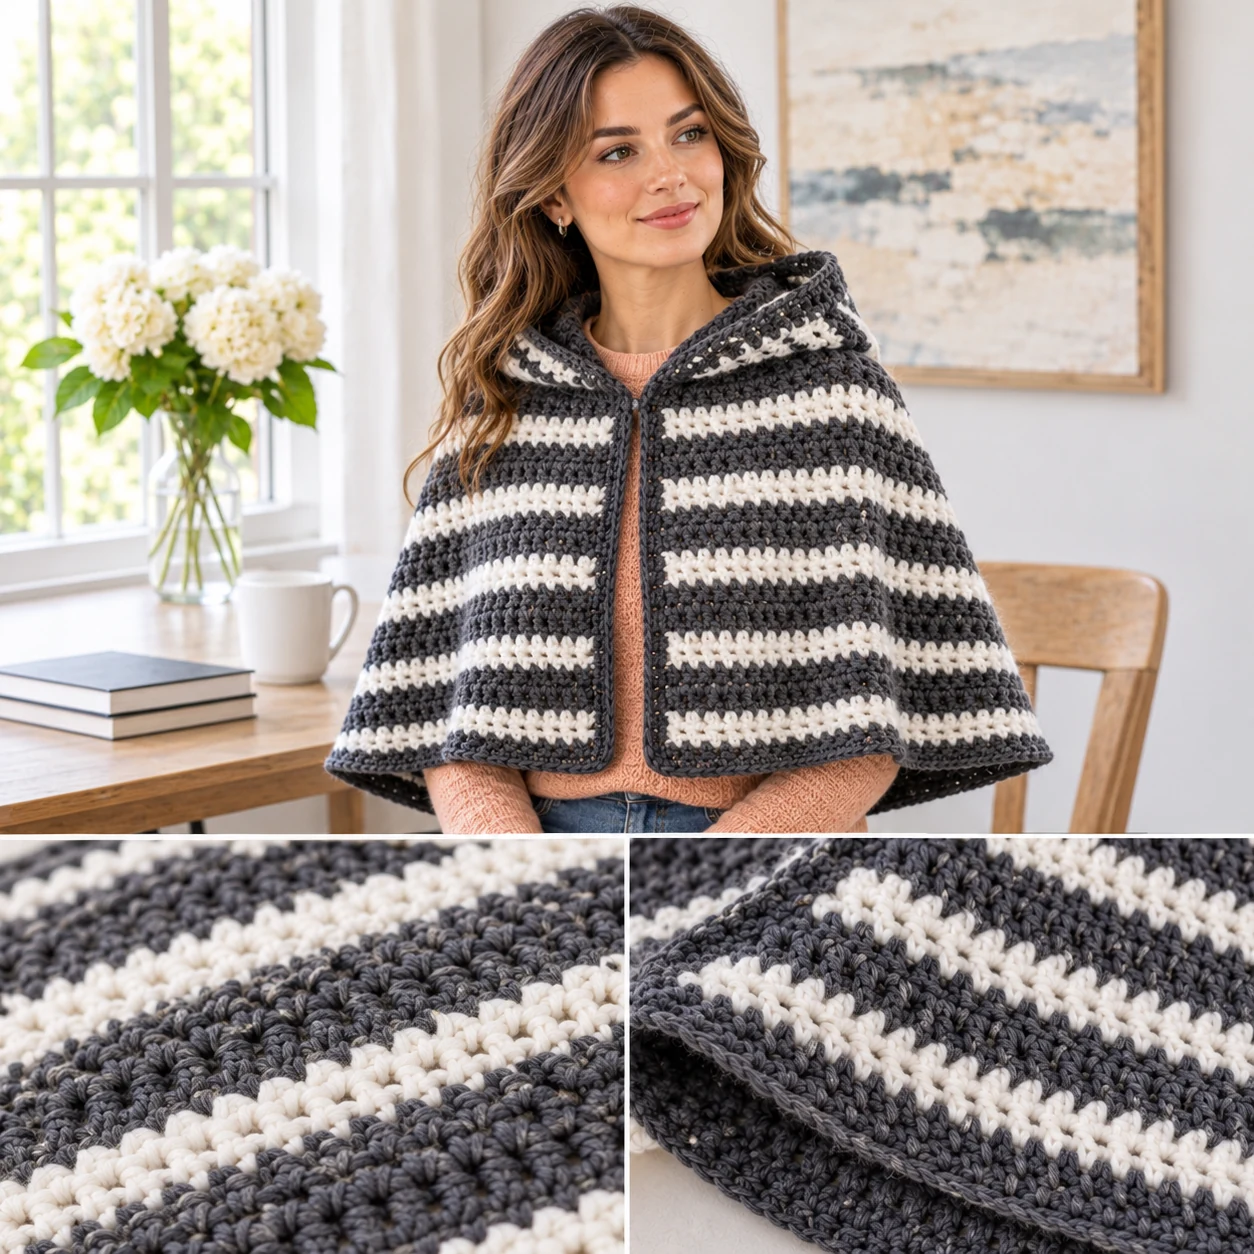
Alternating stripes of charcoal and white create a linear look in this design. It is worked in rows, switching colors at specific intervals.
Unlike tapestry crochet, this style does not carry the yarn inside the stitches. The colors are changed at the end of the row or mid-row.
This results in a fabric that has more stretch than a tapestry design. It maintains the natural elasticity of the chosen stitch.
Beginners should focus on how they join the new color. A clean color change prevents visible knots or gaps in the stripes.
Plan your stripe widths before starting. Using a consistent number of rows for each color ensures the stripes look balanced across the cape and hood.
Color Tips:
- Plan stripe widths
- Practice clean color changes
- Manage multiple yarn ends
12. Cable-Look Textured Cape
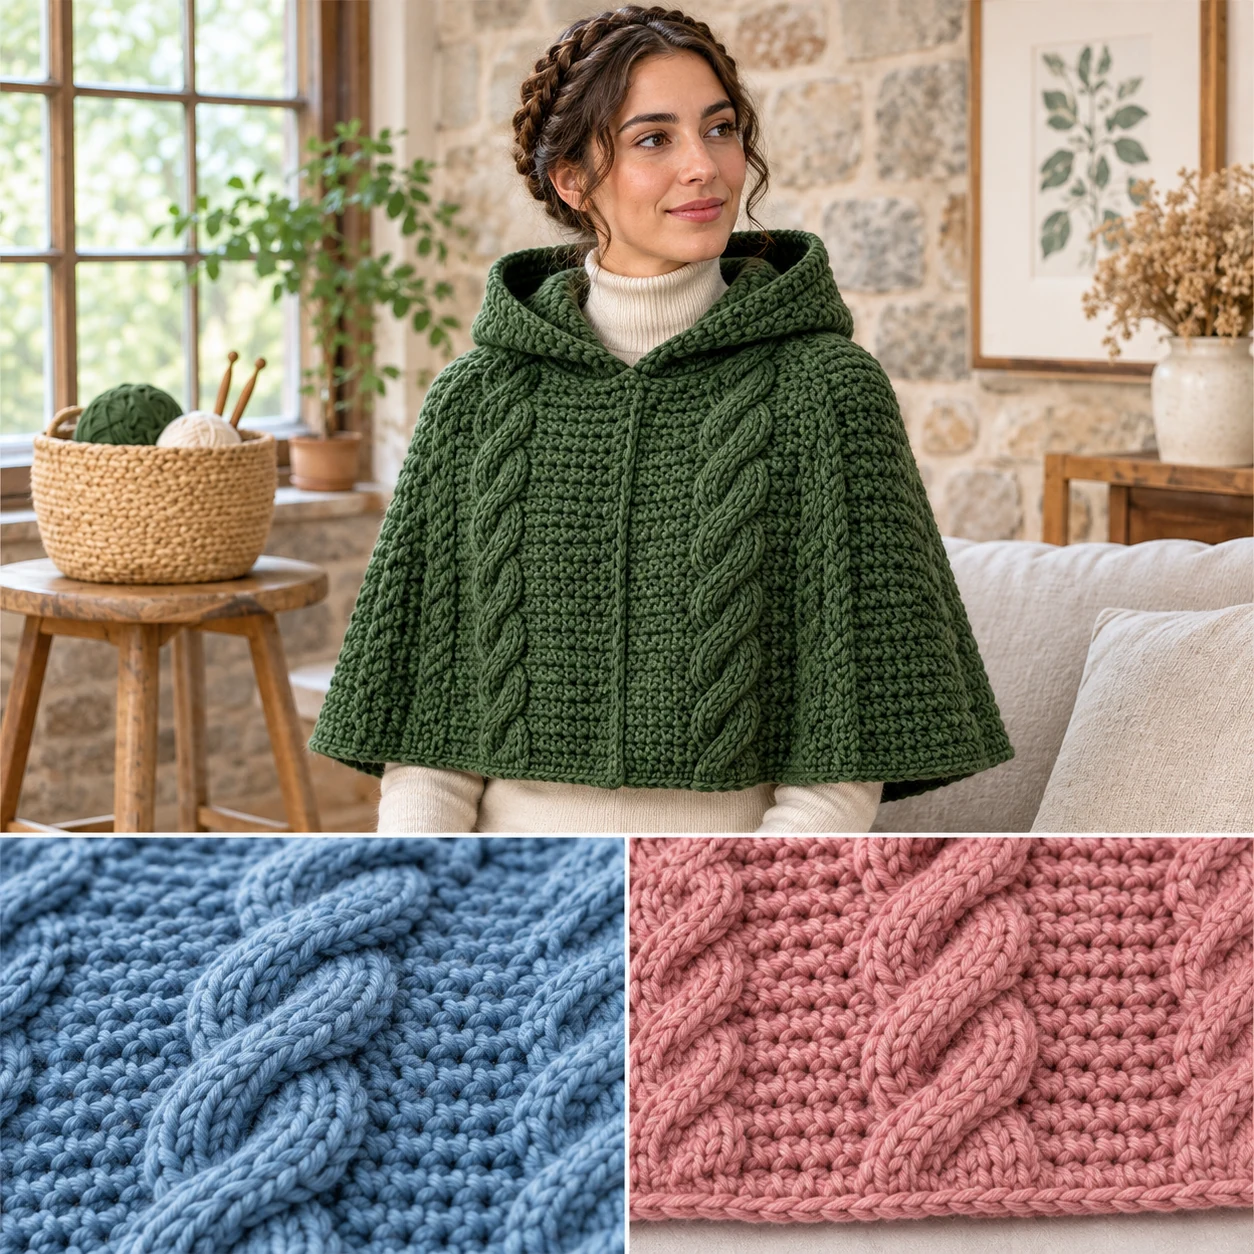
Forest green yarn enhances the braided appearance of this design. It uses a combination of post stitches to create a cable-like look, adding a traditional feel.
The cables create raised ridges that stand out from the background fabric. This makes the cape feel thicker and more substantial than a flat-stitch design.
Because cable work involves wrapping yarn around the post of a stitch, it uses more yarn than a flat stitch. Check your yarn quantity carefully.
This technique requires a bit more coordination. It is helpful to use stitch markers to keep track of where the cable repeats begin and end.
Check the pattern for the frequency of the cables. More cables result in a denser, heavier fabric, while fewer cables allow for more drape.
13. V-Stitch Openwork Cape
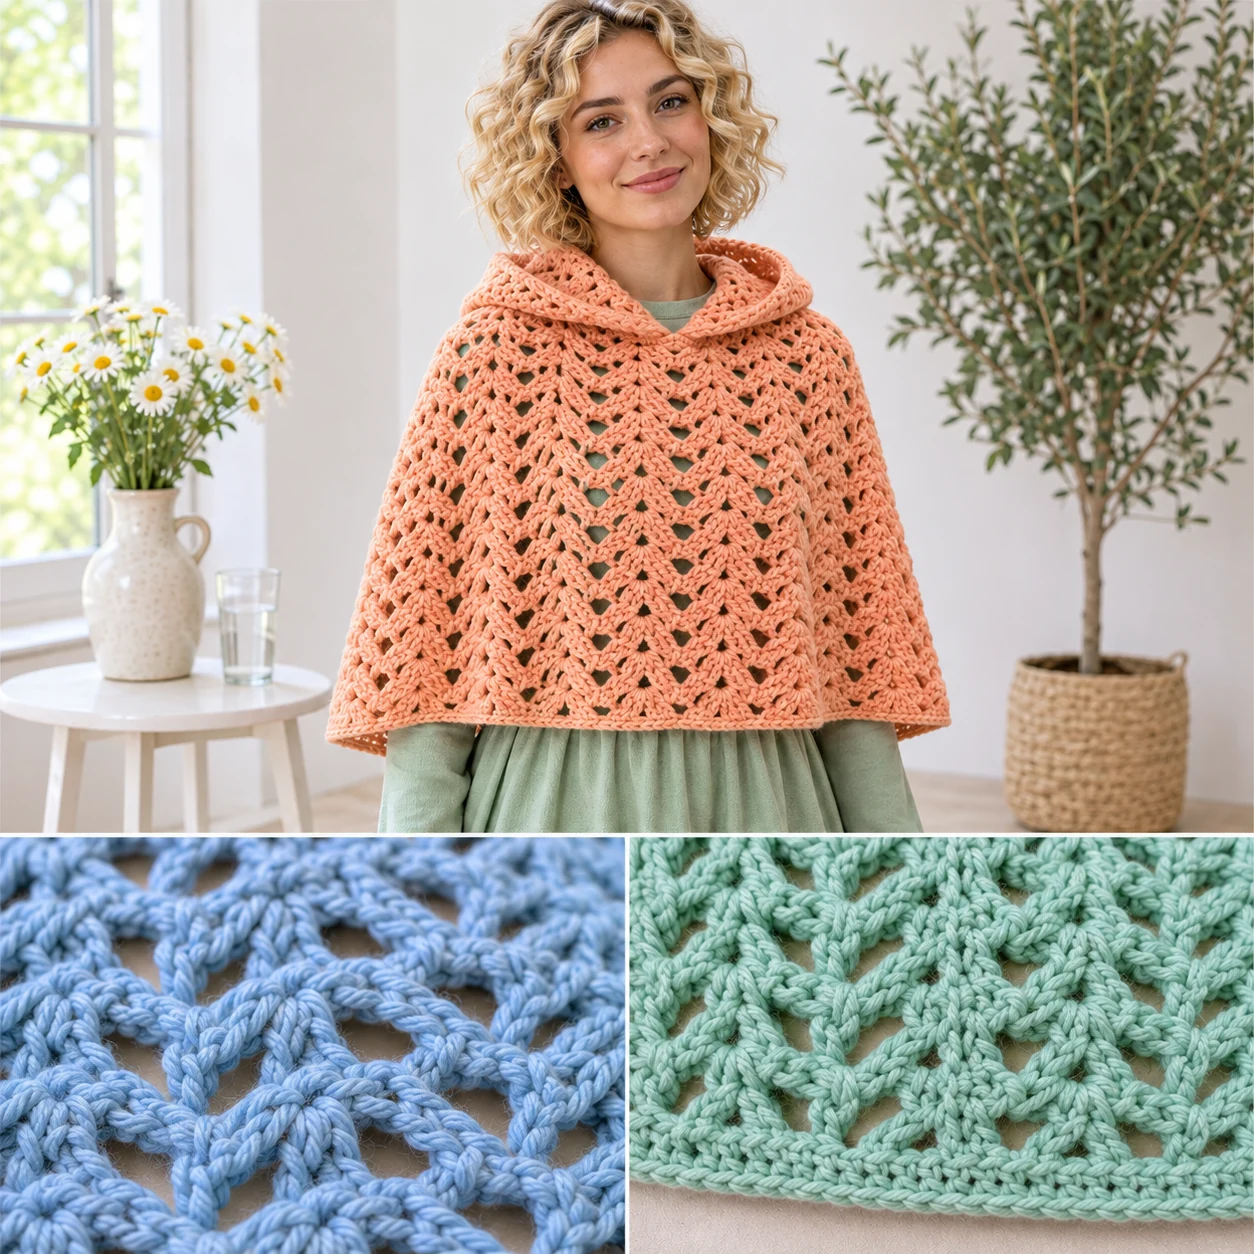
A peach color highlights the V-stitch used in this design, where two double crochets are worked into the same space to create V-shaped openings.
The V-stitch provides a more structured look than a simple mesh but is still lighter than a solid fabric. It creates a rhythmic, repetitive pattern.
This style is a good way to practice working multiple stitches into one space. It allows the cape to drape softly while remaining cohesive.
Check the pattern to see if the V-stitches are worked into the chain spaces or the tops of the stitches, as this changes the look of the fabric.
Because of the open nature of the V-stitch, this design is well-suited for lighter yarns. Check the yarn label for fibers that offer a soft, flexible drape.
Pattern Checks:
- Identify stitch placement
- Count V-clusters
- Check drape
14. Waffle Stitch Hooded Cape
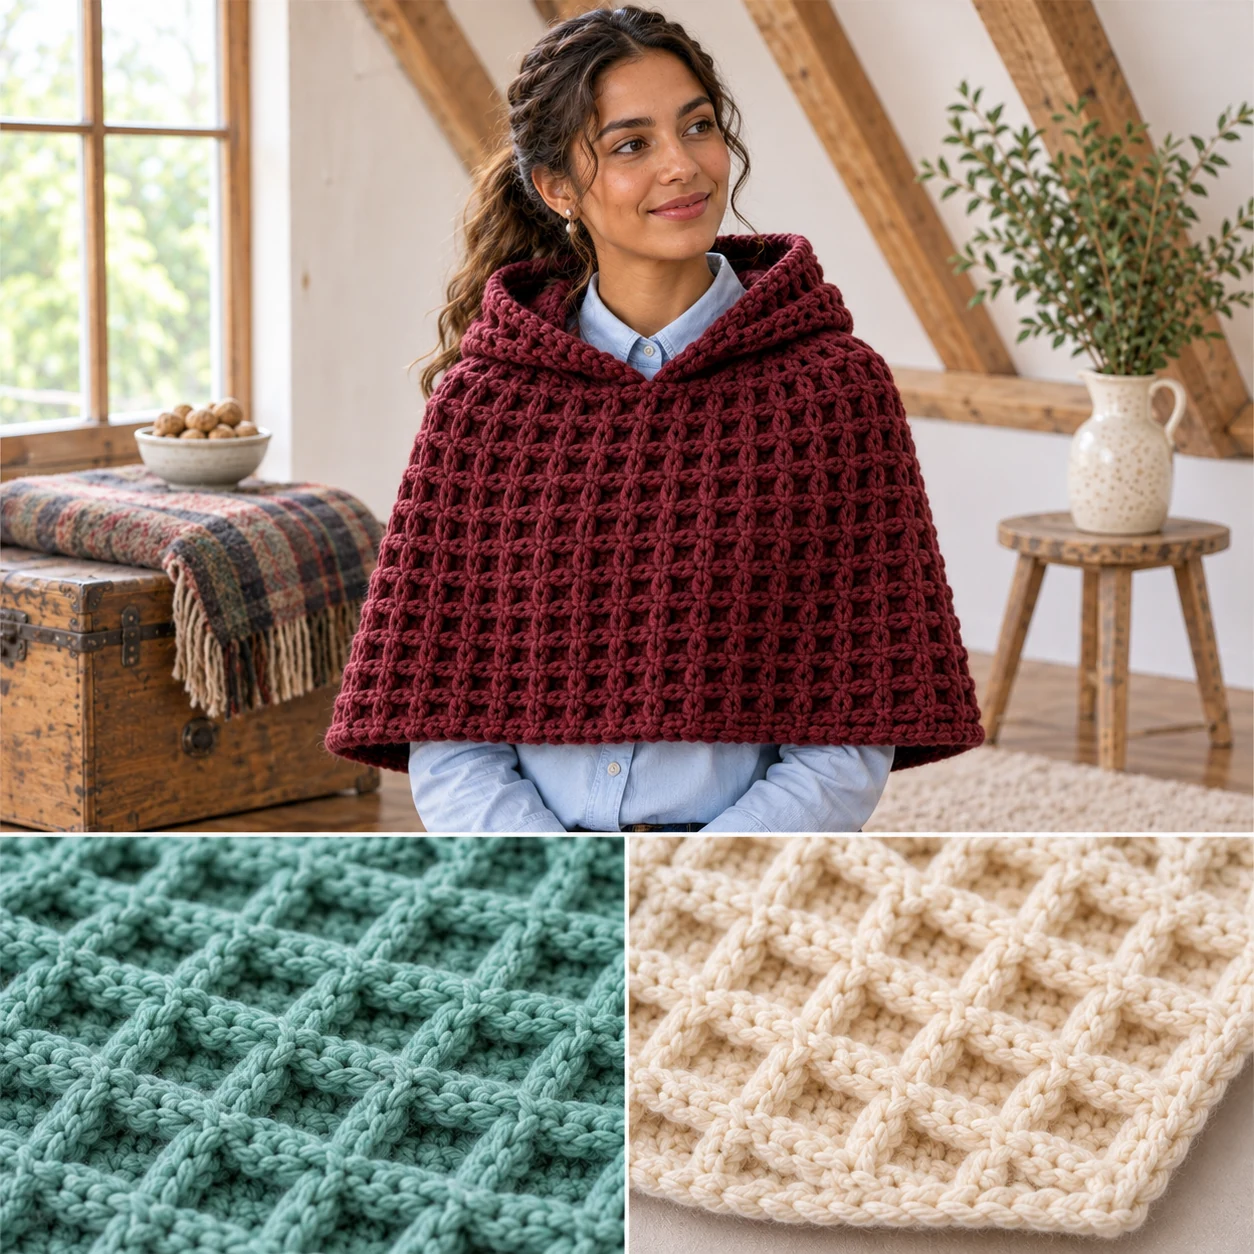
Burgundy yarn emphasizes the deep, grid-like texture of this design. The waffle stitch uses double crochet and post stitches to create recessed squares.
The result is a thick, honeycomb-like fabric that is very tactile. This is one of the heaviest textures available in crochet.
Because of the depth of the stitches, this design can be slow to work. It is a great project for those who enjoy seeing a lot of texture in their work.
Due to the thickness, a bamboo or acrylic blend can help keep the cape from becoming overly heavy or stiff.
Ensure your post stitches are worked consistently. If the tension varies, the recessed squares will look uneven, affecting the overall grid appearance.
15. Cluster Stitch Detailed Cape

Lavender yarn adds a delicate touch to this design, which uses cluster stitches to create small, grouped bumps of yarn across the fabric.
Cluster stitches are similar to puffs but are closed differently, resulting in a flatter, more compact group of stitches than a puff stitch.
This style provides more coverage than a lace cape but is less bulky than a waffle stitch cape. It is a versatile choice for various yarn weights.
Beginners should ensure they pull the loop through all the clustered stitches evenly to avoid creating holes in the fabric.
Check the pattern to see if the clusters are worked in every stitch or spaced out. Spaced clusters create a more open fabric, while every-stitch clusters are denser.
Detail Checks:
- Verify cluster closure
- Check stitch height
- Maintain tension
How Do I Care for My Crochet Cape?
Proper care ensures your cape keeps its shape and the yarn remains in good condition. Always refer to the yarn label first for specific instructions.
At a Glance:
- Follow the yarn label
- Wash in cool or lukewarm water
- Lay flat to dry
- Check for loose ends
Avoid using hot water or high dryer heat, as these can shrink wool and cotton or damage acrylic fibers. Laying the garment flat to dry is the best way to prevent the cape from stretching out of shape.
Regularly check the garment for loose threads or snagged fibers. Use a yarn needle to weave in any ends that may have come loose over time.
Common Beginner Mistakes to Avoid
Many beginners struggle with the size of their project. Working a gauge swatch is the only way to ensure the cape fits the wearer without guessing.
At a Glance:
- Skipping the gauge swatch
- Inconsistent stitch tension
- Poorly woven ends
- Miscounting turning chains
Another common issue is inconsistent tension. If you pull some stitches tighter than others, the cape may look warped or uneven.
Managing yarn ends is also a frequent challenge. Failing to weave in ends securely can lead to the garment unraveling during wear or washing.
Mistakes Checklist:
- Did I work a swatch?
- Are my edges straight?
- Are all ends woven in?
- Did I follow the label?
How Can I Improve My Skills?
To move from basic to advanced capes, practice mixing stitches. Try adding a shell stitch border to a plain single crochet body.
At a Glance:
- Mix different stitch patterns
- Try various fiber types
- Practice different joining methods
- Use stitch markers for counting
Experiment with different fibers to see how they affect the drape. A bamboo yarn will behave very differently than a wool blend in the same pattern.
Focus on your joining techniques. Learning to use a slip stitch join or a whip-stitched seam will help you create cleaner transitions between the hood and the cape.
Frequently Asked Questions
How do I know if my cape is the right size?
Measure the wearer's shoulders and the desired length. Work a gauge swatch to see how your stitches translate to those measurements.
Which yarn is best for a flowing cape?
Bamboo often works well for a drapey look. You can also check the yarn label for fibers that are known for being soft and flexible.
What should I do if my cape is too tight?
If the garment is too tight, you may need to use a larger hook or a different yarn. Always ensure the fit is comfortably loose.
How do I stop my edges from curling?
Consistent tension is key. You can also add a border, such as a shell stitch, to help the edges lie flat.
Can I use any hook for any yarn?
It is best to start with the hook size recommended on the yarn label. You can then adjust the size to achieve the desired fabric density.
How do I join the hood to the cape?
Most patterns use a slip stitch join or a whip-stitched seam with a yarn needle. Be sure to weave in all ends securely.
Final Thoughts on Crochet Hooded Capes
Creating a hooded cape is a wonderful way to explore new textures and garment construction. By choosing the right yarn and stitch, you can create a piece that is both functional and visually appealing.
Remember that this guide is an overview of styles and techniques. To get exact stitch counts, measurements, and assembly steps, you should follow a complete, tested pattern.
Always prioritize safety and comfort by ensuring a loose fit and following the care instructions on your yarn label.