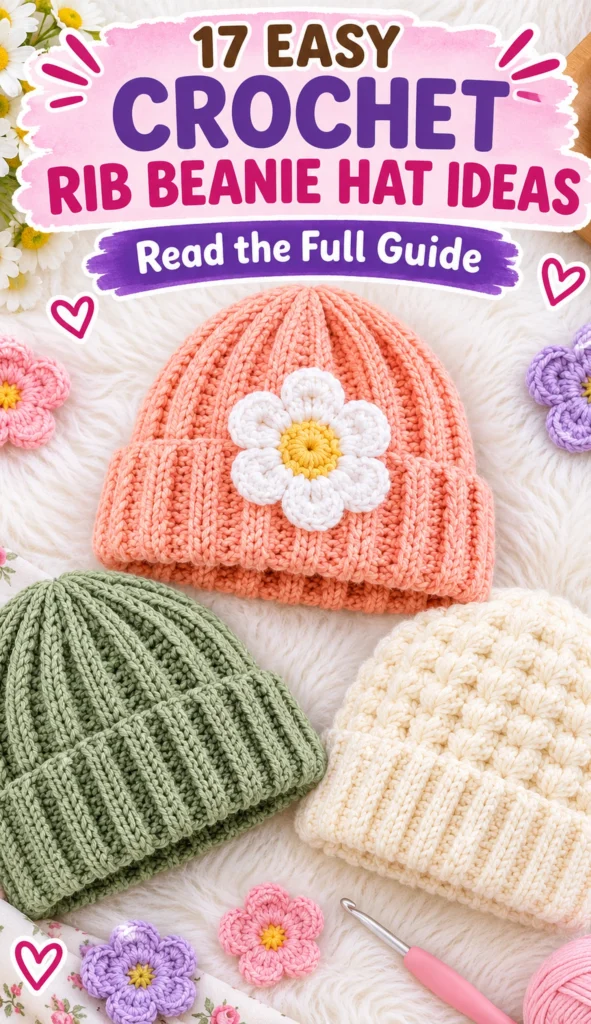
Crochet rib beanies are a staple for anyone learning to work with texture. These hats use specific techniques to create a stretchy, ridged fabric that mimics the look of knitwear. By varying the stitch and yarn, you can change the entire feel of the finished piece.
Choosing the right style depends on the look you want and the tools you have. Some designs focus on deep ridges, while others use combined stitches for a firmer structure. This guide explores various ribbing techniques and visual styles to help you pick your next project.
Key Takeaways:
- Back loop only stitches create a stretchy, ridged fabric.
- Tapestry crochet results in a firmer, less stretchy beanie.
- Always work a gauge swatch to ensure a proper fit.
- Follow yarn label instructions for hook size and care.
- Measure the wearer's head above the ears and eyebrows.
- Quick Reference: Styles at a Glance
- Why are rib beanies great for beginners?
- What materials should you choose?
- How do you ensure a good fit?
- 17 Easy Crochet Rib Beanie Hat Ideas
- 1. Back Loop Only Ribbed Beanie
- 2. Tapestry Crochet Two-Tone Beanie
- 3. Puff Stitch Textured Beanie
- 4. Lace Mesh Ribbed Beanie
- 5. Shell Stitch Accent Beanie
- 6. Half-Twist Ribbed Beanie
- 7. Granny Square Joined Beanie
- 8. Whip-Stitched Seam Beanie
- 9. Slip-Stitch Joined Rib Beanie
- 10. Mixed-Stitch Ribbed Beanie
- 11. Thick-Ribbed Wool Beanie
- 12. Fine-Ribbed Cotton Beanie
- 13. Contrast-Edge Ribbed Beanie
- 14. Cable-Look Ribbed Beanie
- 15. Folded-Brim Ribbed Beanie
- 16. Tapered-Crown Ribbed Beanie
- 17. Wide-Ribbed Bamboo Beanie
- How should you care for your beanies?
- What are common beginner mistakes?
- How can you build your skills?
- Frequently Asked Questions
- Final Thoughts on Crochet Rib Beanies
Quick Reference: Styles at a Glance
| Style | Look | Main technique | What to check |
|---|---|---|---|
| Back Loop Only Ribbed Beanie | Vertical ridges | Back loop only | Construction method |
| Tapestry Crochet Two-Tone Beanie | Graphic colors | Tapestry / two-color | Fit and looseness |
| Puff Stitch Textured Beanie | Bumpy surface | Puff stitch | Yarn quantity |
| Lace Mesh Ribbed Beanie | Open and airy | Lace/mesh | Gap size |
| Shell Stitch Accent Beanie | Scalloped edge | Shell stitch | Placement of shells |
| Half-Twist Ribbed Beanie | Sculpted twist | Twist headband | Joining method |
| Granny Square Joined Beanie | Patchwork | Granny squares | Seam rigidity |
| Whip-Stitched Seam Beanie | Smooth side | Joining ends | Seam tension |
| Slip-Stitch Joined Rib Beanie | Ridged seam | Joining ends | End weaving |
| Mixed-Stitch Ribbed Beanie | Varied texture | Visual style only | Stitch sequence |
| Thick-Ribbed Wool Beanie | Chunky ridges | Visual style only | Wash instructions |
| Fine-Ribbed Cotton Beanie | Sleek ribs | Visual style only | Stretch calculations |
| Contrast-Edge Ribbed Beanie | Two-tone brim | Visual style only | Color change method |
| Cable-Look Ribbed Beanie | Braided texture | Visual style only | Stretch compensation |
| Folded-Brim Ribbed Beanie | Double layer | Visual style only | Foundation length |
| Tapered-Crown Ribbed Beanie | Fitted top | Visual style only | Decrease pattern |
| Wide-Ribbed Bamboo Beanie | Drapey ribs | Visual style only | Drying method |
Why are rib beanies great for beginners?
Ribbed beanies often rely on a single repeating stitch, making them an excellent way to practice muscle memory. Once you master the rhythm of the rib, the construction becomes intuitive.
At a Glance:
- Repetitive stitch patterns
- Simple construction methods
- Clear visual feedback on tension
- Limited number of techniques needed
Many of these designs are worked as a flat rectangle and then joined, which removes the stress of working in rounds for a first-timer. This allows you to focus on your stitch tension before tackling the assembly.
What materials should you choose?
The yarn you pick determines the drape and care of the hat. All stitch names used in these descriptions follow US crochet terms.
At a Glance:
- Check the yarn label for hook size
- Choose acrylic for easy-care items
- Use wool for a traditional feel
- Bamboo for a softer drape
Cotton is breathable but lacks natural stretch, while acrylic is easy to wash and maintain. Wool provides a classic look but can shrink if washed in hot water. Bamboo offers a softer, drapey quality to the fabric.
Yarn Properties:
- Cotton: Breathable, low stretch
- Acrylic: Washable, easy-care
- Wool: Warm, can felt in heat
- Bamboo: Soft, drapey
Hook Tip: Start with the hook size on the yarn label, then adjust to reach your preferred tension.
How do you ensure a good fit?
Because every person crochets with different tension, you cannot rely on a universal size. Measuring the wearer is the only way to ensure the hat fits comfortably.
At a Glance:
- Measure the forehead and ears
- Work a gauge swatch first
- Account for stitch stretch
- Avoid tight fits that leave marks
Measure around the forehead, passing above the eyebrows and ears. For stretchy ribbed bands, the foundation chain is often made slightly smaller than the actual measurement to keep the hat from sliding.
Measuring Steps:
- Measure the head circumference
- Crochet a small test square
- Calculate stitches per inch
- Adjust chain length based on swatch
17 Easy Crochet Rib Beanie Hat Ideas
These styles are organized by the technique used to create the ribbed effect. We move from basic back-loop stitches to more advanced textures and construction methods.
1. Back Loop Only Ribbed Beanie
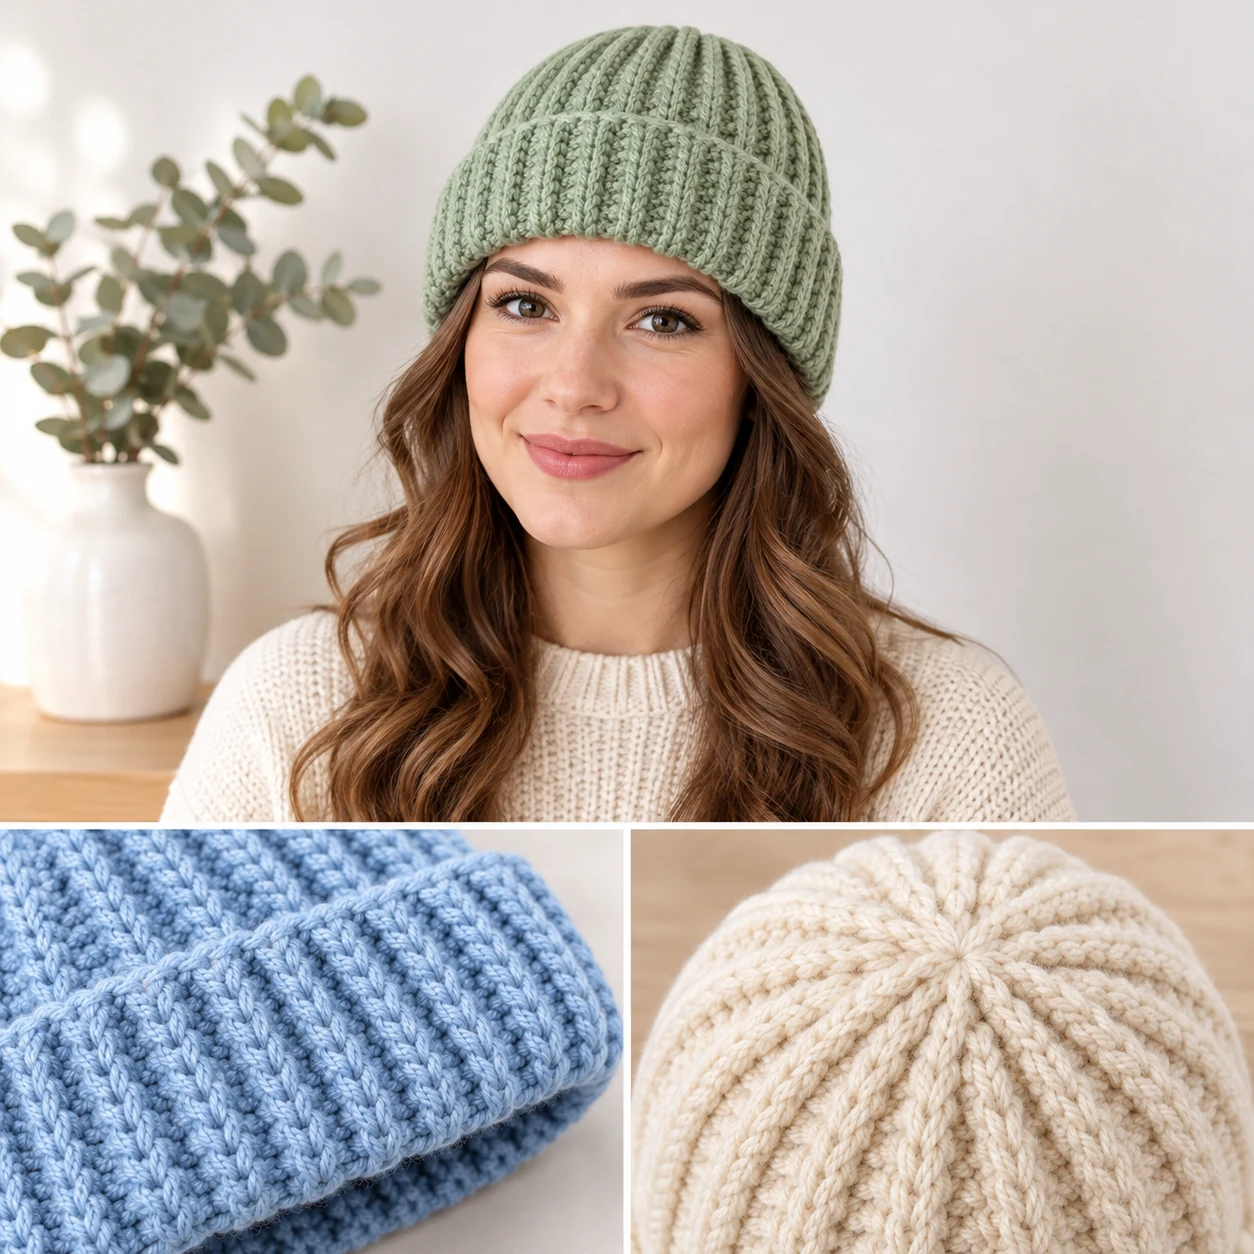
This classic design in soft sage green features distinct vertical ridges. It is the most common way to achieve a knit-like appearance in crochet by utilizing the structure of the stitch.
The back loop only (BLO) technique creates a stretchy fabric where the stretch runs along the row. This makes it a flexible option for different head sizes, as the fabric expands horizontally.
When choosing a pattern for this style, check if it is worked flat or in the round. Flat versions are joined at the end, while round versions are worked as a tube from the brim up.
Acrylic yarn often works well here because it maintains the definition of the ridges even after washing. This ensures the vertical lines remain crisp and the hat keeps its shape.
Design Features:
- Vertical ridged texture
- High horizontal stretch
- Knit-like appearance
2. Tapestry Crochet Two-Tone Beanie
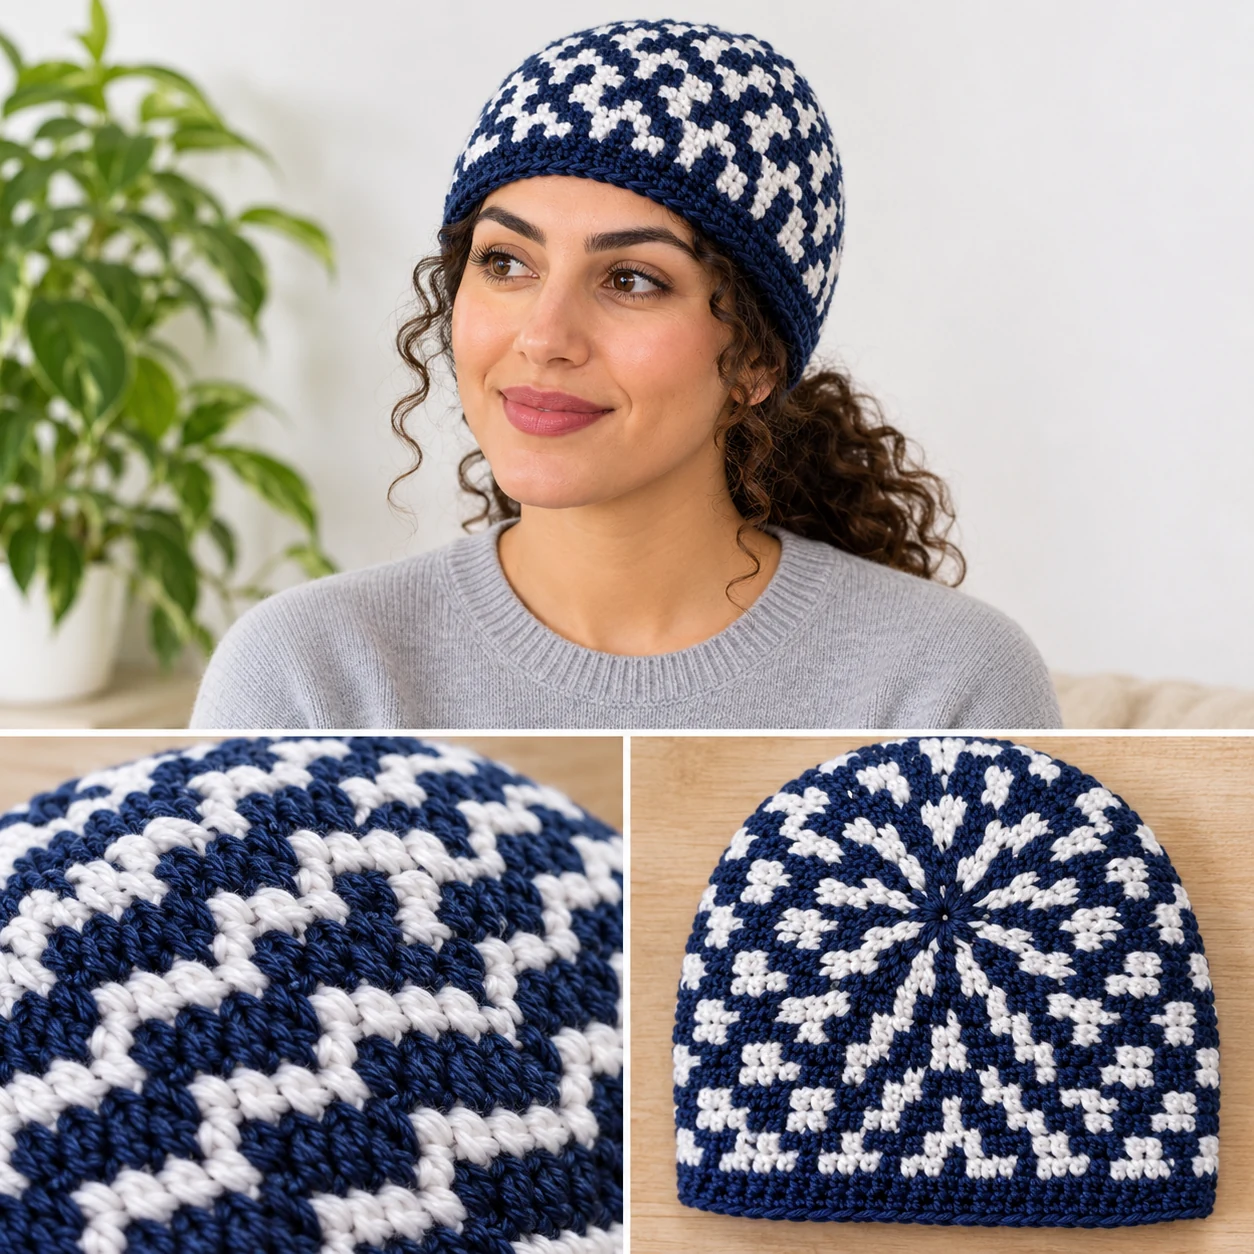
This beanie in navy and white uses two colors to create a bold, graphic look. The colors are integrated directly into the fabric rather than striped in separate rows.
Tapestry crochet involves carrying the unused color inside the stitches. This creates a thicker, firmer fabric than a single-color beanie, which adds a different weight to the hat.
Because the fabric is denser, it has less stretch. You must measure the wearer carefully and keep the design comfortably loose to ensure it fits without being too tight.
Bamboo yarn can be a good choice for this style to add a bit of softness to the firmer structure. This helps balance the thickness of the carried yarn.
Fit Note: Since tapestry crochet is firmer, avoid making the band too small.
3. Puff Stitch Textured Beanie
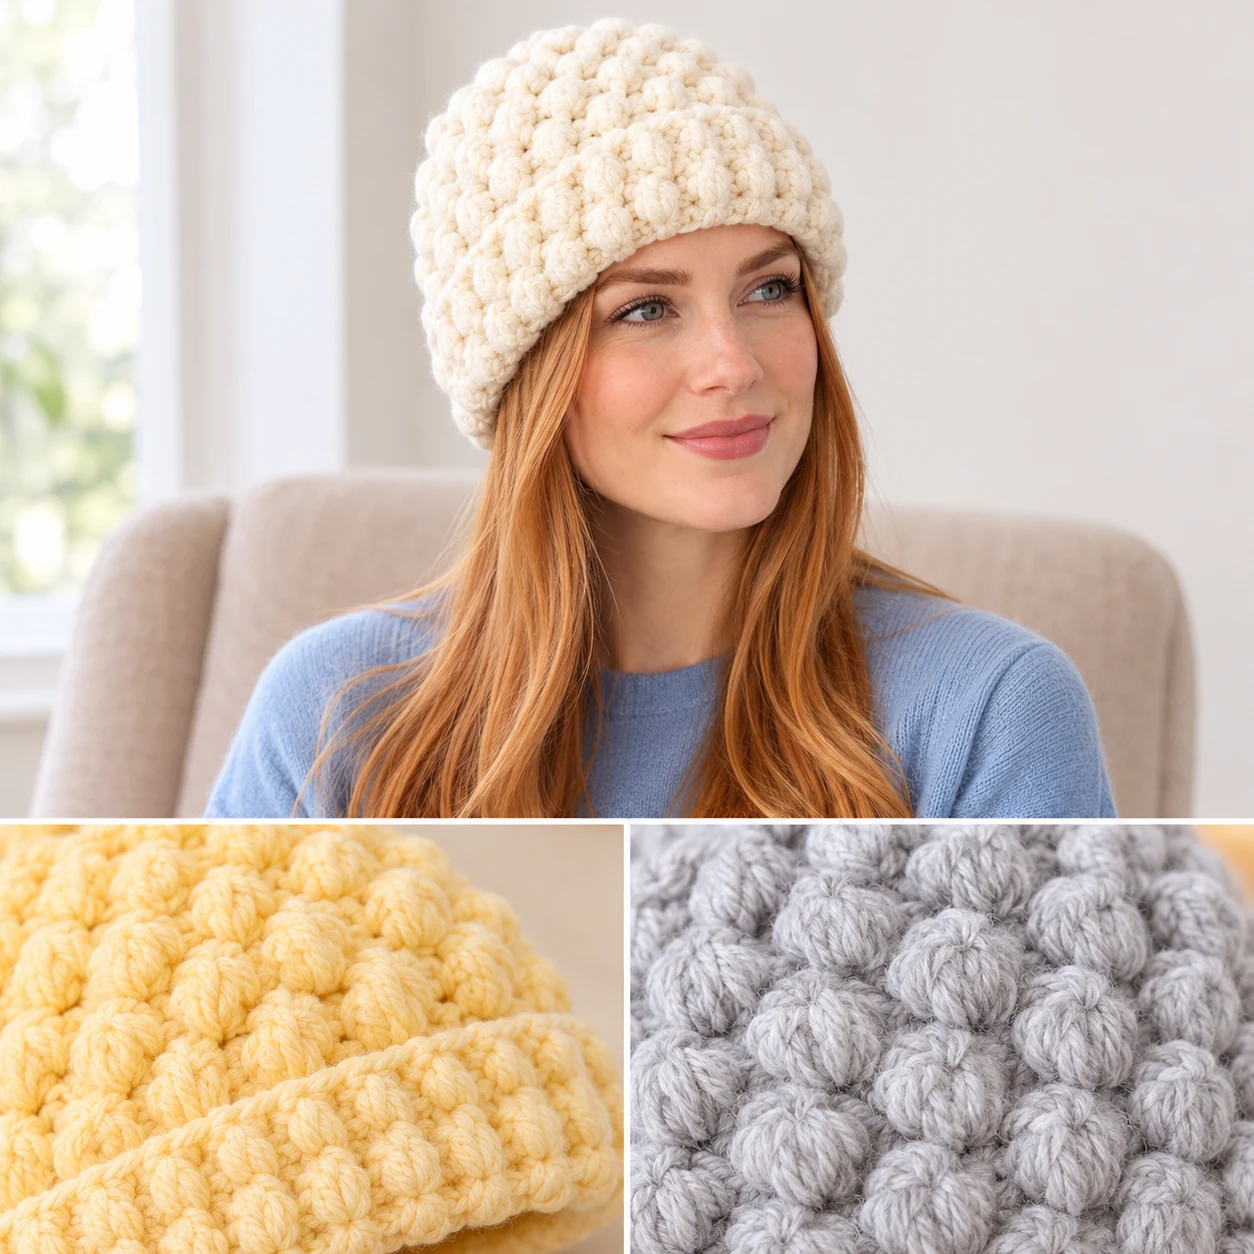
Shown in a creamy white, this beanie replaces flat ribs with a bumpy, three-dimensional surface. It looks more like a popcorn texture than a traditional rib.
The puff stitch is created by pulling up multiple loops in one stitch before closing them. This results in a soft, raised effect that adds visual weight and a tactile feel.
Puff stitches use significantly more yarn than standard single crochet. Check your yarn quantity carefully when selecting a pattern for this style to avoid running out.
Wool yarn can enhance the soft, voluminous look of the puffs. Because wool can felt or shrink if washed hot, follow the label for cold-water care.
Material Tips:
- Higher yarn consumption
- Three-dimensional texture
- Softer fabric feel
4. Lace Mesh Ribbed Beanie
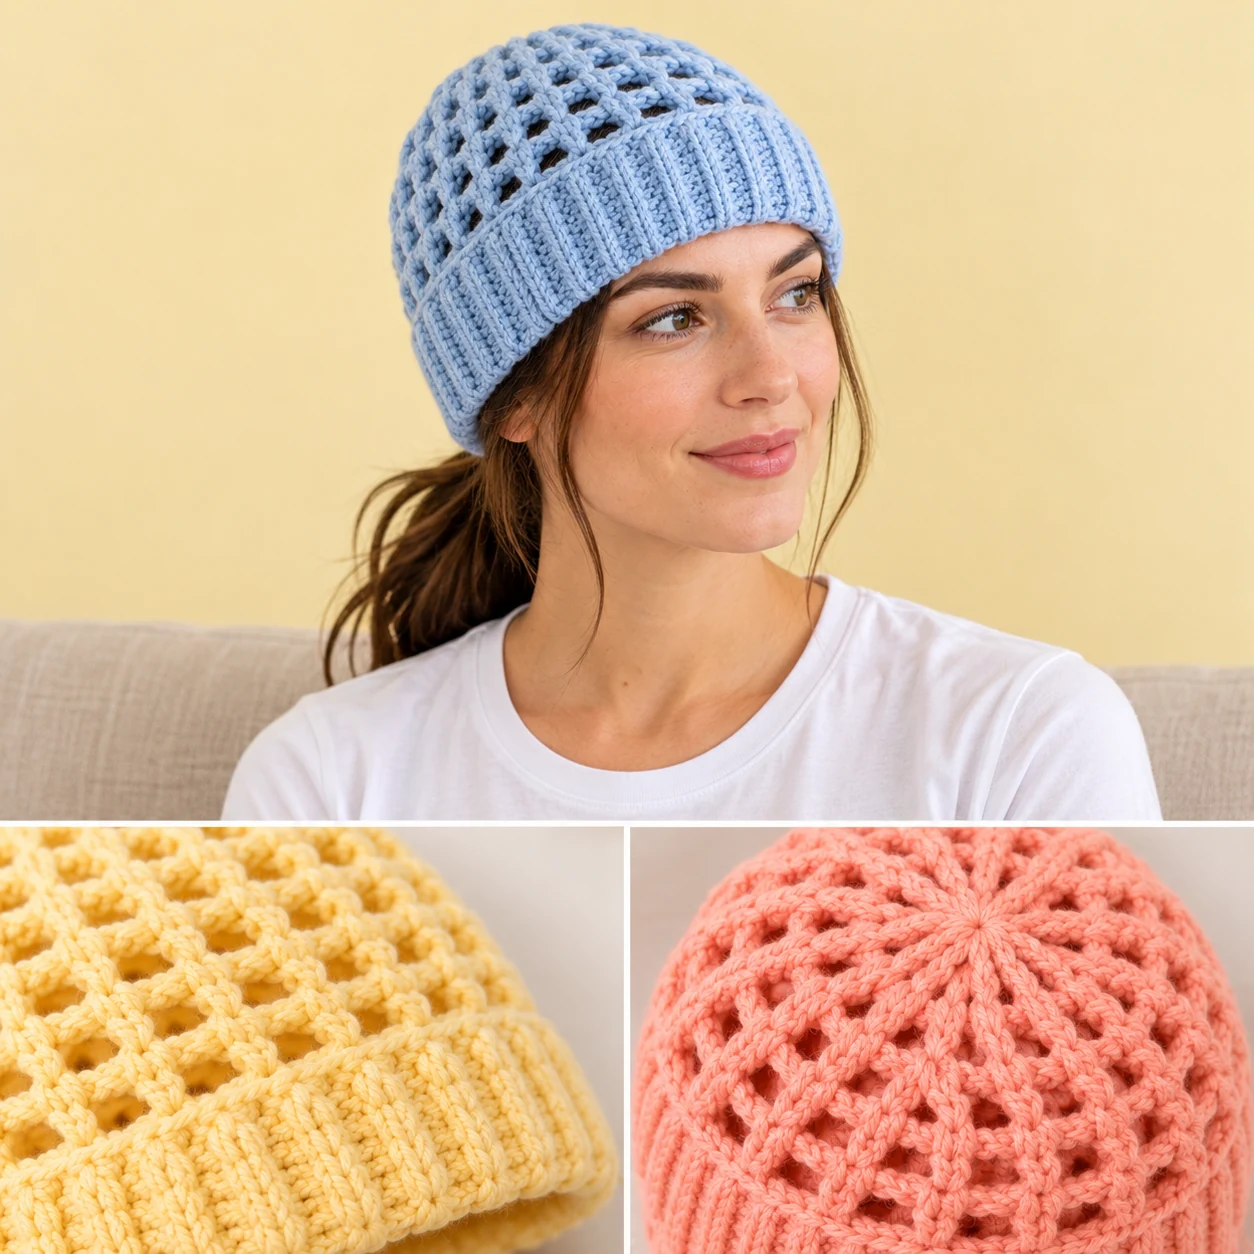
This design in pale blue combines a ribbed base with an open, airy upper section. It creates a contrast between the solid band and the light top of the hat.
The lace effect is achieved by alternating double crochet with chain spaces and skipped stitches. This makes the fabric lighter and more breathable than a solid rib.
When working with mesh, ensure the chain spaces are not too loose. Gaps that are too large can look sloppy and may catch fingers, especially in children's items.
Cotton yarn works well for this style because it provides the structure needed to keep the mesh holes defined. It prevents the open stitches from sagging too much.
5. Shell Stitch Accent Beanie
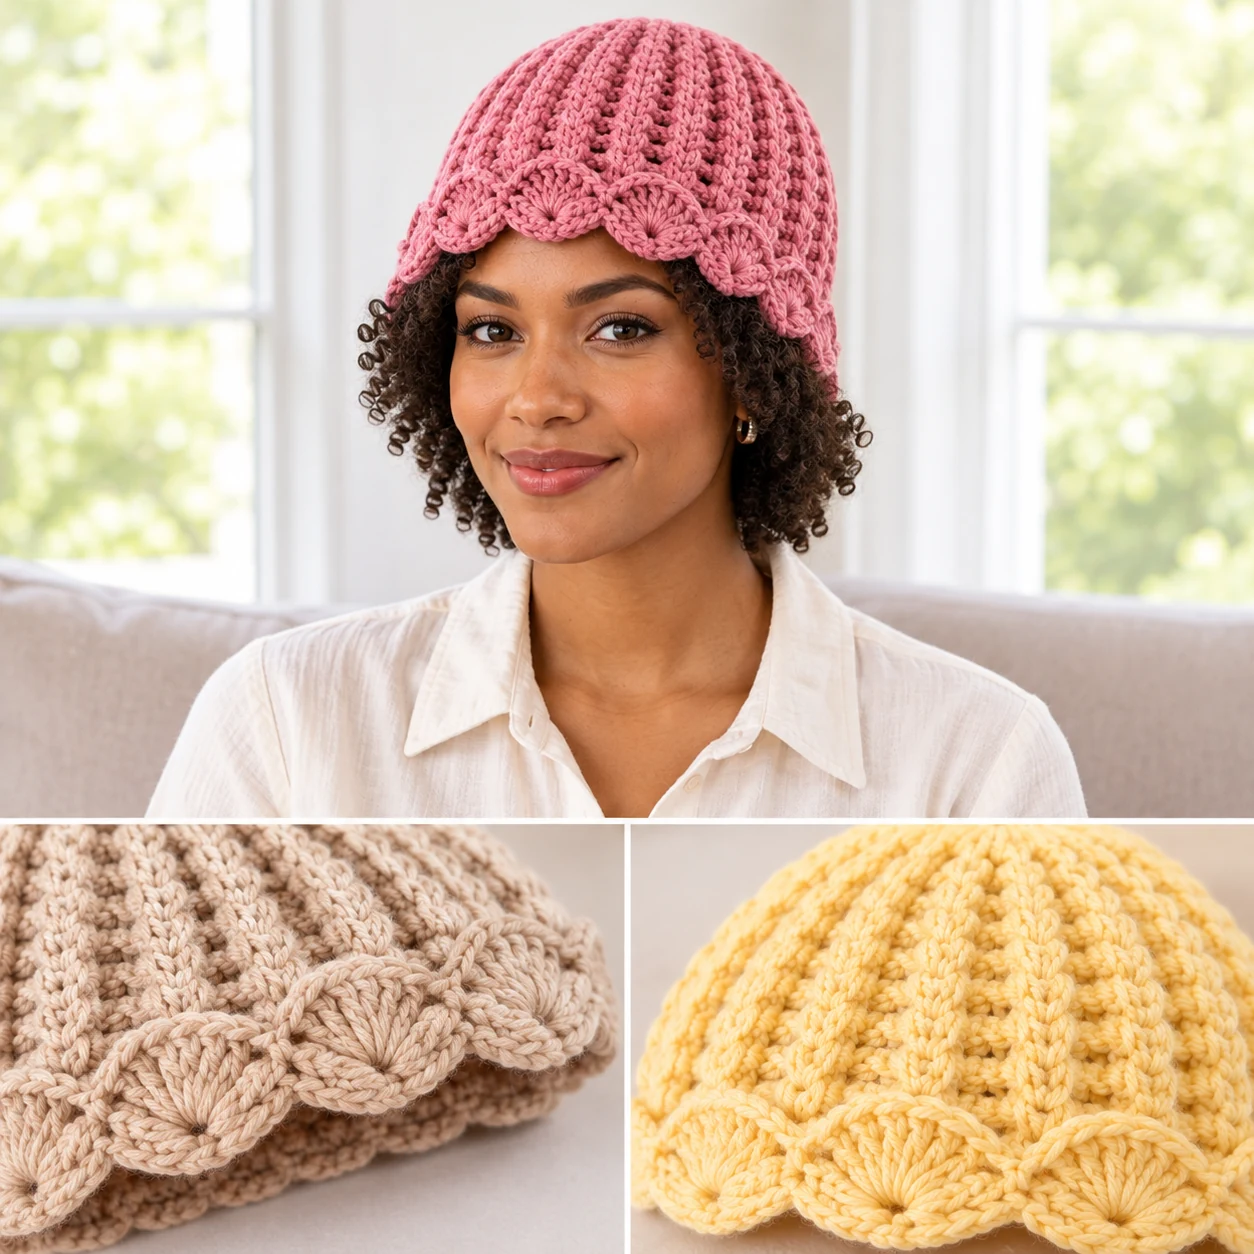
This beanie in dusty rose uses a ribbed body with a decorative shell border. The shells add a scalloped edge to the design, breaking up the vertical lines.
A shell is formed by working several double crochets into the same stitch, typically skipping two stitches on each side to keep the fabric flat.
Unlike the BLO rib, which is uniform, the shell stitch creates a rhythmic pattern of curves. This makes it a way to add a focal point to the hat's brim or crown.
Check the pattern to see if the shells are worked into the brim or as a crown decoration. This determines how the hat will sit on the head.
Visual Details:
- Scalloped edges
- Rhythmic curved pattern
- Contrast in stitch height
6. Half-Twist Ribbed Beanie
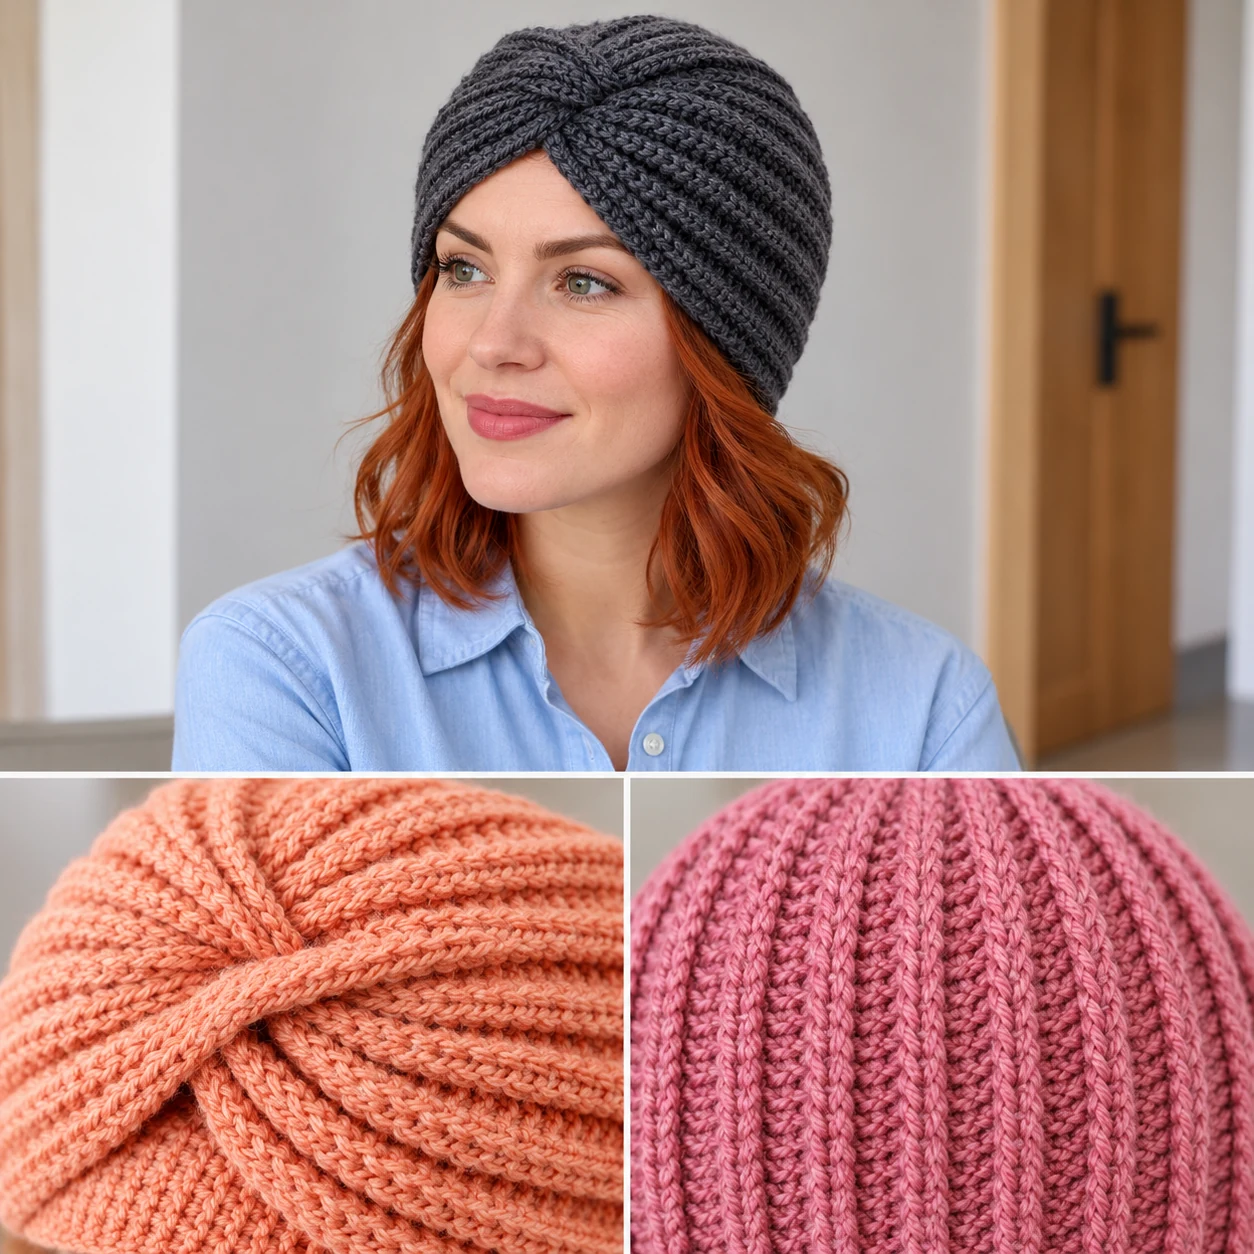
This charcoal beanie features a unique twist in the fabric. It gives the hat a modern, sculpted look that differs from a standard round beanie.
The twist is created by working a flat ribbed strip, giving it one half-twist in the middle, and then sewing the short ends together into a ring.
The twist is part of the joining process, not a result of folding the strip in half during the crochet process. This ensures the twist remains stable.
Acrylic yarn is a practical choice here as it holds the shape of the twist well after repeated wear. It provides the necessary resilience for the sculpted look.
7. Granny Square Joined Beanie
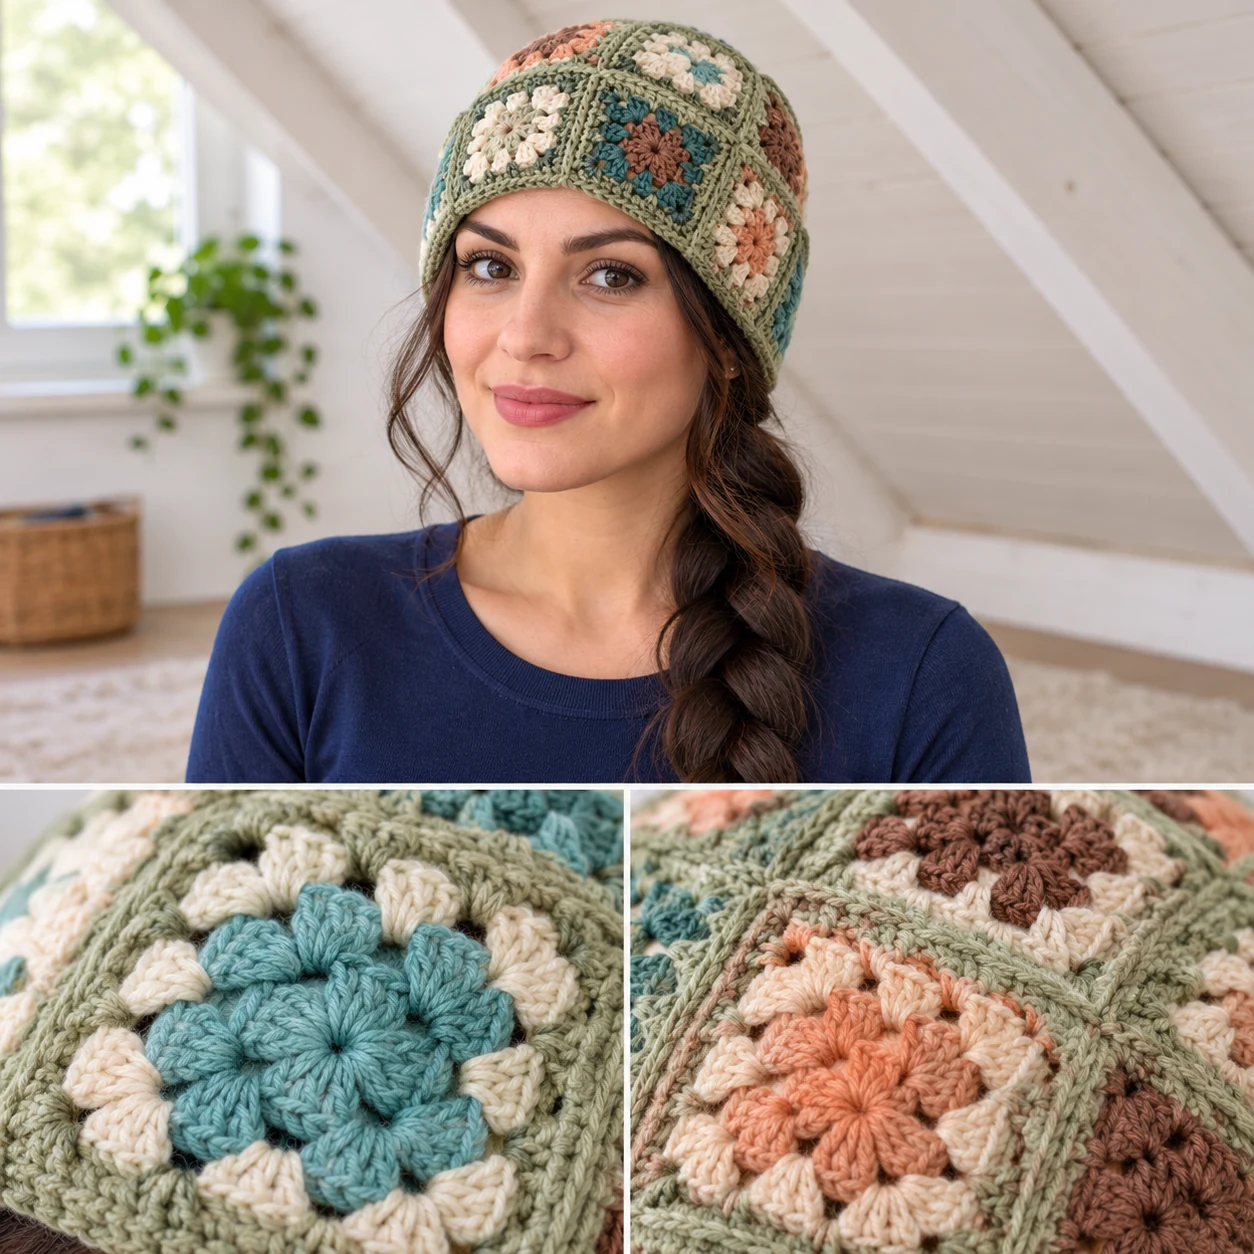
This beanie in soft sage green uses a collection of small squares in various colors. It creates a patchwork effect that is visually distinct from solid ribbed hats.
The squares are worked in rounds from a center and then joined using slip stitches or a yarn needle. This creates a seamed construction throughout the hat.
Because the joined squares are more rigid, this style has very little stretch. It is important to ensure the final piece is comfortably loose to avoid a tight fit.
Wool blends can help soften the seams, making the transition between squares less abrupt. This adds a bit of flexibility to the otherwise rigid structure.
Construction Notes:
- Seamed construction
- Low stretch fabric
- Patchwork appearance
8. Whip-Stitched Seam Beanie
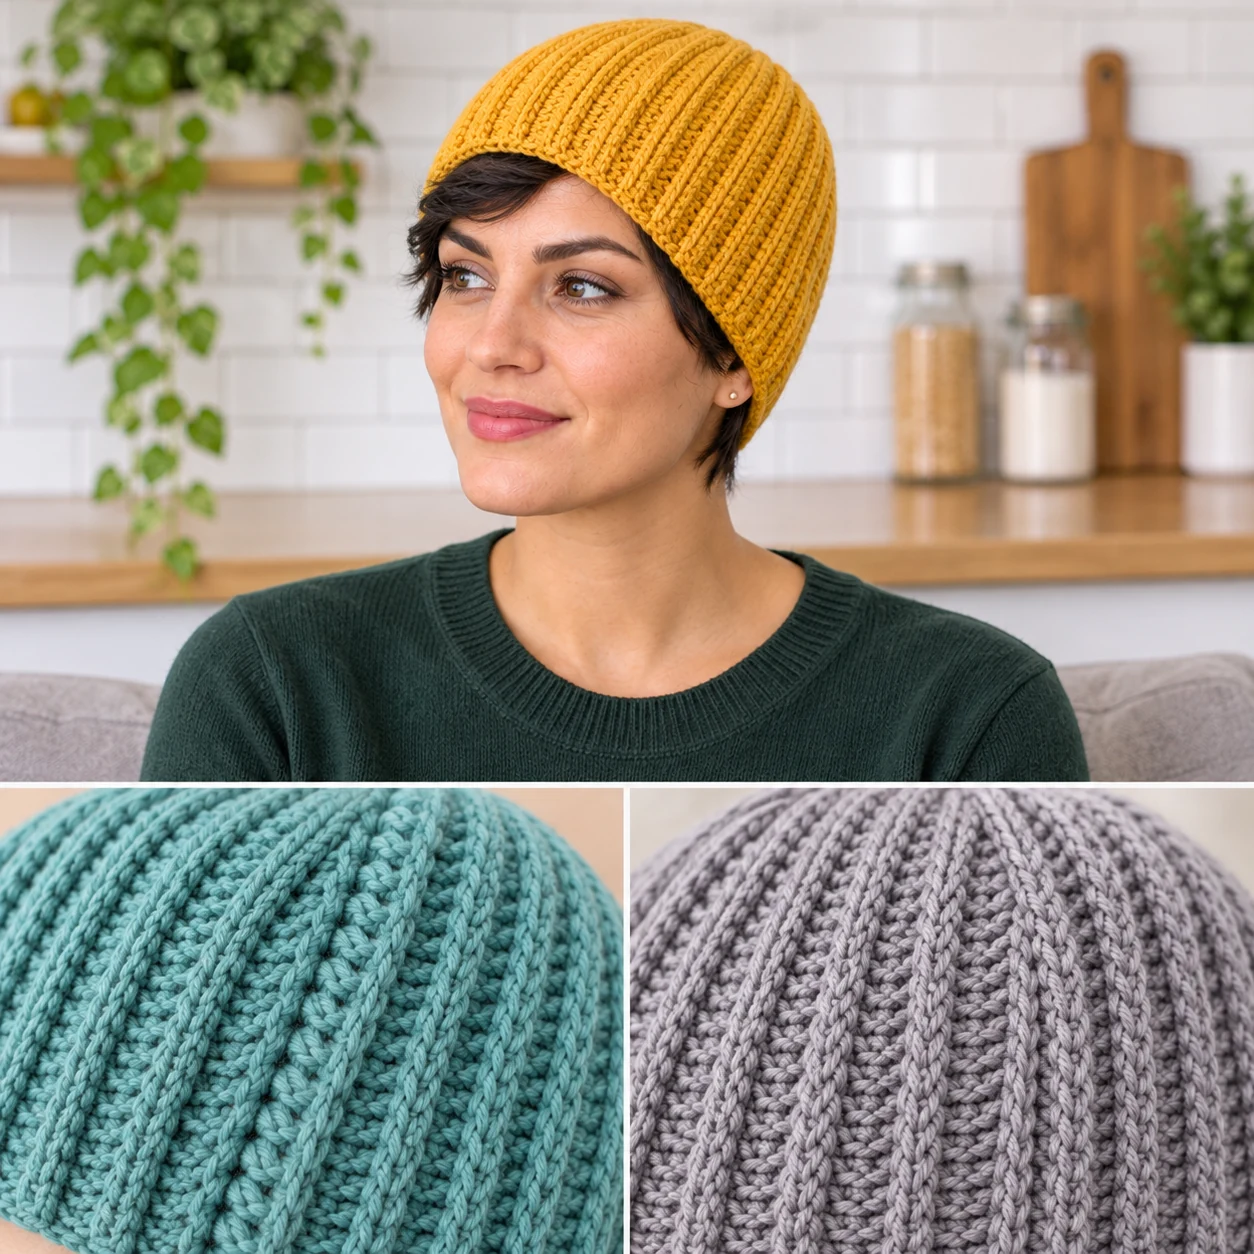
This mustard yellow beanie is worked as a flat ribbed panel. The focus of this design is the clean finish of the side seam where the edges meet.
The ends are joined using a whip-stitched seam with a yarn needle. This method is often preferred over slip stitching for a smoother, flatter look.
A whip-stitched seam can be tucked away to be less visible than a slip-stitch join. This creates a more seamless transition along the side of the head.
When using cotton yarn, be careful not to pull the whip-stitch too tight. Cotton does not stretch to accommodate a tight seam, which could distort the ribbing.
9. Slip-Stitch Joined Rib Beanie
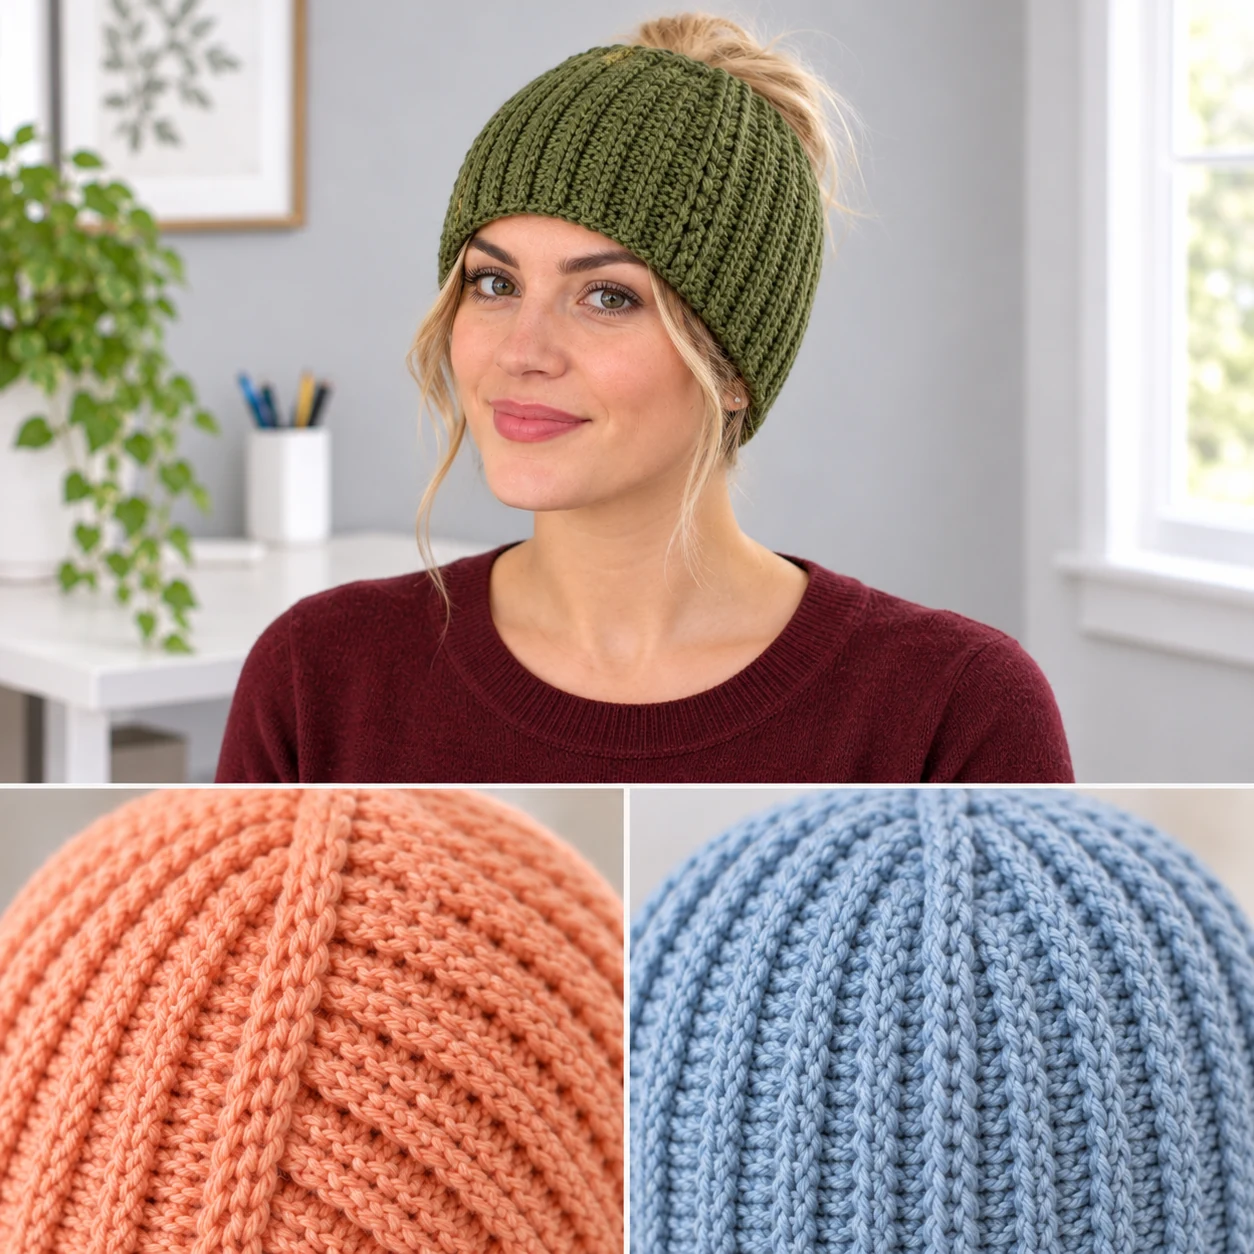
This olive green beanie is joined using a slip stitch. This creates a visible ridge along the seam, which adds a subtle structural detail to the hat.
The slip-stitch join is worked with the crochet hook, making it faster than sewing with a needle. It results in a distinct seam that is part of the design.
Beginners should ensure they weave in every end for several stitches, back and forth, to prevent the seam from opening during wear or washing.
Acrylic yarn is often used here because its slight elasticity helps the slip-stitch join sit comfortably against the head without creating a hard edge.
Assembly Tips:
- Visible seam ridge
- Fast hook-based join
- Requires thorough weaving of ends
10. Mixed-Stitch Ribbed Beanie
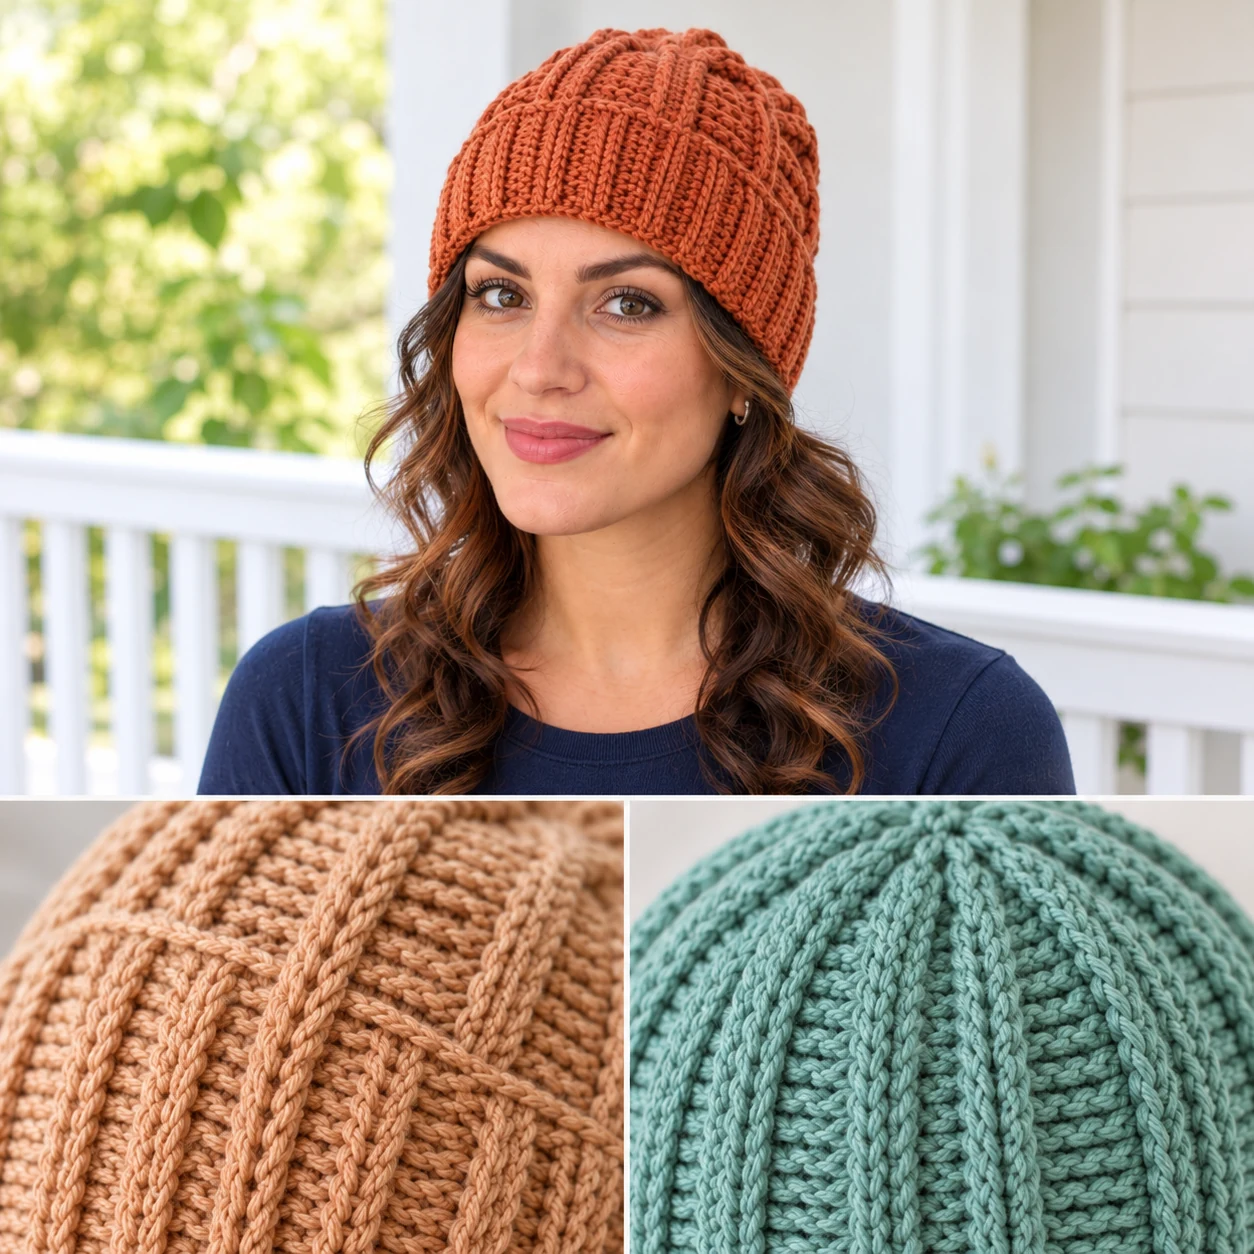
This terracotta beanie alternates between different ribbing heights. It creates a varied texture that is more complex than a standard BLO rib.
By mixing stitches, the fabric can have areas of high stretch and areas of more stability. This is a way to experiment with how different stitches affect tension.
Check the pattern to see how the different stitches are sequenced. Some use rows of single crochet mixed with half double crochet to vary the ridge depth.
Bamboo yarn can be a good choice for this style as it highlights the differences in stitch height with its natural drape and softness.
11. Thick-Ribbed Wool Beanie
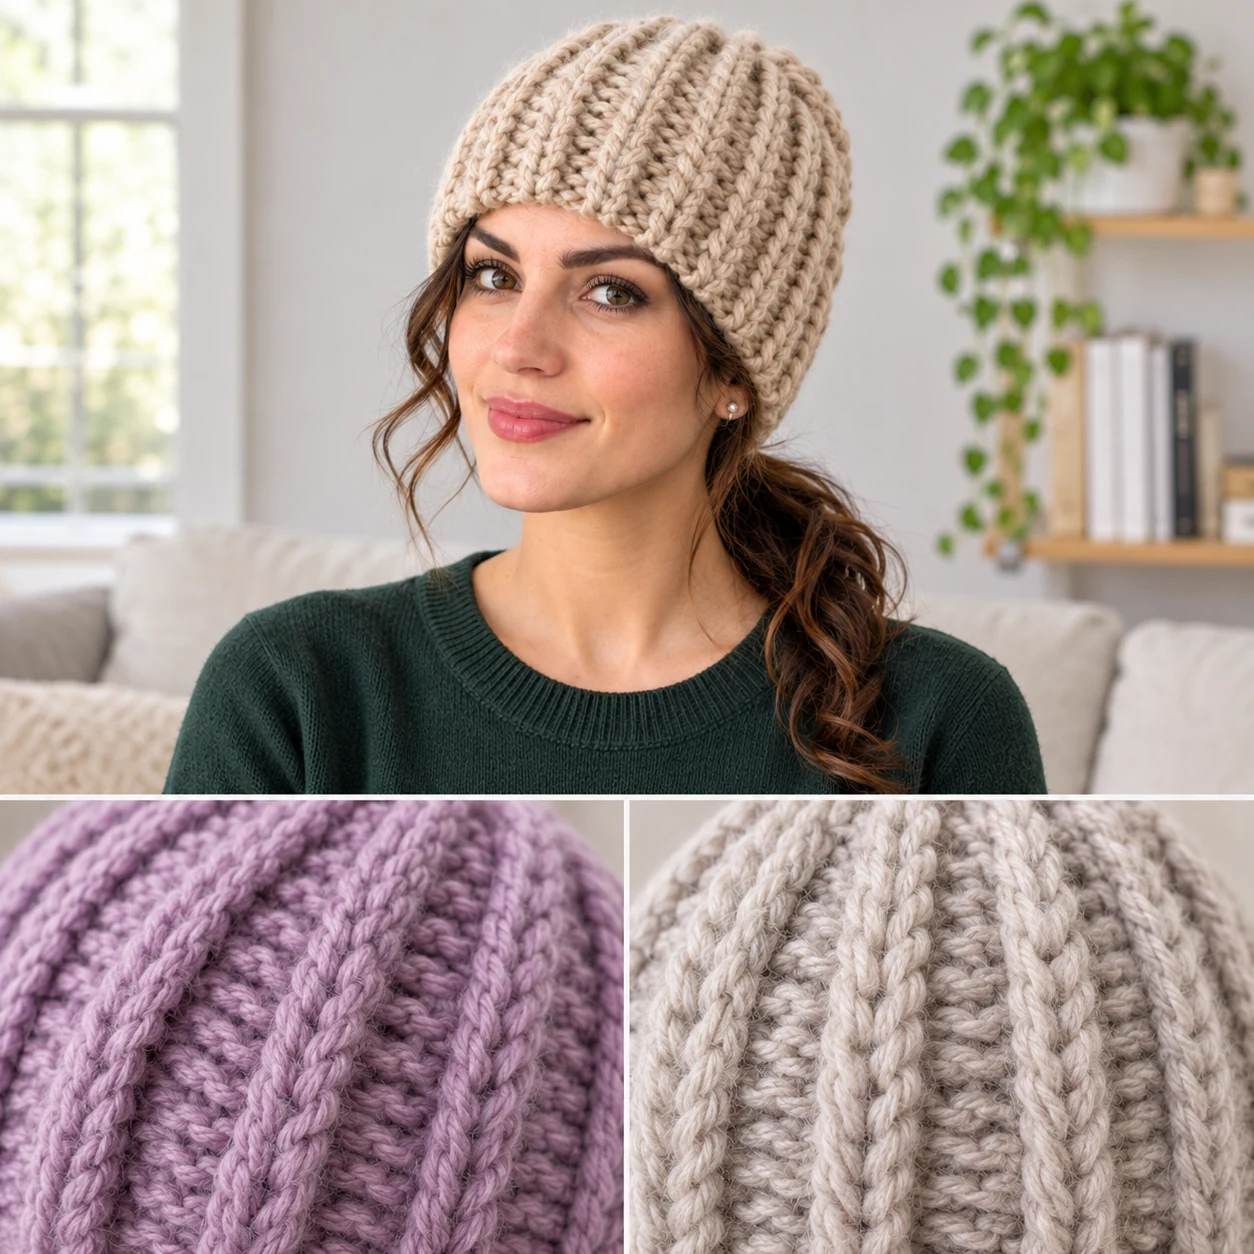
This oatmeal-colored beanie uses a thick wool yarn to create deep, chunky ridges. The result is a heavy, textured look with significant visual impact.
The deep ribs are often achieved by using a larger hook size relative to the yarn. This emphasizes the gap between the ridges and increases the scale of the rib.
Because wool can felt or shrink if washed in hot water, this beanie requires careful hand-washing or cold cycles. Always refer to the yarn label for specifics.
Check your gauge swatch carefully with thick yarn. A small change in tension can significantly change the final size of a chunky project.
Care Reminders:
- Avoid hot water
- Deep ridge definition
- Heavy fabric weight
12. Fine-Ribbed Cotton Beanie
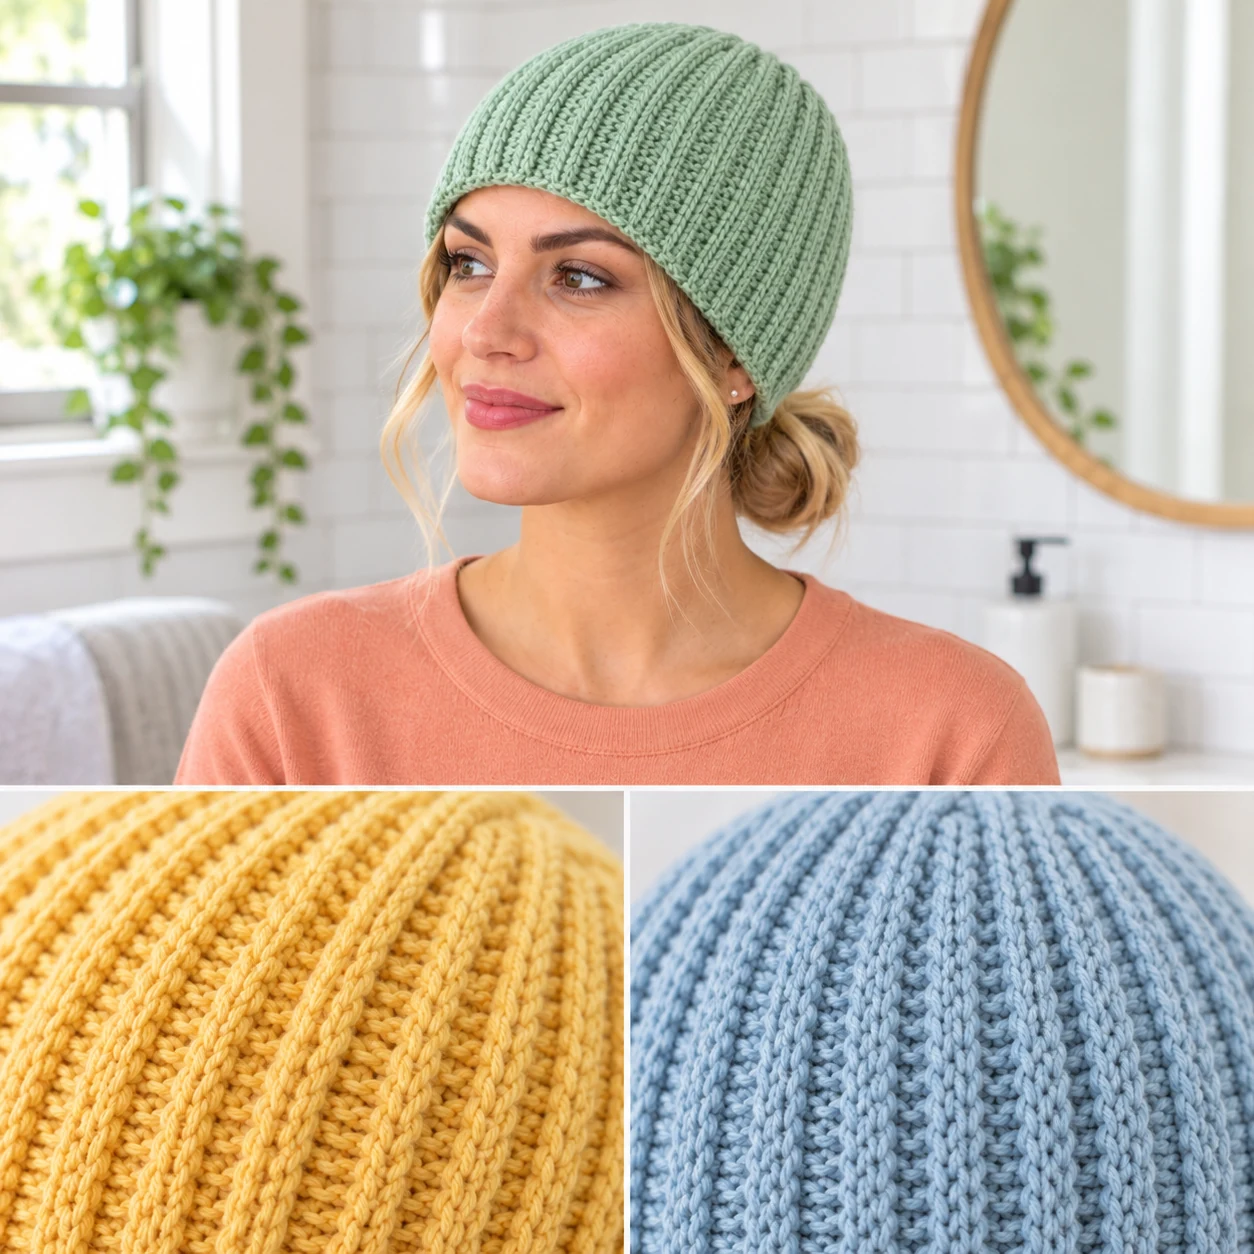
This mint green beanie uses a thin cotton yarn to create very fine, closely spaced ribs. It has a sleeker, more refined appearance than chunky styles.
Cotton is breathable and not stretchy. This means the ribbing must be calculated precisely to fit the head without being too tight or too loose.
Since the yarn is thinner, this project takes more time and more stitches than a chunky wool beanie. It is an excellent project for practicing consistency.
Follow the yarn label for the recommended hook to ensure the fine ribs remain distinct and do not collapse into a flat fabric.
13. Contrast-Edge Ribbed Beanie
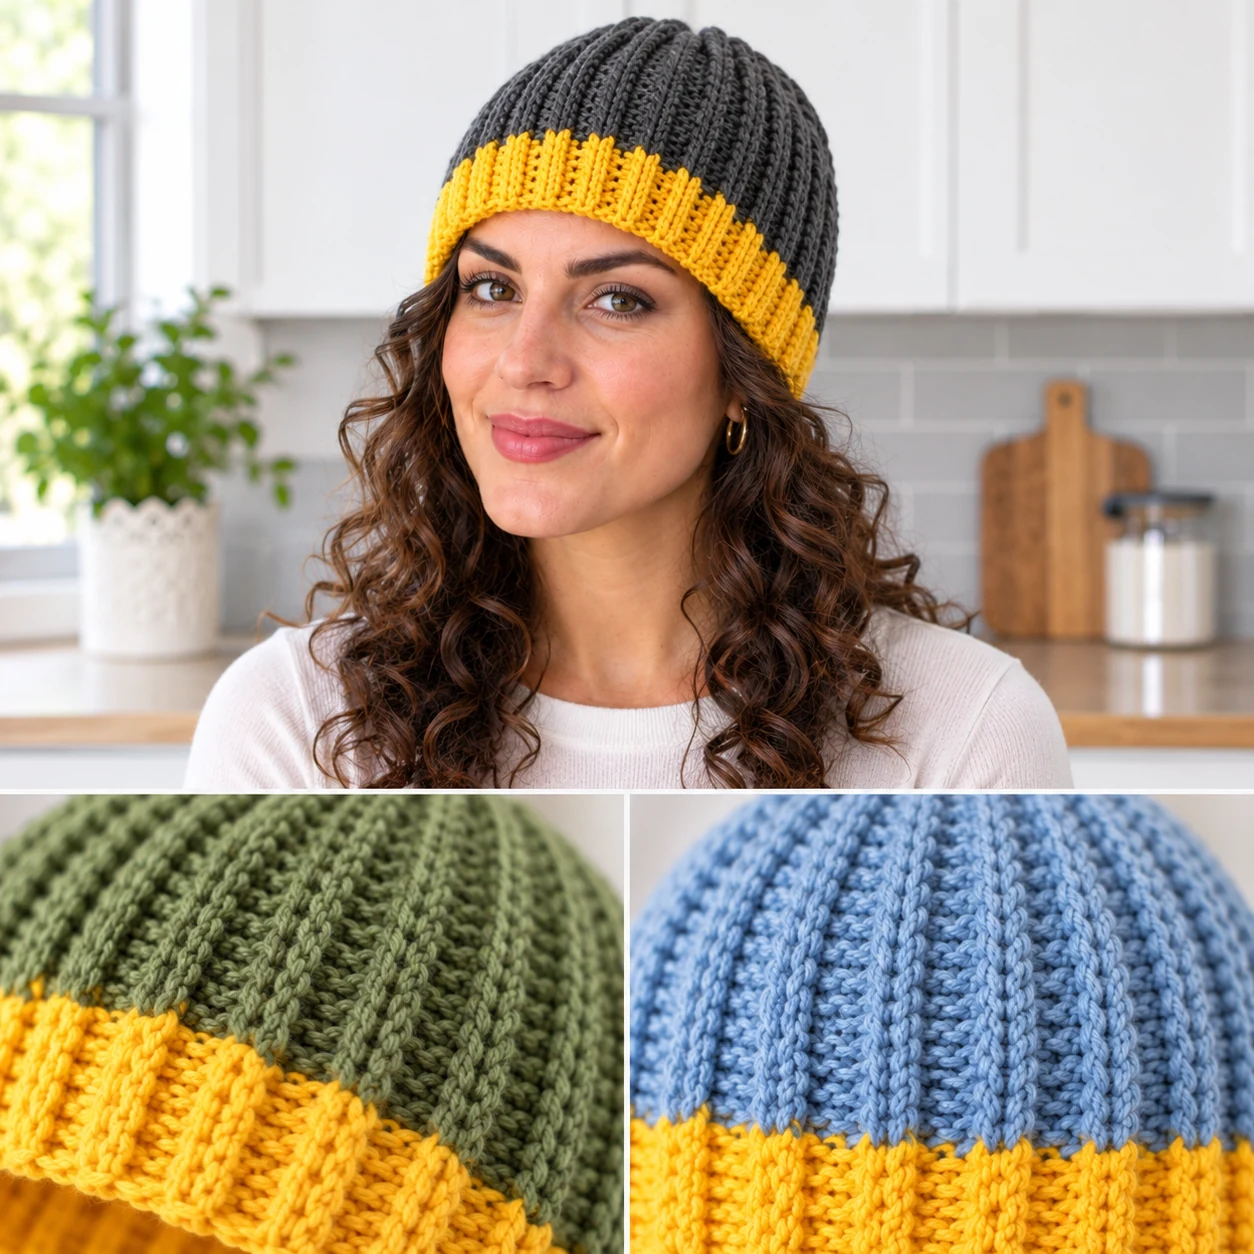
This charcoal beanie features a contrasting yellow edge along the brim. This adds a pop of color to an otherwise neutral design.
The contrast is created by changing yarn colors at the start of the brim. This requires a clean color change to keep the edge sharp and professional.
The ribbed texture of the brim helps hold the contrast color in place, preventing the edge from rolling up or losing its shape.
Acrylic yarn is a good choice for the contrast edge because it is widely washable and keeps its color well over time.
Color Tips:
- Clean color transitions
- Visual focal point
- Structured brim
14. Cable-Look Ribbed Beanie
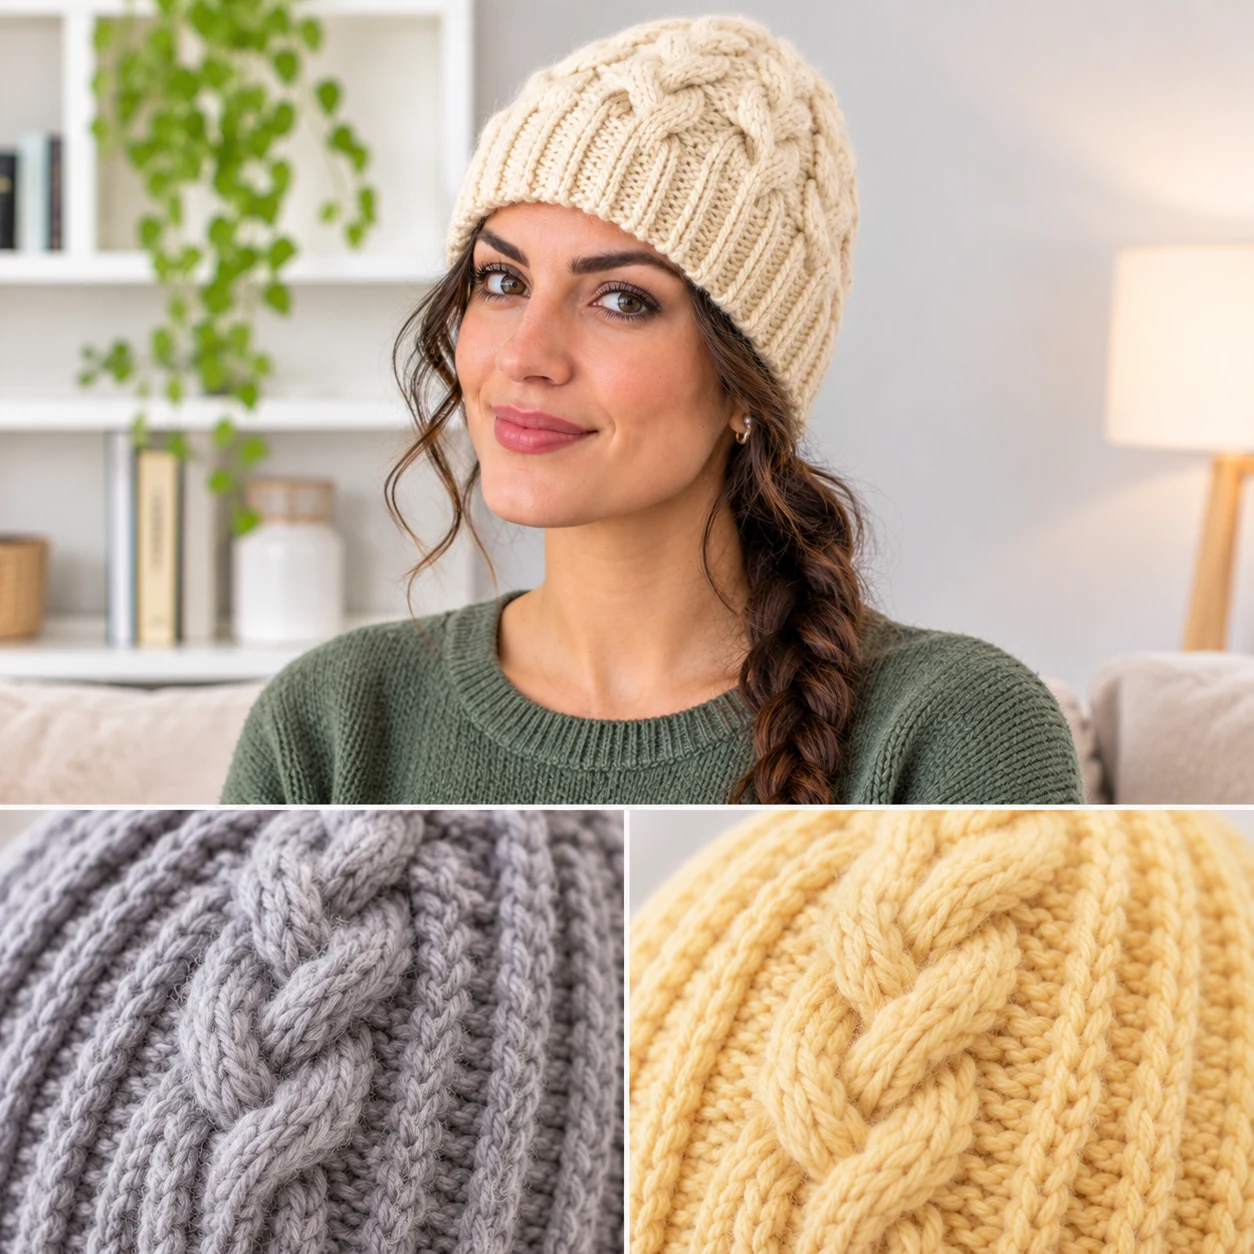
This cream beanie uses a combination of ribbing and crossed stitches to mimic the look of a knitted cable. It creates a sophisticated, braided texture.
The cable effect is achieved by crossing stitches over one another. This creates a denser fabric that is less stretchy than a simple BLO rib.
Because the crossed stitches pull the fabric inward, you must check the pattern for how to compensate for this shrinkage to ensure a proper fit.
Wool yarn works well for this style as it provides the body and elasticity needed to make the cable patterns stand out clearly.
15. Folded-Brim Ribbed Beanie
This brown beanie features an extra-long ribbed section that is folded up over itself. This creates a double layer of fabric at the ears.
The double layer provides more structure to the bottom of the hat, helping it stay in place without needing to be worked too tightly.
The fold adds a visual break in the ribbing, making the hat look more substantial. Ensure the foundation chain is long enough to allow for the fold.
Wool blends are often used for this style to provide the necessary body to support the folded brim and keep it from sagging.
Construction Tips:
- Double-layer brim
- Added structure at base
- Requires extra length
16. Tapered-Crown Ribbed Beanie
This forest green beanie has a ribbed body that gradually narrows at the top. This creates a sleek, fitted silhouette that follows the head's shape.
The tapering is achieved by decreasing stitches as you move toward the crown. This differs from the uniform width of a basic rib tube.
Because the top is tighter, it is important to ensure the decreases are worked evenly to avoid lumps or holes at the peak of the hat.
Acrylic yarn is a practical choice here as it allows for a consistent decrease without distorting the fabric or creating uneven gaps.
17. Wide-Ribbed Bamboo Beanie
This soft peach beanie uses a bamboo yarn to create wide, flowing ribs. The fabric is much more drapey than a wool or acrylic version.
The wide ribs are created by working multiple stitches into the back loop. This results in a softer, less rigid ridge that moves with the wearer.
Bamboo's natural lack of stiffness means the hat will conform more to the shape of the head, making it a very soft and flexible option.
Follow the yarn label for care, as bamboo can stretch if hung up while wet; always lay it flat to dry to maintain the hat's shape.
Fabric Qualities:
- High drape
- Soft ridge definition
- Conforms to head shape
How should you care for your beanies?
Proper care prevents your hats from shrinking or losing their shape over time. Always prioritize the instructions on the yarn label over general advice.
At a Glance:
- Follow the yarn label first
- Avoid high heat
- Lay flat to dry
- Check for loose threads
Avoid using hot water or high dryer heat, as these can damage acrylic and shrink wool or cotton. To maintain the shape of the ribs, lay the finished beanie flat to dry on a clean towel.
What are common beginner mistakes?
Many beginners struggle with tension, which can make a ribbed beanie too tight or too loose. Working a gauge swatch is the best way to avoid this.
At a Glance:
- Skipping the gauge swatch
- Tension being too tight
- Poorly woven ends
- Incorrect hook size
Another common error is forgetting to weave in ends securely. If the ends are not woven back and forth for several stitches, the seams can pull apart during wear.
Mistakes to Avoid:
- Ignoring the yarn label's hook suggestion
- Pulling the joining seam too tight
- Forgetting to measure the wearer
- Using the wrong stitch for the desired stretch
How can you build your skills?
Start with a simple BLO rib beanie to get comfortable with the texture. Once you can maintain consistent tension, try a two-color tapestry design.
At a Glance:
- Master BLO single crochet first
- Experiment with different fibers
- Try working in the round
- Practice different joining methods
Moving from flat construction to working in the round is a great next step. This removes the need for a side seam and teaches you how to manage a continuous circle of stitches.
Frequently Asked Questions
What is the difference between BLO and standard crochet?
Standard crochet uses both loops of the stitch. Back loop only (BLO) uses only the rear loop, which creates a raised ridge and a stretchier fabric.
Why is my beanie too tight?
This usually happens if the gauge swatch was skipped or if the tension is too tight. Check your hook size against the yarn label and re-measure the head.
Can I use any yarn for a rib beanie?
Yes, but different yarns change the result. Cotton has less stretch, while wool and acrylic provide more flexibility.
How do I stop the seam from showing?
Use a whip-stitched seam with a yarn needle instead of a slip stitch. This allows you to hide the join more effectively within the ribs.
Why does my tapestry crochet beanie not stretch?
Tapestry crochet carries an extra strand of yarn inside the stitches. This makes the fabric thicker and firmer, which naturally reduces the stretch.
How do I know when to change my hook size?
If your stitches feel too stiff or the hat is too small despite following the pattern, try a larger hook. If it is too loose, try a smaller one.
Final Thoughts on Crochet Rib Beanies
Creating a ribbed beanie is a rewarding way to explore how different stitches change the feel of a garment. Whether you prefer the stretch of BLO or the firmness of tapestry crochet, the key is consistency and correct measurement.
Please remember that this guide is an overview of styles and techniques. You should follow a complete, tested pattern for exact stitch counts, sizing, and assembly steps to ensure a successful project.
Always check your finished items regularly for loose threads or snagged fibers to keep them in great condition.