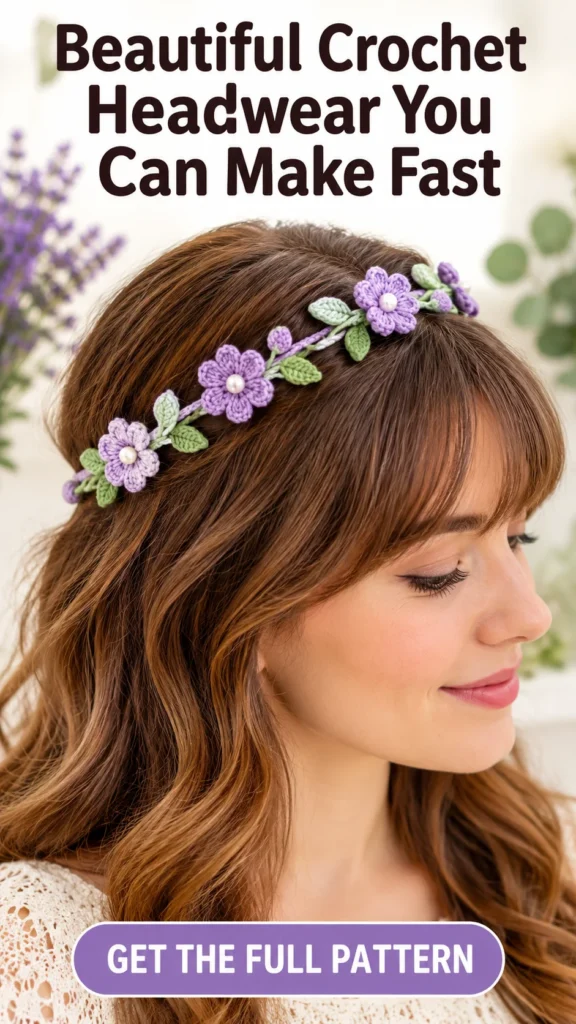
Search your yarn collection immediately. You likely have a cotton skein tucked away for a unique occasion; this dainty floral crown is the perfect use for your most beautiful fingering weight yarn.
The method of assembly is quite fascinating. First, you will employ a smart slip stitch method to produce a braided cord for the band. Following that, you will crochet individual motifs, including small flowers, circular berries, and petite leaves. Because these are joined at the conclusion, you have the freedom to shift their positions until you are satisfied with the layout.
Regarding the difficulty, this is an intermediate-level task. The challenge stems from using a tiny hook to create small details rather than any complex individual steps. As long as you are proficient with basic stitches and round crochet, this project is well within your reach. Allow four to seven hours for completion and remember to pause and rest.
Color Palette
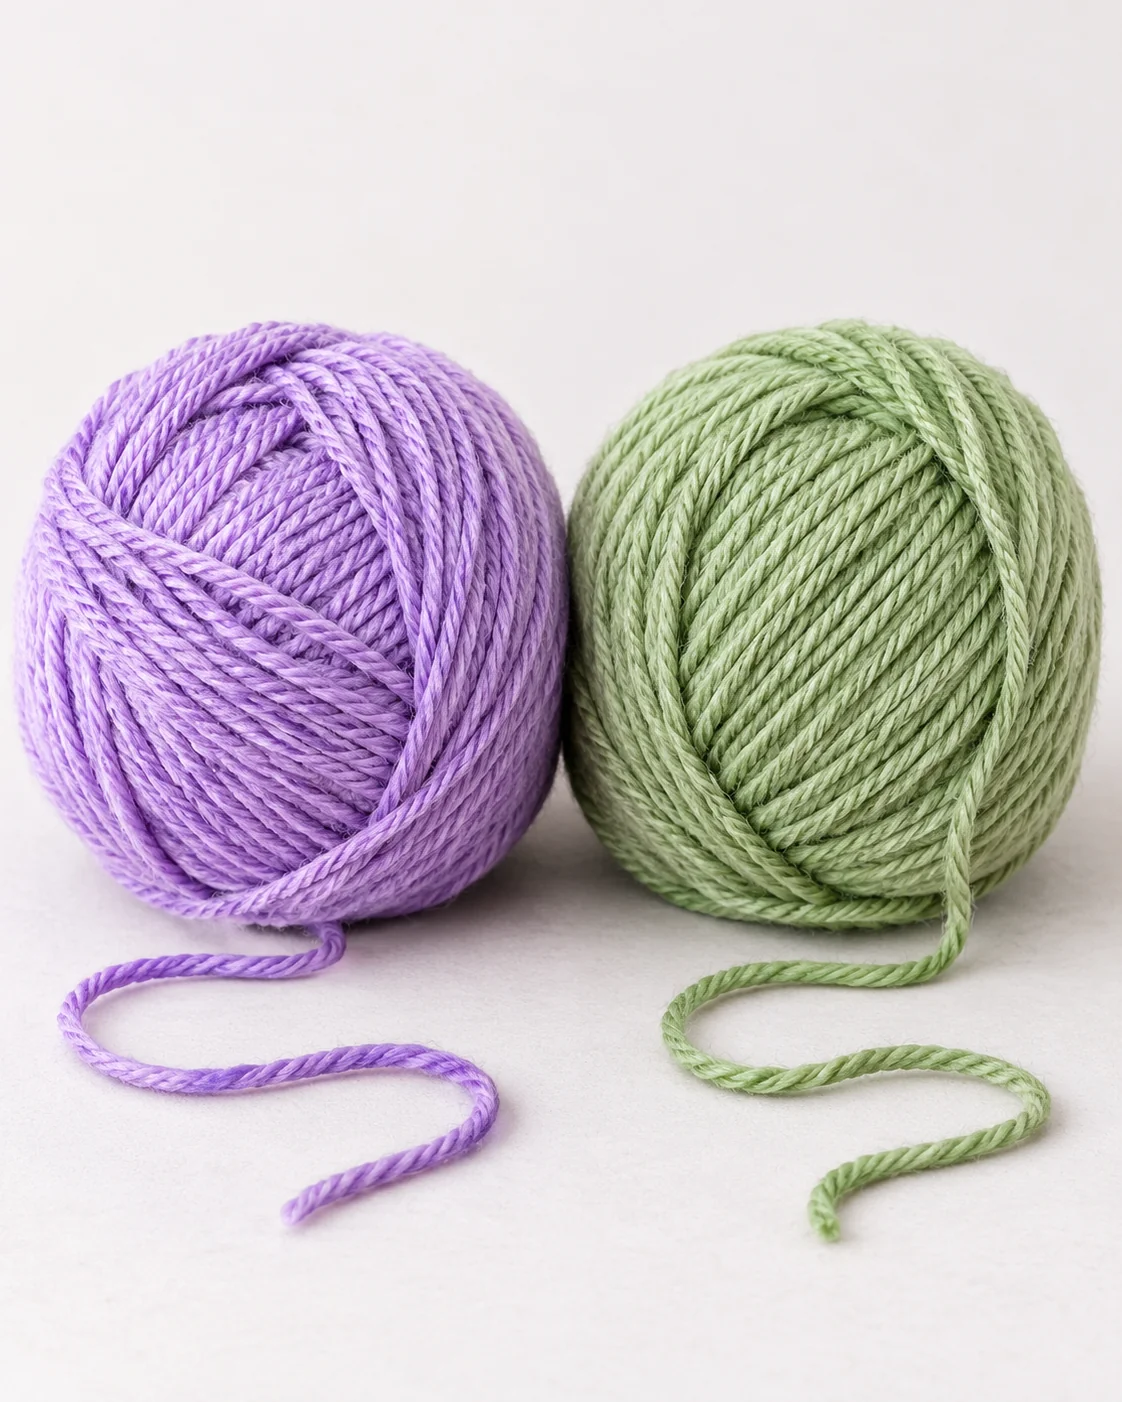
This version features a selection of hues that create an elegant and harmonious mood. The palette begins with lavender, which brings a soft, romantic quality to the design. This is followed by sage green, adding a grounded, organic feel that balances the floral tones. Together, these colors complement one another beautifully, blending a sense of serenity with a natural touch to ensure the overall look remains sophisticated and cohesive.
Reasons to Enjoy This Crochet Project
While the final result appears complex, this crown is actually composed of uncomplicated, small components. You can complete each flower in only two rounds, while the leaves are flat ovals that take roughly five minutes apiece. The berries are created as small spheres using a continuous spiral.
The true transformation occurs during assembly. By placing these small motifs onto the braided band, you create a stunning botanical headpiece perfect for a fairy tale photoshoot or a garden wedding.
Endless customization is a highlight of this design. You might choose yellow or pink instead of lavender, or substitute sage with cream for the leaves. You have the freedom to omit the berries or add more of them; the pattern provides the structure, but you control the creative choices.
Required Supplies
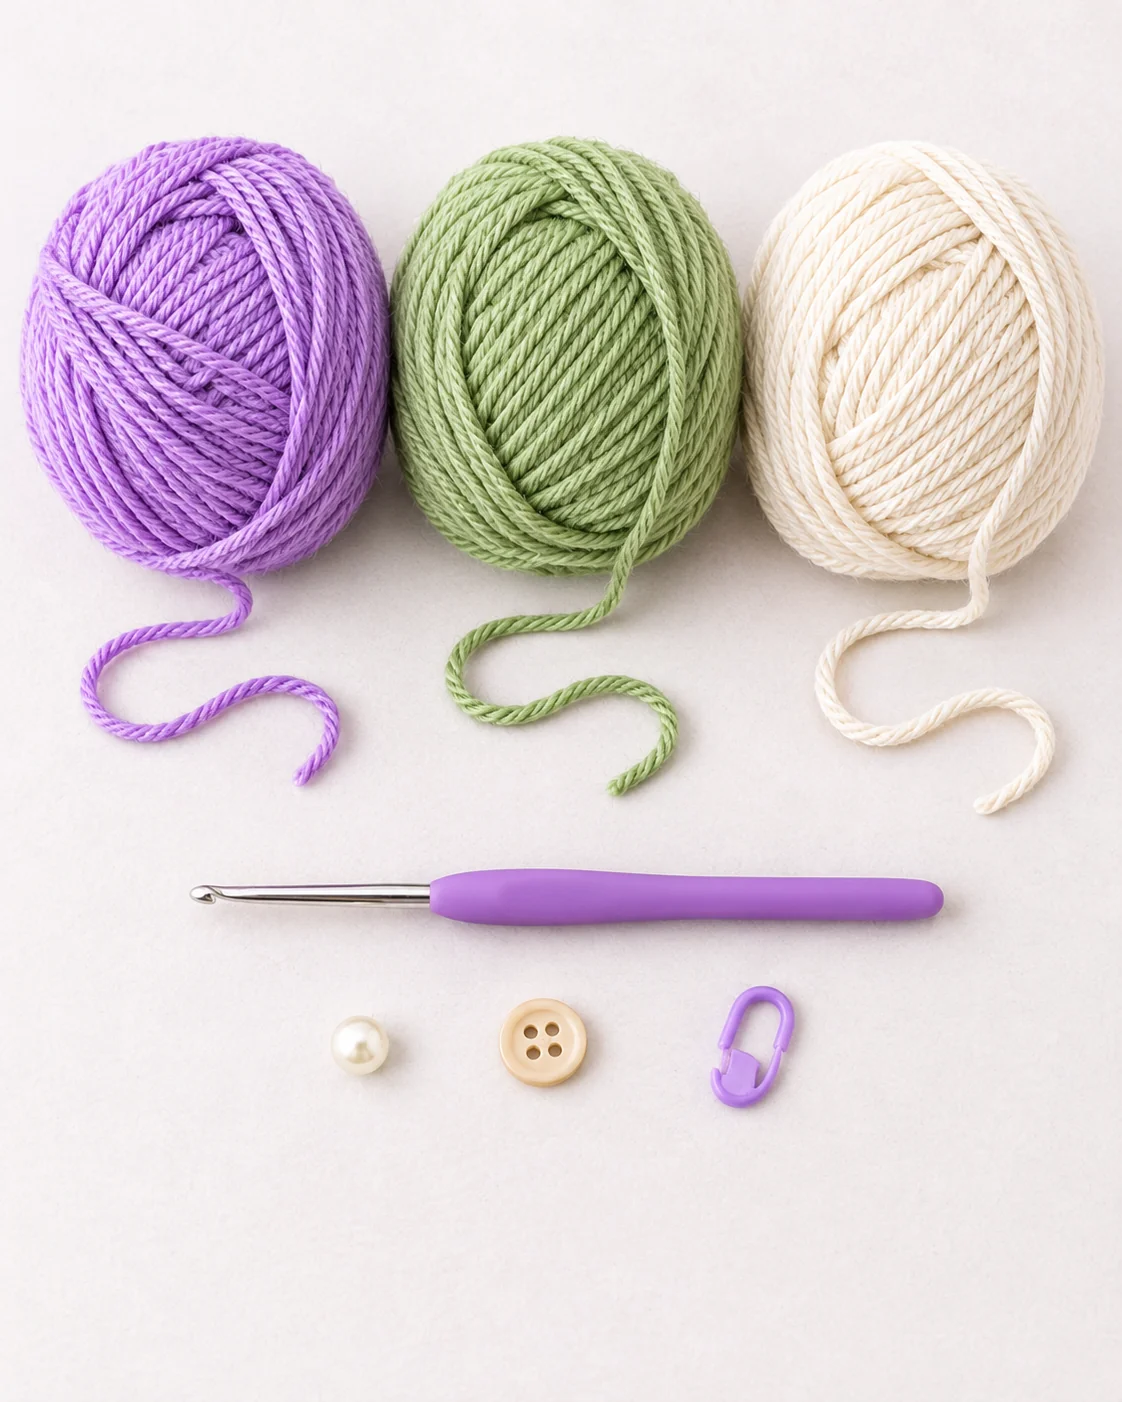
Yarn:
Color A (natural or linen tone): 100% cotton fingering weight yarn, approximately 80 yards or 73 meters
Color B (lavender): 100% cotton fingering weight yarn, approximately 30 yards or 27 meters
Color C (sage): 100% cotton fingering weight yarn, approximately 30 yards or 27 meters
Hook: US size B-1 / 2.25 mm crochet hook
Notions:
Recommended Yarns
For a result with a slight mercerized sheen, Lion Brand 24/7 Cotton in Ecru, Lavender, and Sage is a widely available option.
If you prefer Paintbox Yarns Simply DK Cotton in Champagne White, Wisteria Purple, and Pistachio Green, be aware that this is a DK weight yarn. Using this will require a US size E-4 / 3.5 mm hook and will result in motifs approximately 20% larger.
To achieve the listed gauge with crisp, clean motifs and fine detail, DMC Natura Just Cotton in Nacar, Viola, and Vert Mousse is an ideal choice due to its fingering weight.
You may use any light DK or smooth fingering weight cotton. To ensure the stitch definition of the small motifs remains clear, do not use textured or fuzzy yarns.
Final Dimensions
The band circumference measures roughly 20 to 22 inches or 51 to 56 cm, though this can be adjusted by changing the tie length.
The band width is about 1/4 inch or 0.6 cm.
The decorative front section spans approximately 7 inches or 18 cm in length.
Each flower diameter is roughly 1 inch or 2.5 cm.
Each berry diameter is approximately 3/8 inch or 1 cm.
Each leaf length is about 1 inch or 2.5 cm.
Gauge
Utilize a US B-1 / 2.25 mm hook and fingering weight yarn.
To ensure the finished crown fits comfortably, create a swatch of the braided band before starting, as gauge is important for this project.
Pattern Terminology and Abbreviations
ch:chain
sl st:slip stitch (insert hook, yarn over, pull through stitch and loop on hook in one motion)
sc:single crochet (insert hook, yarn over, pull up a loop, yarn over, pull through both loops)
hdc:half double crochet (yarn over, insert hook, pull up a loop, yarn over, pull through all three loops)
dc:double crochet (yarn over, insert hook, pull up a loop, yarn over, pull through two loops, yarn over, pull through remaining two loops)
MR:magic ring (adjustable starting ring for working in the round)
st(s):stitch(es)
flo:front loop only
sc2tog:single crochet two together (a decrease that turns two stitches into one)
pm:place marker
RS:right side
WS:wrong side
Unique Methods
Creating the Braided Chain Band
To achieve a look resembling a twisted rope, slip stitches are worked into both sides of a foundation chain. The process is as follows:
Step 1: Work the foundation chain to your desired length.
Step 2: Turn. Beginning in the 2nd chain from the hook, slip stitch into the back bump of each chain across. The back bump is the third loop on the back of each chain stitch. Do not turn when you finish.
Step 3: Rotate the piece 180 degrees so you are now working along the opposite side of the foundation chain. Slip stitch into each of the unused front loops of the original foundation chain across. Fasten off.
The result is a sturdy, gently curved band that maintains its form well and features a braided texture on the top.
Picot (Optional for Leaf Tips)
To add a small decorative knot for extra detail at the leaf tip, chain 3 and then slip stitch into the first of those 3 chains.
Step by Step Crochet Pattern Instructions
Section 1: The Band
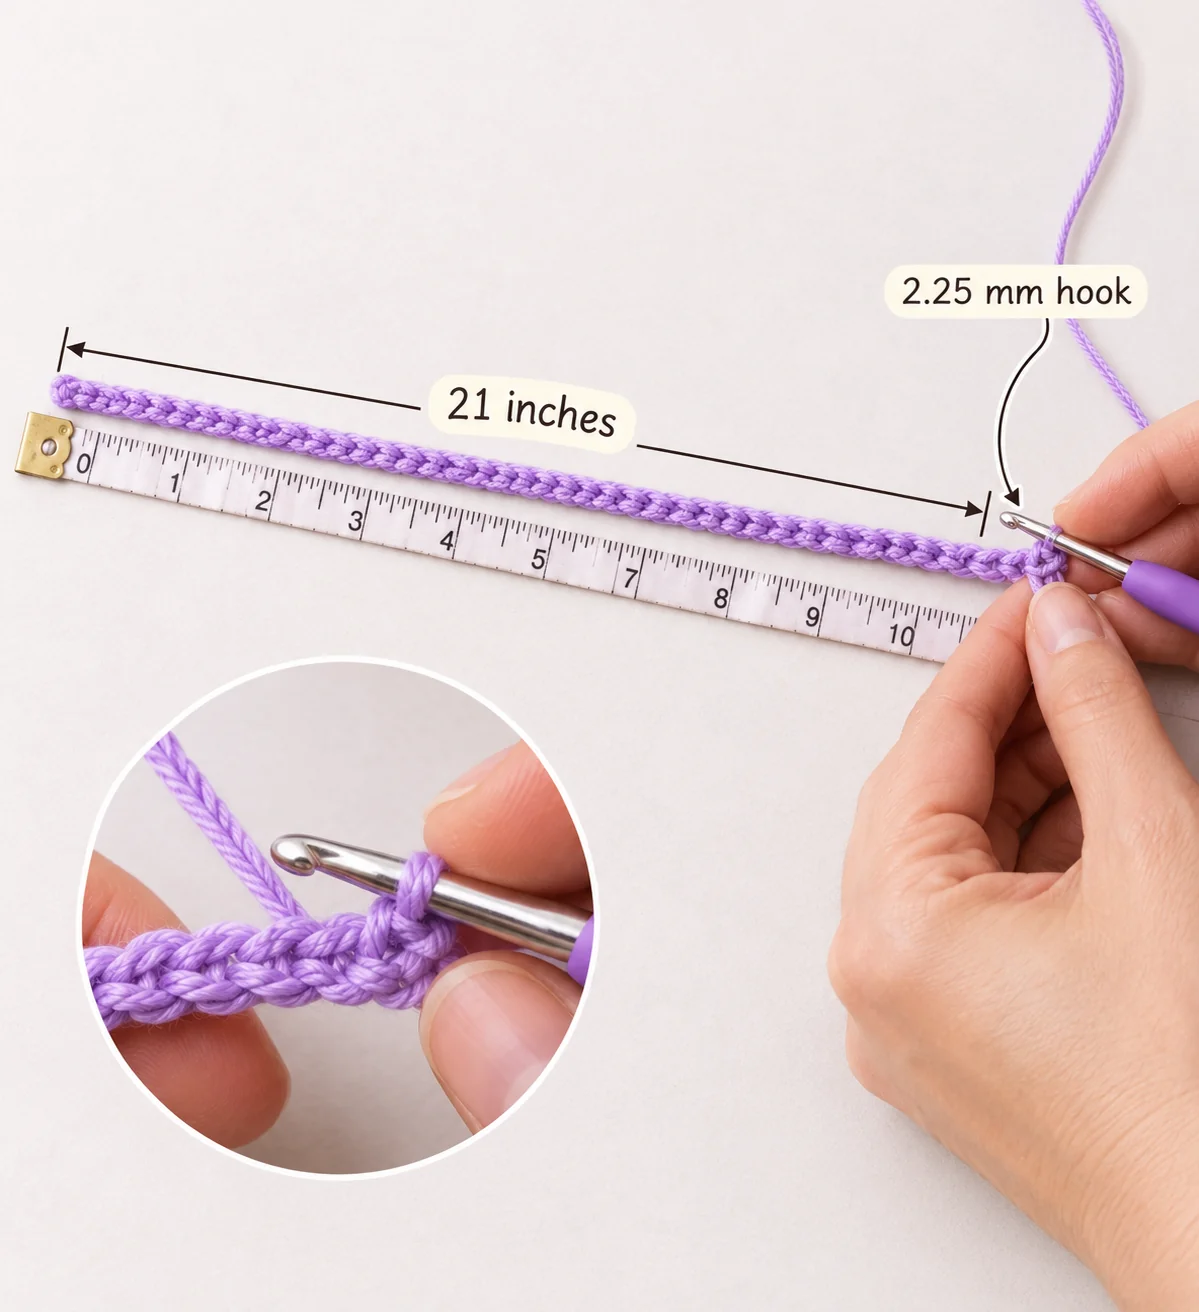
With Color A and your 2.25 mm hook, work as follows.
Foundation chain: Ch 160.
This yields a band approximately 10 inches or 25.5 cm long before the braiding technique. The braiding draws in the chain slightly, producing a finished length of approximately 9 inches or 23 cm of rigid band. Two 6 inch tie tails at each end bring the total wearable length to approximately 21 inches or 53 cm.
Row 1 (Braiding Pass 1): Turn. Beginning in the 2nd ch from the hook, sl st into the back bump of each ch across. Do not fasten off and do not turn. (159 sl sts)
Row 2 (Braiding Pass 2): Rotate work 180 degrees. Working along the opposite side of the foundation chain, sl st into each unused front loop of the original foundation chain across. (159 sl sts)
Fasten off, leaving a 6 inch tail for finishing. If you are using the tie method, leave a longer tail.
Checkpoint: Your completed band should measure approximately 9 to 9.5 inches or 23 to 24 cm in length. It should have a firm, braided cord appearance and hold its shape without curling.
Section 2: The Flowers
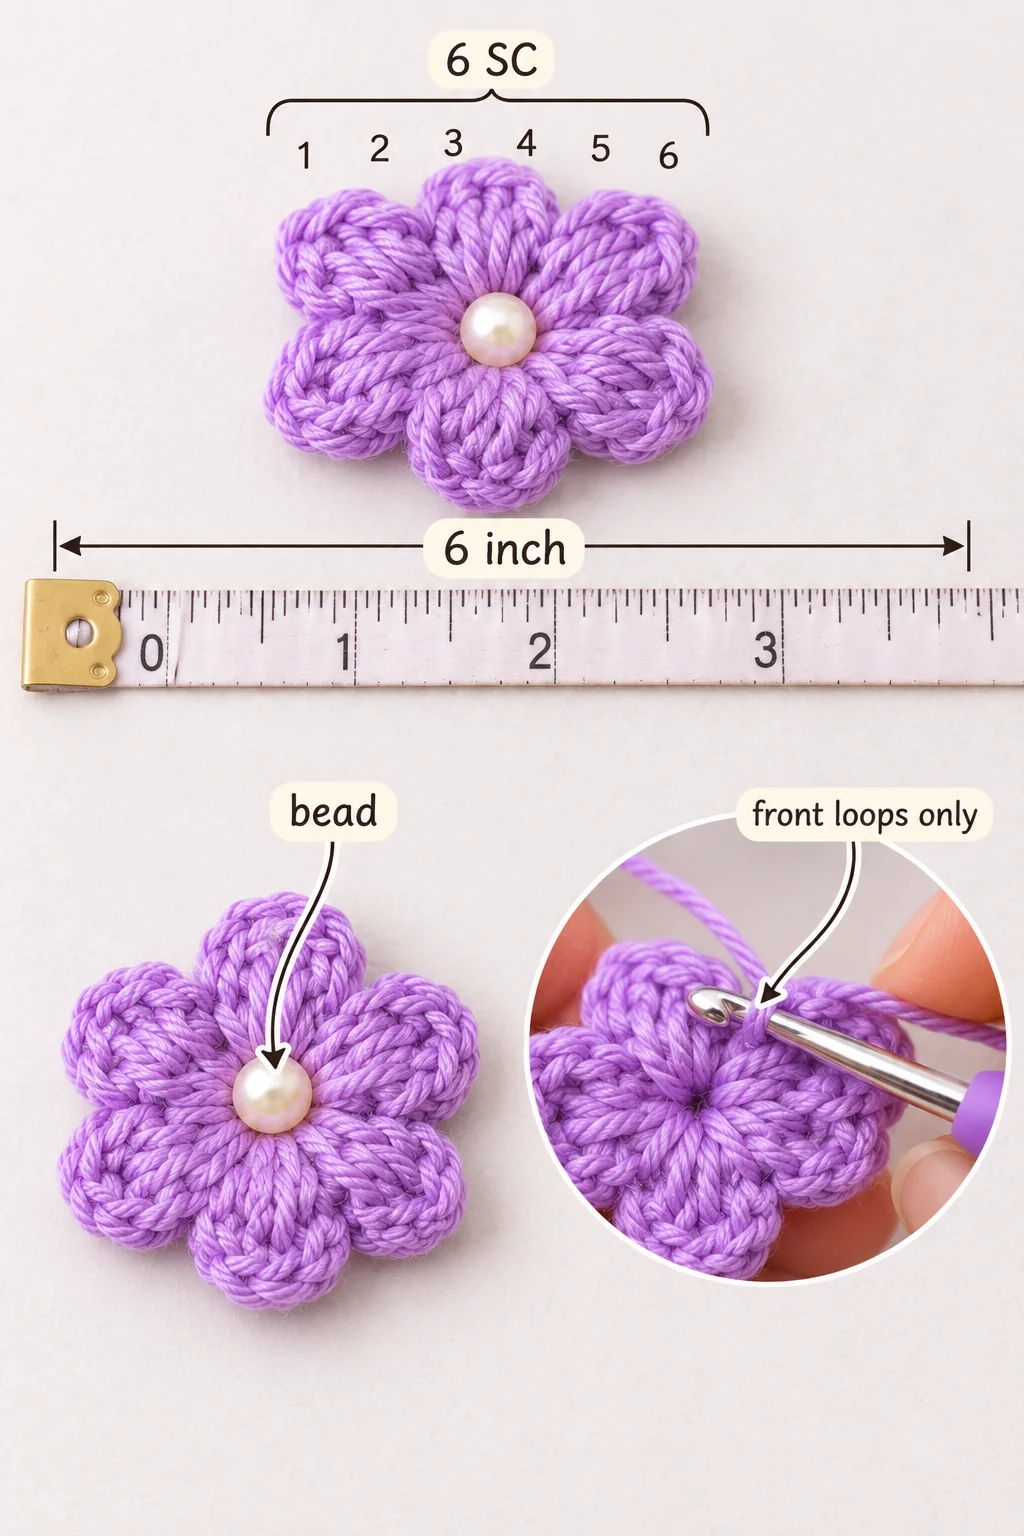
Make 3 flowers in Color B.
Round 1: Make a MR. Ch 1 (does not count as a st). Work 6 sc into the MR. Pull ring closed. Sl st to first sc to join. (6 sc)
Round 2: Ch 1 (does not count as a st). Working in front loops only for this round, work (sc, hdc, dc, hdc, sc) into each st around. This creates 6 petals. Sl st to first sc to join. (30 sts total: 6 petals each consisting of 5 sts)
Fasten off, leaving a 6 inch tail for sewing.
The pearl bead will be sewn to the center of each flower during assembly. Set your beads aside for now.
Section 3: The Berries
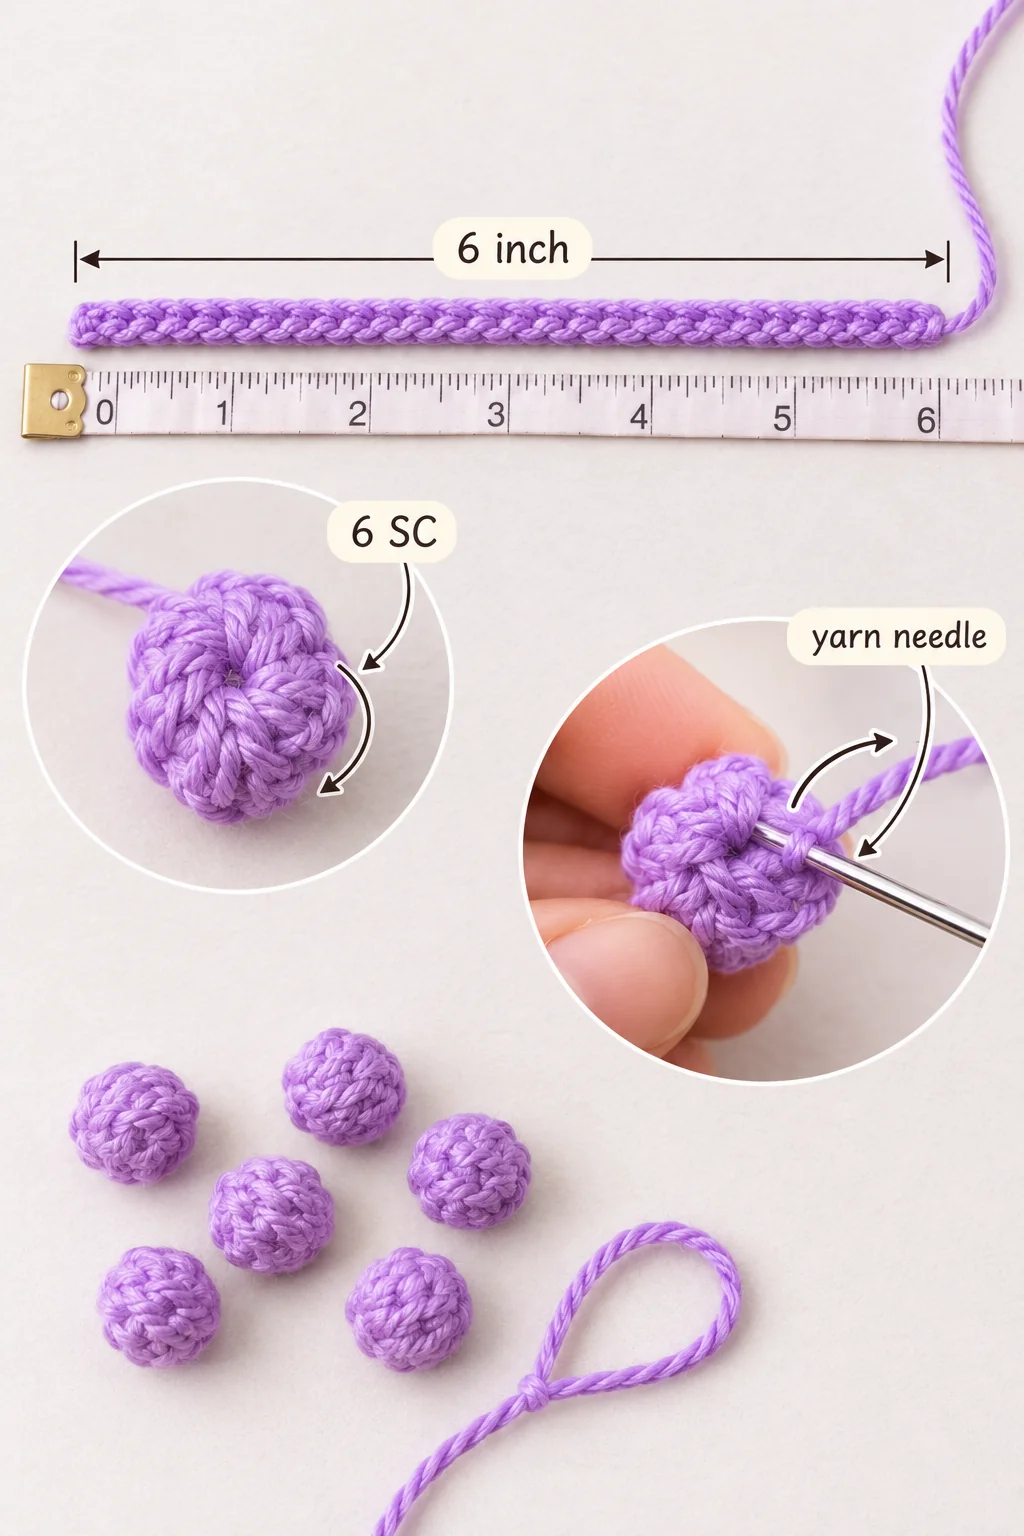
Make 5 berries (or 6 for a fuller arrangement) in Color B.
Round 1: Make a MR. Ch 1 (does not count as a st). Work 6 sc into the MR. Pull ring closed. Do not join. (6 sc)
Round 2: Working in a continuous spiral (pm in first st of round to track beginning), 2 sc in each st around. (12 sc)
Round 3: Sc in each st around. (12 sc)
Round 4: Sc2tog around until 6 sts remain. You can stuff lightly with a small amount of yarn scraps or leave unstuffed for a flatter profile. The crown shown appears to have lightly stuffed berries, giving a round bobble look. (6 sc)
Round 5: Sc2tog around. (3 sc)
Fasten off, leaving a 6 inch tail. Thread tail onto yarn needle and pass through remaining 3 sts, pull to close opening. Knot to secure.
Section 4: The Leaves
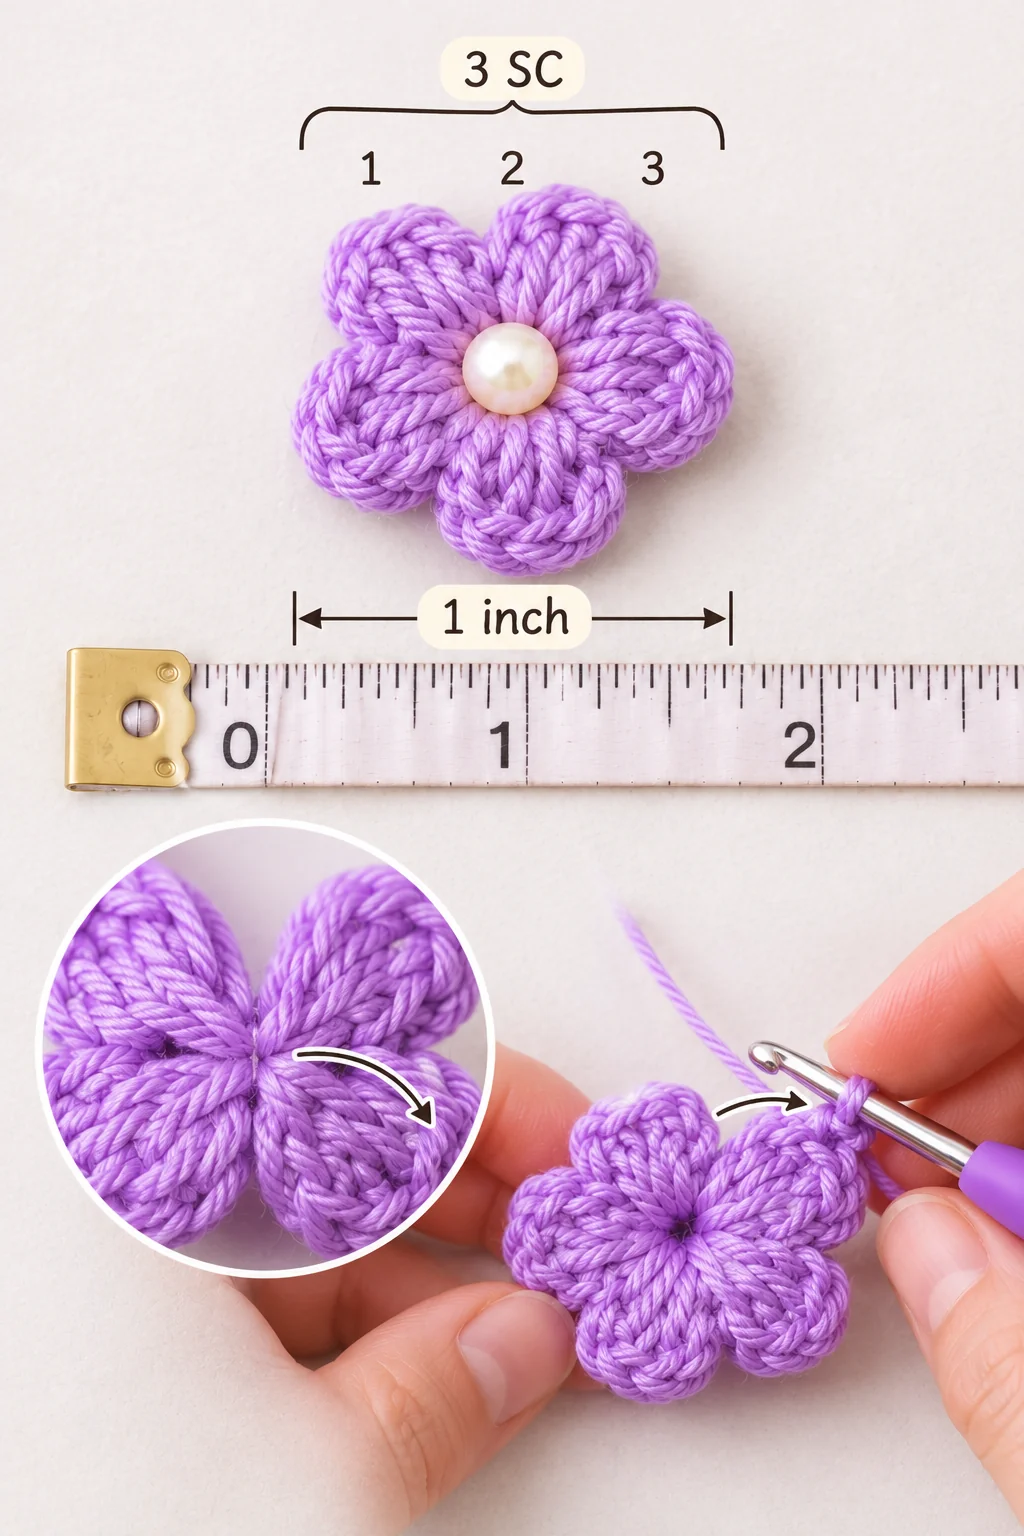
Make 6 to 8 leaves in Color C. Each leaf is worked flat in rows.
Foundation: Ch 7.
Row 1 (RS): Starting in the 2nd ch from the hook, sc in next 1 ch, hdc in next 1 ch, dc in next 1 ch, hdc in next 1 ch, sc in next 1 ch, then work 3 sc into the last ch (this is the leaf tip).
Rotating to work along the opposite side of the foundation chain, sc in next 1 ch, hdc in next 1 ch, dc in next 1 ch, hdc in next 1 ch, sc in next 1 ch. Sl st to the first sc at the base to join. (13 sts around the leaf perimeter, not counting the sl st join)
Fasten off, leaving a 6 inch tail for sewing.
Optional detail: For leaves with a slightly pointed tip, substitute a picot at the center of the 3 sc tip. Work sc, ch 3, sl st into first of those 3 chs (picot), sc into the same tip chain space.
Checkpoint: Each leaf should measure approximately 1 inch or 2.5 cm long and 1/2 inch or 1.3 cm wide at its widest point. Each berry should measure approximately 3/8 to 1/2 inch or 1 to 1.3 cm in diameter. Each flower should measure approximately 1 inch or 2.5 cm across.
How to Customize the Size
For a smaller head or child size: Reduce the foundation chain by 16 stitches per inch you wish to remove. For a head circumference of 18 to 19 inches, reduce to ch 128 and adjust tie length as needed.
For a larger head or looser fit: Add 16 stitches per inch you wish to add. For a head circumference of 23 to 24 inches, increase to ch 176.
For a longer decorative section: Make 4 flowers instead of 3 and 8 to 10 berries and 10 leaves, spacing them to cover 9 inches or 23 cm of the front band.
Hook size adjustments: Moving to a US C-2 / 2.75 mm hook will produce motifs and band approximately 10 to 12% larger. Moving to a US D-3 / 3.25 mm hook produces motifs approximately 20% larger, which is more suitable for DK weight yarn.
Finishing and Assembly
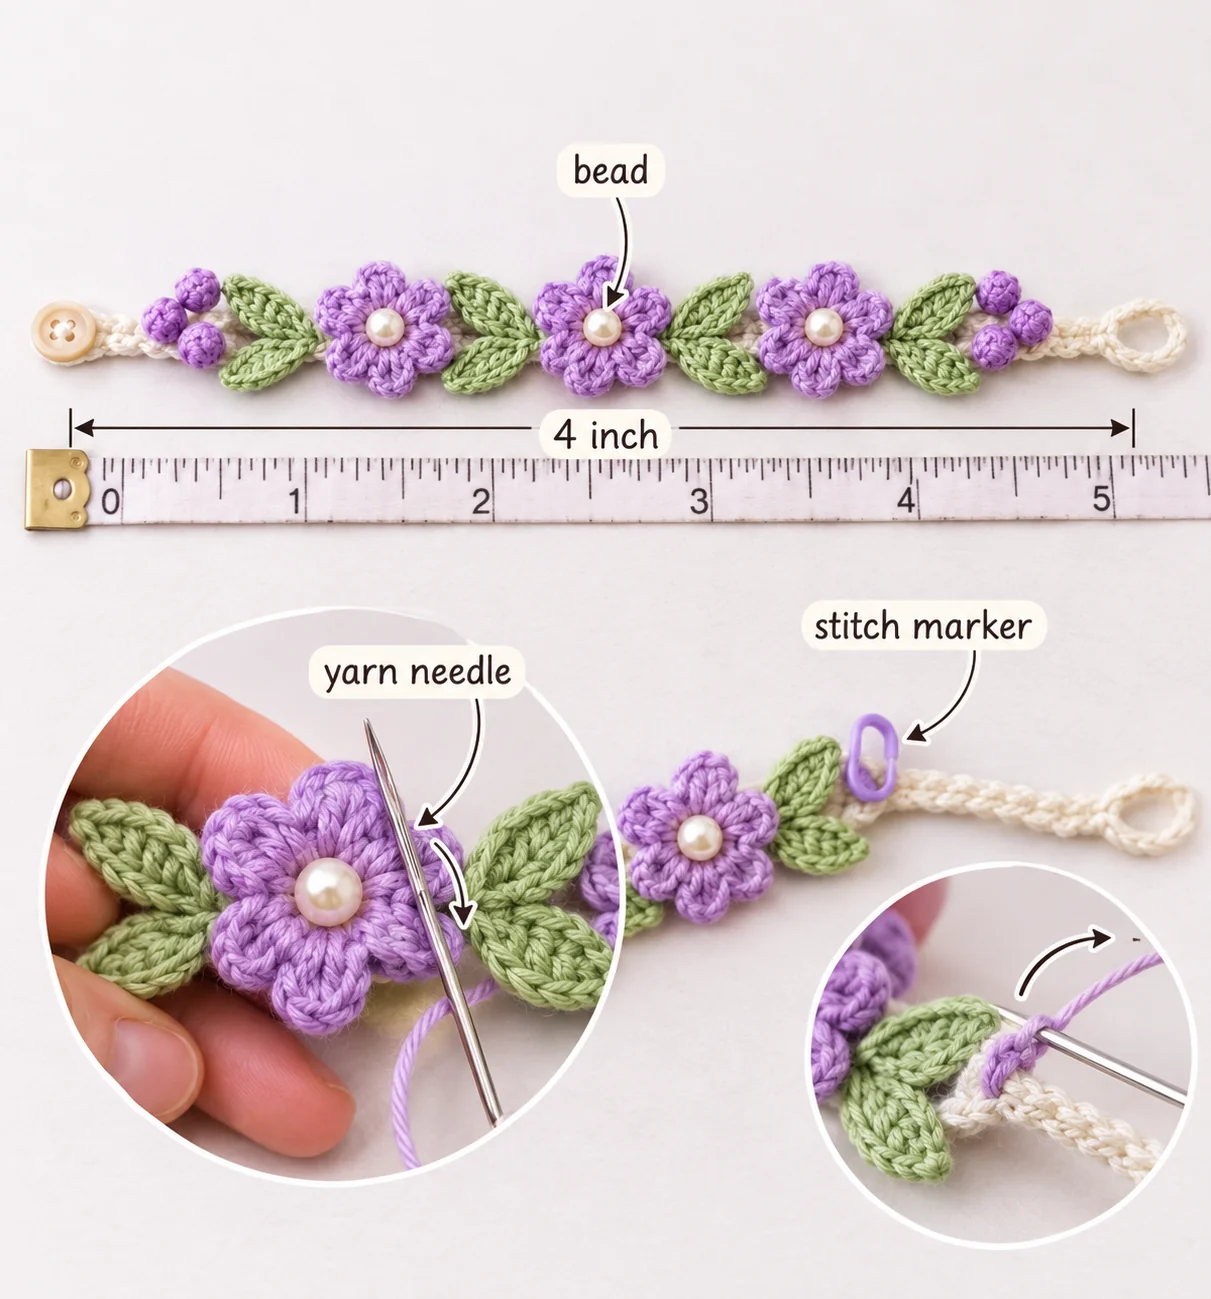
Step 1: Weave in all ends on all motifs except the sewing tails. You need those tails to attach everything to the band.
Step 2: Block the flowers and leaves lightly. Pin them flat on a foam blocking board, mist with water, and allow to dry completely. Blocking opens the petals and flattens the leaves for a much neater finished appearance. Do not skip this step.
Step 3: Lay the completed band flat on your work surface. Mark the center 7 inches or 18 cm of the band with stitch markers or pins. This is your decorative placement zone.
Step 4: Arrange the motifs along the marked front section of the band without sewing, following this layout:
Left end:1 berry cluster (1 to 2 berries), 1 leaf pair, 1 flower
Center:1 leaf pair, 1 flower (centered exactly at the midpoint of the decorative section as the focal point), 1 leaf pair
Right end:1 flower, 1 leaf pair, 1 to 2 berries
Fill remaining gaps between motifs with single leaves or lone berries as desired. The vine appearance comes from the braided cord itself acting as the stem, so position motifs close to or slightly overlapping the band.
Step 5: Once you are happy with the arrangement, pin all motifs in place.
Step 6: Using the sewing tails and a yarn needle, sew each motif to the band with several secure stitches. Pass the needle through the band stitches to anchor well. For berries, stitch through the base. For leaves, stitch along the center spine at the base. For flowers, stitch through the back at the center.
Step 7: Using a beading needle and matching white or cream thread, sew one pearl bead securely to the center of each flower. Pass the thread through the bead at least 3 times and knot firmly at the back of the flower.
Step 8: Weave in all remaining ends.
Step 9: Finish the ends of the band using your chosen method.
For the tie method: Trim ends to 6 inches or 15 cm or longer if desired. You can leave the ends as plain cord for tying or wrap with a few overhand knots to prevent fraying. If the yarn end frays, apply a small amount of fabric glue or clear nail polish to the tip.
For the button and loop method: Sew a small button to one end of the band approximately 1/4 inch or 0.6 cm from the end. At the opposite end, attach Color A yarn with a sl st and ch 6, sl st back into the same point on the band to form a loop. Fasten off and weave in end. Try the loop over the button before fastening off to ensure a secure but workable fit.
Blocking Your Finished Crown
Wet blocking is recommended for the best results. Submerge all finished motifs and the completed assembled crown briefly in cool water. Gently squeeze out excess water without wringing. Pin to a foam mat in the desired shape, opening petals on flowers and smoothing leaves flat. Allow to dry fully before wearing.
Cotton holds its blocked shape beautifully. This step makes a significant difference in how polished your finished crown looks.
Maintenance and Care
Use a mild soap and cool water to hand wash the item. To dry, lay it flat, ensuring you do not twist or wring the fabric. You can restore the crown’s shape if it becomes distorted during use by gently reshaping it by hand after a light misting of water.
To prevent the dimensional motifs from being crushed, keep the crown loosely coiled or stored flat. Hand washing is acceptable if the beads are sewn on securely; if not, detach the beaded flowers prior to cleaning and sew them back on once the piece is dry.
Essential Pattern Guidelines
Complete the creation of every motif prior to joining them to the band. This approach allows you to verify your total count and modify the number of pieces if necessary.
To ensure comfort against the head, the back of the crown remains plain. The decorative elements are concentrated across the front 7 inches, occupying about the center third of the piece.
Unless the instructions state otherwise, maintain the right side facing and avoid turning your work between rounds.
For the example shown, sage green was used for all leaves, lavender for all berries and flowers, and a natural linen toned Color A for the band. You may choose any three complementary colors that make your heart happy.
Ideal Occasions for This Crochet Crown
Whether you are dressing up as a woodland princess at home or preparing for a garden wedding, this wildflower crown is a breathtaking addition. It is an excellent choice for flower girl attire, fairy costumes, birthday parties, or professional photo shoots.
Because it looks so professional, it serves as a wonderful handcrafted present that will surprise the recipient.
I appreciate you selecting this lavender Wildflower Crochet Crown pattern. My hope is that the process of making it is as rewarding as wearing the final piece. Please share a picture of your completed work or tag me on Instagram and Facebook; seeing your finished projects is truly a highlight for me.
Feel free to leave a comment if you have questions or want to describe your results, as I read every message. You can also save this pattern to a Pinterest board to easily locate it when you are prepared to begin.
Related Designs
- Mint Green Shell Stitch Baby Dress Free Crochet Pattern
- Sage Green Romantic Peplum Crochet Top Free Pattern
- Sage Green Halter Peplum Dress Free Crochet Pattern
- Ocean Wave Granny Square Bamboo Tote Free Crochet Pattern
You Did It!
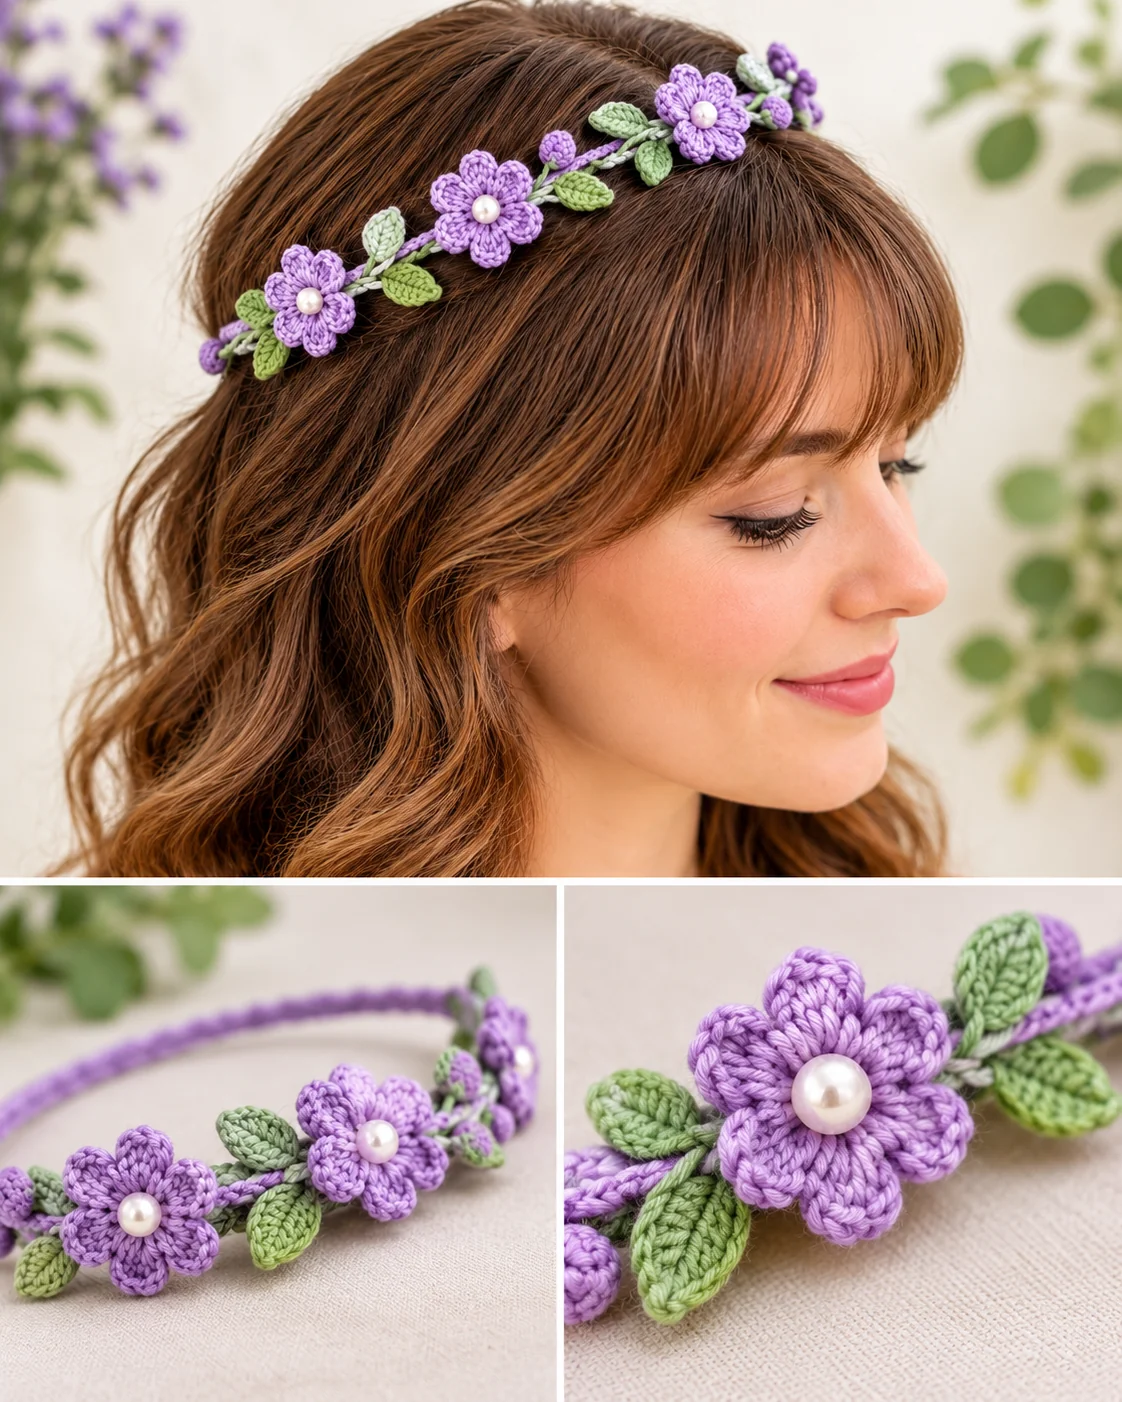
Congratulations on completing your Lavender Wildflower Crochet Crown! Take a moment to look at the final photo to compare your overall shape and those delicate close-up details. Enjoy wearing your beautiful new botanical headpiece!