

I don’t know about you, but I have a serious soft spot for anything that gives off storybook vibes. A child in a hooded cape? Instant fairytale energy.
This Winter Berry Hooded Cape delivers all the cozy, whimsical charm without complicated construction. The color-blocked stripes work up in simple half double crochet, and the hood attaches with basic seaming. No fussy shaping, no confusing decreases, just straightforward rounds that grow bigger as you go.
If you’ve been wanting to make something that looks impressive but won’t leave you tangled in confusion, this is your project. Let me walk you through every stitch.
Details Regarding the Hooded Cape Crochet Design
To achieve the elegant A-line shape, this cape is constructed from the neckline downward. Despite its appearance, the method is straightforward; the body consists of joined rounds with increases placed at four equidistant points to create the flare.
The hood is crocheted as a flat rectangle before being folded and seamed at the top and joined to the neckline. Finishing touches include a braided tie with tassels for the closure and a burgundy picot edging along the hem.
Basic stitches are used to create a high-end look through four color-blocked sections: the hood and trim are burgundy, the upper portion is dusty rose, the middle is cream, and the bottom section is forest green.
Designed for children roughly 4 to 8 years old, this garment typically reaches mid-thigh for a child of average height. Instructions for adjusting the size are provided at the conclusion of the pattern.
Required Experience
Designed for those with intermediate skills, this project requires proficiency in basic seaming, executing tidy color changes, and crocheting in joined rounds. If you have prior experience creating a simple sweater or a hat, you are well-prepared for this pattern.
While the finishing process and the sequence of construction may seem daunting to absolute beginners, the detailed step-by-step instructions make it possible to acquire these new skills during the process.
Final Dimensions
The neckline circumference measures 22 inches / 56 cm.
From the center back shoulder to the hem, the cape length is 18 inches / 46 cm.
The hood height is 10 inches / 25.5 cm.
Measured from front to back, the hood depth is 9 inches / 23 cm.
The hem circumference is roughly 62 inches / 157.5 cm.
Required Supplies
Yarn:
You will need roughly 1000 yards / 914 m of total yardage.
Ensure all yarn used is worsted weight (size 4).
Hook: US size J / 6.0 mm crochet hook
Notions:
Recommended Yarns
For a cost-effective option that is machine washable and provides great stitch definition, Lion Brand Pound of Love> is an excellent choice.
If you prefer a softer feel, Cascade 220 Superwash> is ideal. Its superwash wool is machine washable and gentle for children.
Using a J hook with Paintbox Yarns Simply DK> results in a slightly looser drape, which complements the silhouette of the cape.
Steer clear of mohair blends or yarns with a heavy halo, as these will hide the thick texture of the half double crochet stitches. Ensure any yarn chosen for children’s wear is washable.
Gauge
14 hdc x 10 rows = 4 inches / 10 cm, worked in rows with a J/6.0 mm hook, blocked.
Gauge matters for this pattern. If your gauge is off, the neckline might be too small to fit over a child’s head or too large to sit properly on the shoulders. Take time to swatch before you begin.
Abbreviations and Stitch Definitions
ch = chain: wrap yarn over hook, pull through loop on hook
sl st = slip stitch: insert hook, yarn over, pull through stitch and loop on hook in one motion
sc = single crochet: insert hook, yarn over, pull up loop (2 loops on hook), yarn over, pull through both loops
hdc = half double crochet: yarn over, insert hook, yarn over, pull up loop (3 loops on hook), yarn over, pull through all 3 loops
hdc2tog = half double crochet 2 together (decrease): insert hook into next stitch, yarn over, pull up a loop (3 loops on hook), insert hook into following stitch, yarn over, pull up a loop (5 loops on hook), yarn over, draw through all 5 loops
st(s) = stitch(es)
rnd = round
RS = right side
WS = wrong side
t-ch = turning chain
pm = place marker
Special Techniques
Picot Edging
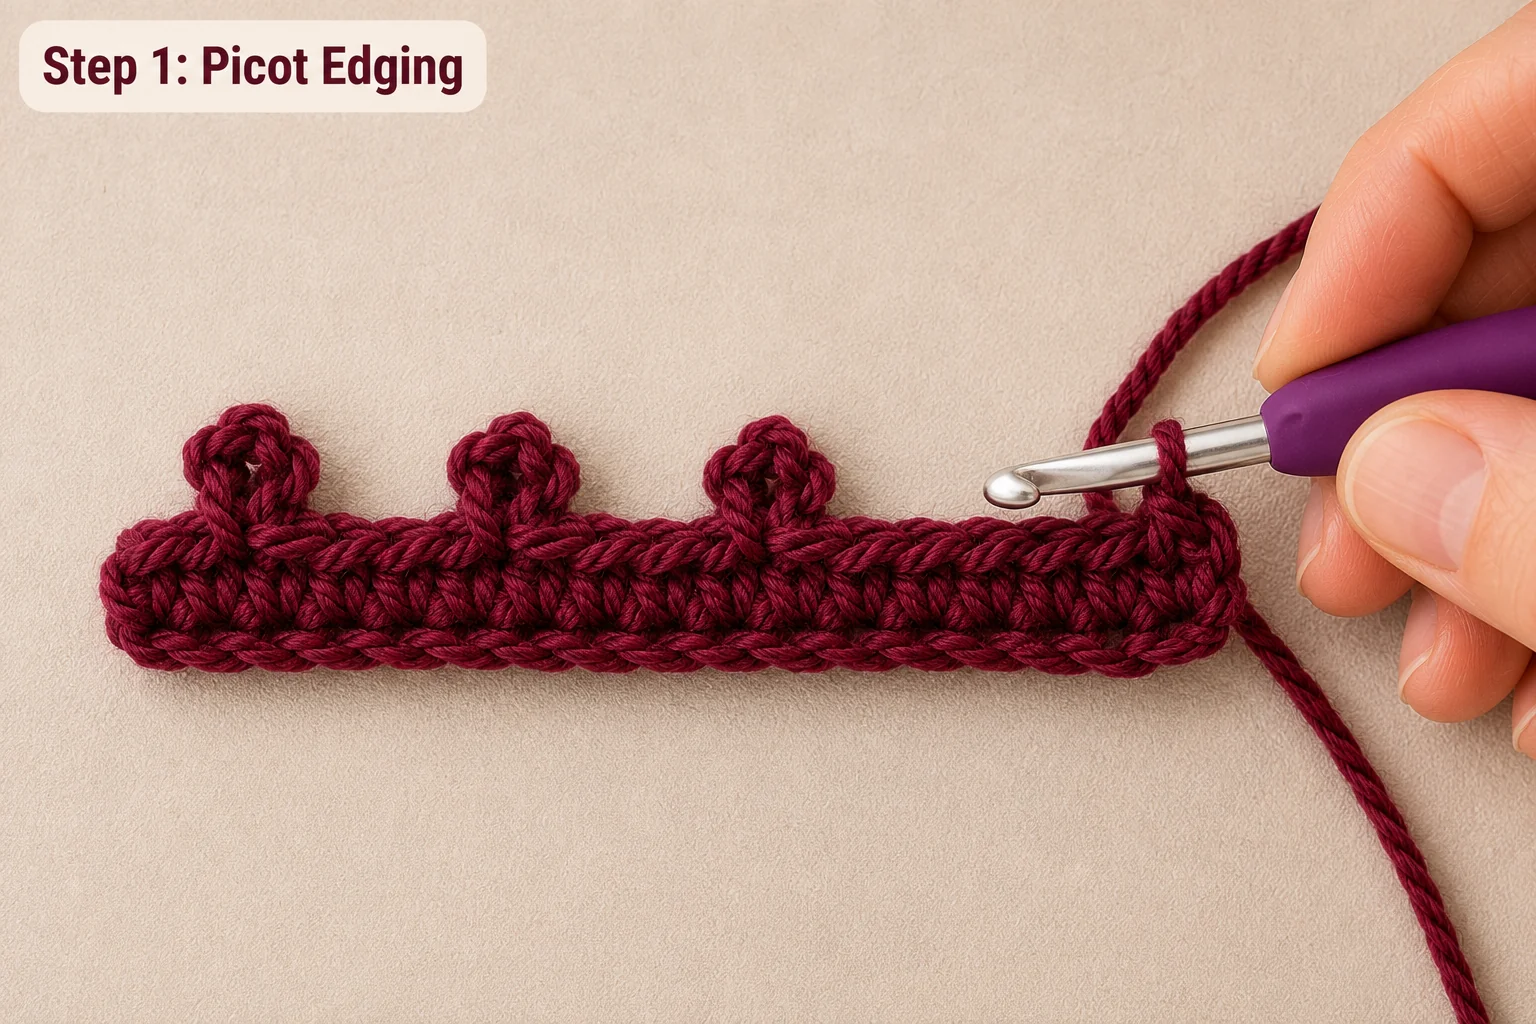
This creates the decorative scalloped border you see along the hem.
Step 1: Work 1 sc into the first stitch.
Step 2: Chain 3.
Step 3: Slip stitch into the first chain made (the one closest to the hook) to form a small picot knot.
Step 4: Work 1 sc into each of the next 2 stitches.
Step 5: Repeat steps 2 through 4 across the edge.
Braided Tie

Cut 12 strands of Color A, each 36 inches / 91.5 cm long. Divide into 3 groups of 4 strands. Align all ends evenly and tie an overhand knot at the top, leaving a 1 inch / 2.5 cm tail above the knot. Braid the three groups together firmly for approximately 10 inches / 25.5 cm. Tie an overhand knot at the end of the braid to secure. Trim the tail ends below the bottom knot to 2.5 inches / 6.5 cm to form a tassel. Separate and fluff the tassel strands. Make 2 identical braided ties.
Pattern Notes Before You Begin
1. The cape body is worked in joined rounds from the top down. The right side faces out throughout.
2. The hood is worked separately in flat rows, then folded and seamed at the top, and attached to the neckline after the cape body is complete.
3. All color changes are made on the last yarn over of the final stitch of a round before the new color is needed. Cut and join colors cleanly.
4. The ch-2 at the start of each round counts as the first hdc. The last stitch of each round is worked into the top of the ch-2 from the previous round.
5. The cape has a split at the center front, forming two open front panels. The tie closes the cape at the neckline.
6. Markers are placed at the 4 increase points. Move markers up each round.
Cape Body Instructions
The cape body begins at the neckline and is worked downward in rounds.
Setup
Using Color A and a J/6.0 mm hook, chain 80. Being careful not to twist the chain, slip stitch into the first chain to form a ring.
Foundation Round: Ch 2 (counts as first hdc). Hdc in each of next 77 ch around. Join with sl st to top of ch-2. (78 hdc)
Place markers at the following positions to mark increase points:
Increase Method: On each increase round, work 2 hdc into each marked stitch. This adds 4 stitches per increase round. Move markers into the first of the 2 hdc worked into the old marked stitch each round.
Color A Section (Neckline Band)

Rounds 1 through 3: Work even in hdc, no increases. Join each round with sl st to top of ch-2. (78 hdc each round)
At the end of Round 3, fasten off Color A. The hood will be seamed here after the body is complete.
Switch to Color B (Dusty Rose).
Color B Section (Dusty Rose Upper Cape)

Round 4: Join Color B with sl st to top of ch-2 of previous round. Ch 2, work 2 hdc into same st (increase at marker 1 position). Hdc across to marker 2, 2 hdc into marker 2 st. Hdc across to marker 3, 2 hdc into marker 3 st. Hdc across to marker 4, 2 hdc into marker 4 st. Hdc to end of round. Join with sl st to top of ch-2. (82 hdc)
Round 5: Ch 2, hdc into each st around, working 2 hdc into each of the 4 marked sts. Join. (86 hdc)
Round 6: Ch 2, hdc into each st around, working 2 hdc into each of the 4 marked sts. Join. (90 hdc)
Round 7: Ch 2, hdc into each st around, working 2 hdc into each of the 4 marked sts. Join. (94 hdc)
Round 8: Ch 2, hdc into each st around, working 2 hdc into each of the 4 marked sts. Join. (98 hdc)
Round 9: Ch 2, hdc into each st around, working 2 hdc into each of the 4 marked sts. Join. (102 hdc)
Round 10: Ch 2, hdc into each st around, working 2 hdc into each of the 4 marked sts. Join. (106 hdc)
Round 11: Ch 2, hdc into each st around, working 2 hdc into each of the 4 marked sts. Join. (110 hdc)
Round 12: Ch 2, hdc into each st around, working 2 hdc into each of the 4 marked sts. Join. (114 hdc)
Round 13: Ch 2, hdc into each st around, working 2 hdc into each of the 4 marked sts. Join. (118 hdc)
Round 14: Ch 2, hdc into each st around, working 2 hdc into each of the 4 marked sts. Join. (122 hdc)
Round 15: Ch 2, hdc into each st around, working 2 hdc into each of the 4 marked sts. Join. (126 hdc)
At the end of Round 15, fasten off Color B.
Checkpoint: After completing Round 15, the cape body should measure approximately 7.5 inches / 19 cm from the neckline foundation.
Switch to Color C (Cream/Off-White).
Color C Section (Cream Mid Section)

Round 16: Join Color C. Ch 2, hdc into each st around, working 2 hdc into each of the 4 marked sts. Join. (130 hdc)
Round 17: Ch 2, hdc into each st around, working 2 hdc into each of the 4 marked sts. Join. (134 hdc)
Round 18: Ch 2, hdc into each st around, working 2 hdc into each of the 4 marked sts. Join. (138 hdc)
Round 19: Ch 2, hdc into each st around, working 2 hdc into each of the 4 marked sts. Join. (142 hdc)
Round 20: Ch 2, hdc into each st around, working 2 hdc into each of the 4 marked sts. Join. (146 hdc)
Round 21: Ch 2, hdc into each st around, working 2 hdc into each of the 4 marked sts. Join. (150 hdc)
Round 22: Ch 2, hdc into each st around, working 2 hdc into each of the 4 marked sts. Join. (154 hdc)
Round 23: Ch 2, hdc into each st around, working 2 hdc into each of the 4 marked sts. Join. (158 hdc)
Round 24: Ch 2, hdc into each st around, working 2 hdc into each of the 4 marked sts. Join. (162 hdc)
Round 25: Ch 2, hdc into each st around, working 2 hdc into each of the 4 marked sts. Join. (166 hdc)
At the end of Round 25, fasten off Color C.
Checkpoint: After completing Round 25, the cape body should measure approximately 12.5 inches / 32 cm from the neckline foundation.
Switch to Color D (Forest Green).
Color D Section (Forest Green Lower Section)

Round 26: Join Color D. Ch 2, hdc into each st around, working 2 hdc into each of the 4 marked sts. Join. (170 hdc)
Round 27: Ch 2, hdc into each st around, working 2 hdc into each of the 4 marked sts. Join. (174 hdc)
Round 28: Ch 2, hdc into each st around, working 2 hdc into each of the 4 marked sts. Join. (178 hdc)
Round 29: Ch 2, hdc into each st around, working 2 hdc into each of the 4 marked sts. Join. (182 hdc)
Round 30: Ch 2, hdc into each st around, working 2 hdc into each of the 4 marked sts. Join. (186 hdc)
Round 31: Ch 2, hdc into each st around, working 2 hdc into each of the 4 marked sts. Join. (190 hdc)
Round 32: Ch 2, hdc into each st around, working 2 hdc into each of the 4 marked sts. Join. (194 hdc)
Round 33: Ch 2, hdc into each st around, working 2 hdc into each of the 4 marked sts. Join. (198 hdc)
Round 34: Ch 2, hdc into each st around, working 2 hdc into each of the 4 marked sts. Join. (202 hdc)
Round 35: Ch 2, hdc into each st around, working 2 hdc into each of the 4 marked sts. Join. (206 hdc)
Round 36: Ch 2, hdc into each st around, working 2 hdc into each of the 4 marked sts. Join. (210 hdc)
Round 37: Ch 2, hdc into each st around, working 2 hdc into each of the 4 marked sts. Join. (214 hdc)
At the end of Round 37, do not fasten off Color D yet.
Checkpoint: After completing Round 37, the cape body should measure approximately 17.5 inches / 44.5 cm from the neckline foundation.
Hem Picot Edging

Drop Color D (cut with a 6 inch tail and weave in later). Join Color A with sl st to the last st of Round 37.
Edging Round: Work picot edging as described in Special Techniques across all 214 sts of the hem edge. Work the picot repeat as: sc in first st, ch 3, sl st in first ch, sc in next 2 sts, repeat. This uses 3 sts per repeat. 213 sts accommodate 71 complete picot repeats. Work the final stitch as a plain sc to close the round cleanly. Join final sc to first sc with a sl st. Fasten off and weave in ends.
Hood Instructions

The hood is worked flat in rows, then folded in half and seamed across the top.
Using Color A and J/6.0 mm hook.
Foundation Chain: Chain 64.
Row 1 (RS): Hdc in 3rd ch from hook (the skipped 2 chs count as first hdc), hdc in each ch across. Turn. (63 hdc)
Rows 2 through 25: Ch 2 (counts as first hdc), hdc in each st across to last st, hdc in top of t-ch. Turn. (63 hdc each row)
After Row 25, do not turn. Do not fasten off.
Checkpoint: The hood panel should measure approximately 9 inches / 23 cm wide and 10 inches / 25.5 cm tall at this point.
Hood Top Seam

Fold the hood panel in half so that Row 25 aligns with the foundation chain edge, with RS facing out. Thread a yarn needle with Color A. Using a whipstitch seam along the top folded edge across the full 63-stitch width. Fasten off. Turn RS out.
Hood Face Opening Edging
Working around the front face opening edge of the hood with Color A, work 1 row of sc evenly around the entire face opening edge. Join with sl st to first sc. Fasten off.
Attaching the Hood to the Cape

1. Block the hood and cape body lightly before seaming.
2. Fold the hood so that the back seam sits centered at the back. The face opening faces forward.
3. With the cape neckline edge facing up, pin the bottom open edge of the hood to the neckline, distributing the hood’s 63 stitches evenly around the 78-stitch neckline. Leave approximately 7 to 8 stitches at each front opening edge with no hood attached.
4. Using Color A and a yarn needle, seam the hood to the neckline with a whipstitch from the WS. Fasten off and weave in all ends.
Tie Attachments

Thread one braided tie through the neckline fabric at each front edge, approximately 1 inch / 2.5 cm in from the front opening at the level of Round 2 on the neckline band. Secure the end of each braided tie by tying a knot against the fabric on the WS.
Cape Front Edge Finishing

Working along each front edge of the cape with Color A, work 1 row of sc evenly down each front edge from neckline to hem. Work approximately 1 sc per row end. Fasten off.
Size Customization Tips
For a smaller size (ages 2 to 4): Begin with a foundation chain of 68 (67 hdc at neckline). Work the same increase schedule, but stop the body at Round 32 instead of Round 37. Reduce the hood foundation chain to 56 and work only 20 rows. Adjust yarn quantities down by approximately 15 percent.
For a larger size (ages 8 to 12): Begin with a foundation chain of 92 (91 hdc at neckline). Work the same increase schedule, adding an additional 6 increase rounds in the green section through Round 43. Increase the hood foundation chain to 72 and work 28 rows. Adjust yarn quantities up by approximately 20 percent.
For adult sizing: Begin with a foundation chain of 120 (119 hdc at neckline). Work increases through approximately Round 55 for a hip-length capelet. Hood foundation chain should be 90 stitches worked for 34 rows. Yarn quantities will approximately double.
Finishing and Blocking
Weave in all ends securely, hiding color-change tails on the WS.
For wet blocking, submerge the finished cape in lukewarm water with a small amount of wool wash. Gently squeeze out excess water without wringing. Roll in a clean towel to remove moisture.
Lay flat on a blocking mat. Shape the neckline into a smooth circle and pin lightly. Stretch the hem gently outward to encourage the A-line flare. Shape the hood over a rounded form like a balloon or large ball. Allow to dry completely before removing pins.
Maintenance Guide
For Acrylic yarn: Use a cold, gentle machine wash cycle. You may lay the item flat to dry or use a low tumble dry setting.
For Superwash wool: Use a mild soap and hand wash in cool water. Dry by laying the piece flat.
For the most precise instructions, always refer to the label on your specific yarn.
Designing this Winter Berry Hooded Cape was a joy, and I hope you find just as much pleasure in crafting it. Because of the color blocking, this project is an excellent way to utilize leftover yarn from your stash, creating a garment that makes a child look as if they belong in a storybook.
Save this crochet pattern to your Pinterest boards if you found it useful, ensuring it is easy to locate when you are prepared to cast on. I would love to see your completed capes! Please tag me on Instagram or leave a comment below to share your work. Happy hooking!
You Did It!

Congratulations on finishing your Winter Berry Hooded Cape! Take a moment to look back at the final photos to compare your overall shape and those lovely close-up details. Your handmade creation is now ready to bring some whimsical, fairytale energy to a lucky child!