
Pumpkin Granny Square Crochet Pattern: 3D Tutorial
Looking for a cozy autumn project that is a little more interesting than an ordinary granny square? This pumpkin granny square crochet pattern combines a classic square with a plump, raised pumpkin and a small magenta stem.
The electric blue, magenta, and deep purple colors make it a lovely fall crochet motif for blankets, cushions, wall hangings, and handmade seasonal gifts.
In this tutorial, you will learn about the materials, stitches, pumpkin shaping, assembly, and finishing techniques you need to make your own textured crochet square. You will also find ideas for changing the colors and using your finished motif in other projects.
Table of Contents
-
About the 3D pumpkin granny square
-
Materials and tools
-
Crochet stitches and abbreviations
-
Step-by-step pumpkin granny square tutorial
-
Common mistakes and solutions
-
Customization ideas
-
Care instructions
-
Practical crochet tips
-
Frequently asked questions
About This 3D Pumpkin Granny Square Crochet Pattern
A traditional granny square is usually flat, but this design adds a three-dimensional pumpkin to the center. The deep purple-colored square creates an open, decorative frame, while the electric blue pumpkin features raised ribs that give it a rounded appearance.
The magenta stem finishes the motif and adds a natural autumn touch.
This design works well for crocheters who already know a few basic stitches and want to try shaping, post stitches, and simple crochet assembly.
Project details
-
Project type: 3D pumpkin granny square
-
Skill level: Advanced beginner; suitable for confident beginners who know basic crochet stitches
-
Finished size: Approximately 10 × 10 inches (25 × 25 cm)
-
Yarn: Worsted-weight acrylic yarn, category 4
-
Hook: 8 mm (H-8 as specified in the pattern)
-
Main colors: Deep Purple or off-white, electric blue, and magenta
-
Construction: Granny square base, separately crocheted pumpkin body, stem, and final assembly
-
Season: Fall, autumn, and Halloween decorating
-
Time required: Allow approximately 3–5 hours for your first attempt, depending on your experience, tension, and assembly speed. This is a planning estimate, not a guaranteed completion time.
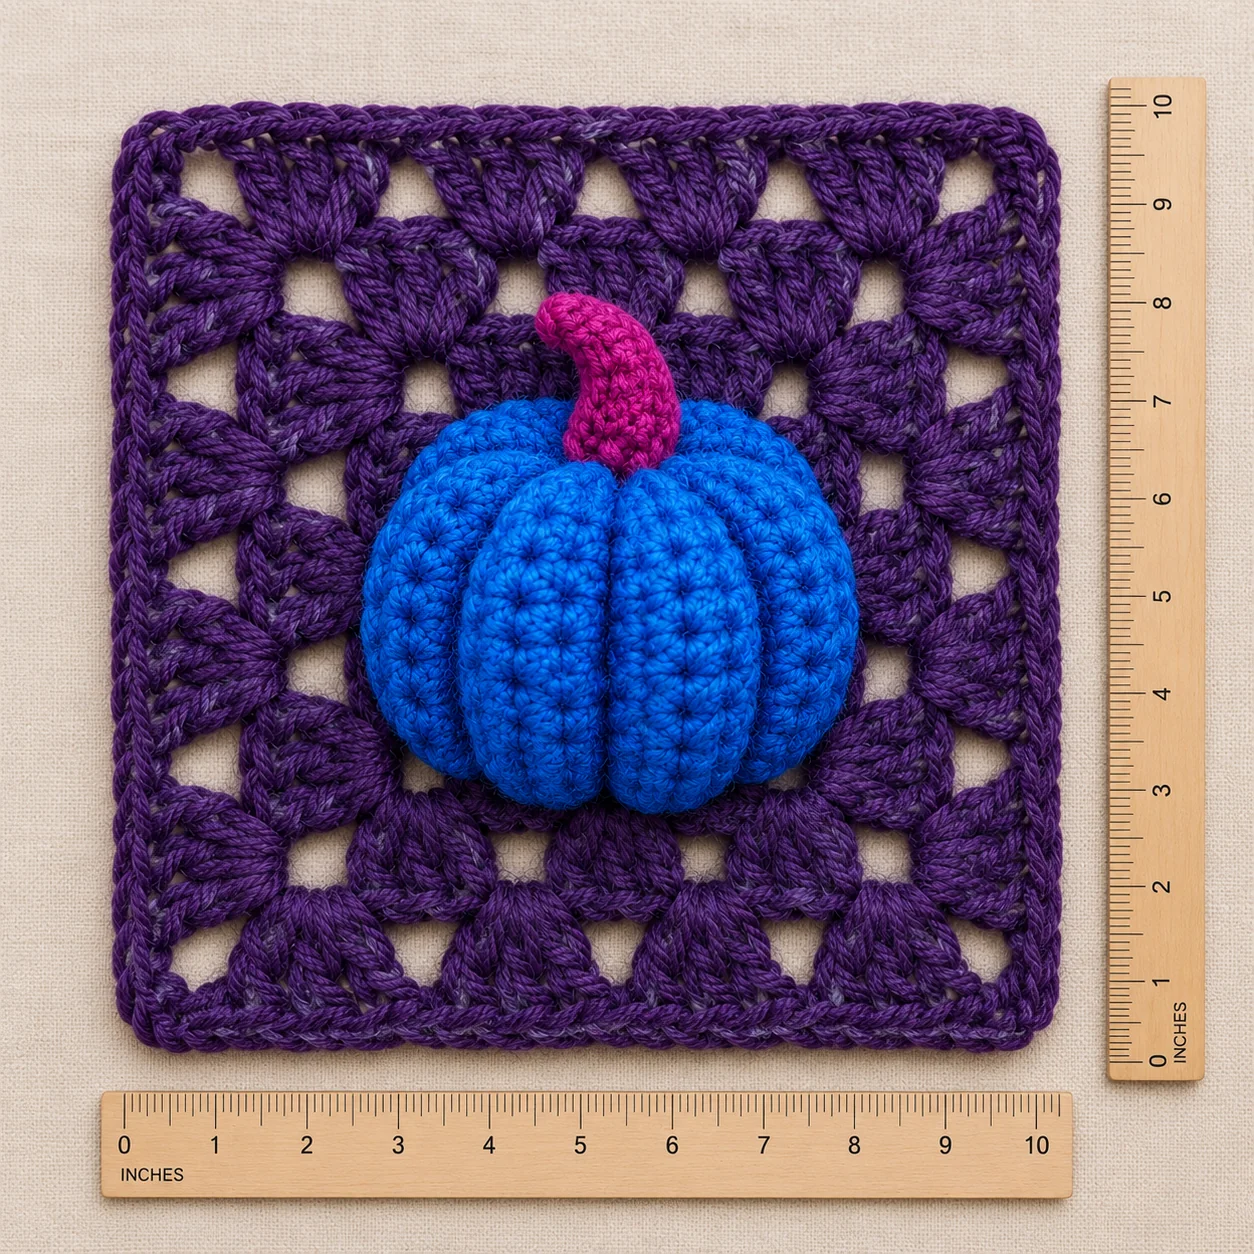
Photo suggestion: Add your own finished square here, photographed from directly above against a warm wooden or neutral background. Include a ruler or measuring tape to show its actual size.
Where can you use this fall crochet motif?
One of the best things about a decorative granny square is that you can use it in several ways.
Try your finished pumpkin motif as:
-
A decorative cushion or pillow panel.
-
Part of an autumn-themed crochet blanket.
-
A small wall hanging or framed fiber-art piece.
-
A handmade tote bag panel.
-
Seasonal shelf or table decor.
-
A thoughtful handmade gift for someone who loves crochet.
For bags, blankets, and other frequently handled projects, attach the pumpkin securely and make sure the back of the square is neat and comfortable to use.
Materials for Your Pumpkin Granny Square
Gather your materials before you begin. Using yarn of a similar thickness throughout the project will help the square and pumpkin look balanced.
Material
Recommended choice
Square base yarn
Deep Purple or off-white, worsted weight (4)
Pumpkin yarn
Electric Blue, worsted weight (4)
Stem yarn
Magenta, worsted weight (4)
Crochet hook
8 mm
Tools
Scissors, yarn needle, optional stitch markers
Finishing supplies
Small amount of stuffing for the stem, if needed
How much yarn do you need?
The supplied pattern estimates the following amounts:
-
Deep Purple or off-white: 60–70 yards (55–65 m).
-
Electric Blue: 40–50 yards (35–45 m).
-
Magenta: 10–15 yards (10–12 m).
The amount of magenta yarn depends on the stem’s length and how much yarn you need for sewing. Keep a little extra of each color available in case your tension differs from the sample.
Which yarn works best?
A smooth acrylic worsted-weight yarn is a practical choice because it is widely available, easy to work with, and suitable for decorative home projects.
Choose an electric blue shade that contrasts clearly with the deep purple base. A forest magenta or deep olive stem complements the pumpkin without competing with its texture.
The pattern specifies an 8 mm hook. Because hook size affects stitch appearance and finished measurements, check your square as you work. If your fabric is unusually loose or stiff, review the pattern and yarn combination before making the entire project.
Crochet Stitches and Abbreviations
This tutorial uses standard US crochet terminology.
Abbreviation
Meaning
MR
Magic ring
ch
Chain
sl st
Slip stitch
sc
Single crochet (UK double crochet)
hdc
Half double crochet (UK half treble crochet)
dc
Double crochet (UK treble crochet)
inc
Increase; work two stitches in the same stitch
dec
Decrease
FPdc
Front post double crochet
st / sts
Stitch / stitches
FO
Fasten off
A quick note for UK crocheters: US single crochet is called double crochet in UK terminology. US double crochet is called treble crochet in UK terminology. Following the correct terminology matters because the same abbreviations can mean different stitches in different systems.
What is a front post double crochet?
A front post double crochet (FPdc) is worked around the post of a stitch rather than through the top loops. It pushes the stitch forward, creating a raised ridge.
In this pumpkin design, those raised stitches form the visible ribs that make the electric blue body look more like a pumpkin instead of a flat circle.
Step-by-Step Pumpkin Granny Square Crochet Tutorial
The project has three main parts: the deep purple granny square, the electric blue pumpkin, and the magenta stem. You will make the pieces separately and sew the pumpkin onto the finished base.
Important: The following instructions follow the construction and stitch counts shown in the supplied pattern PDF. They are a written guide to the design, not a replacement for the original illustrated pattern if you need its complete photo references.
Part 1: Crochet the deep purple granny square base
Use deep purple or off-white yarn for all five rounds of the square base. Work the corners carefully so the square remains flat and even.
Step 1: Make the center circle
-
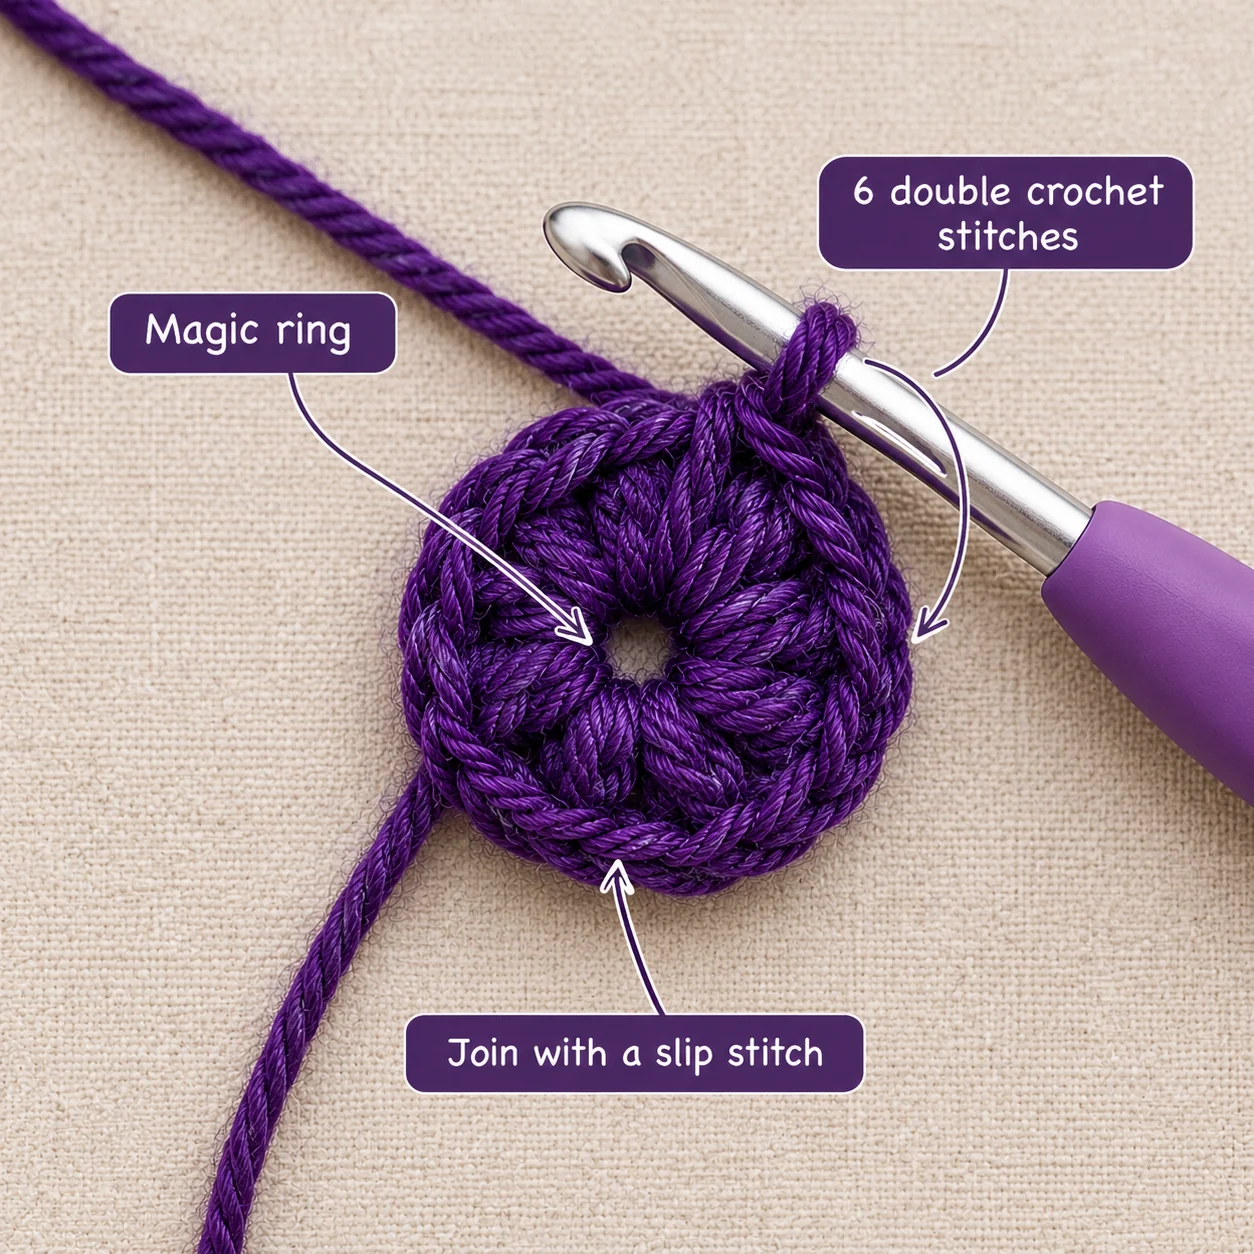
Make a magic ring.
-
Chain 3; this counts as your first double crochet.
-
Work 5 additional double crochets into the ring, giving you 6 double crochets in total.
-
Pull the ring tight.
-
Slip stitch to the top of the beginning chain to join.
Stitch count: 6 double crochets, arranged as a center circle.
Tip: If you find the magic ring difficult, practice tightening it before moving on. A loose center can leave a noticeable hole in your finished square.
Step 2: Create the four corners
-
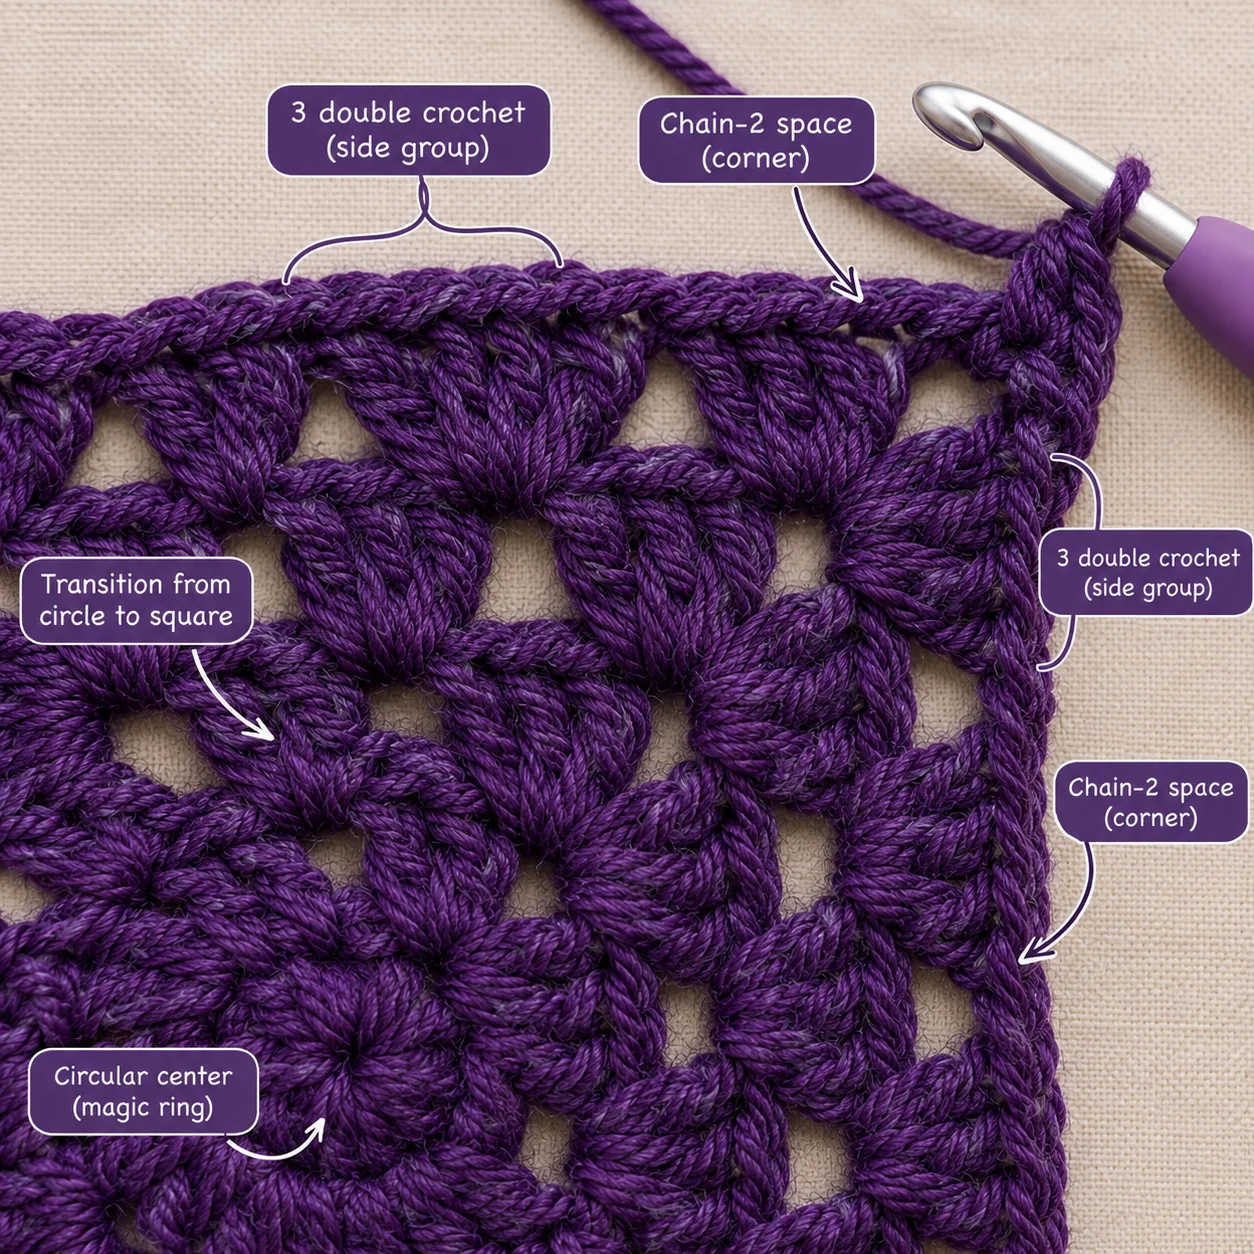
Slip stitch into the next chain-2 space.
-
Chain 3, then work 2 double crochets into the same space.
-
Chain 2.
-
Work 3 double crochets into that space to complete the first corner group.
-
Repeat the corner arrangement in the remaining spaces as directed by the pattern.
-
Join with a slip stitch to the beginning chain.
Round count: 4 corner groups, each formed by 3 double crochets and a chain-2 corner space.
Tip: The chain-2 spaces form the corners. Make them easy to identify, as you will need to work into the correct spaces in the following rounds.
Step 3: Build the square
-
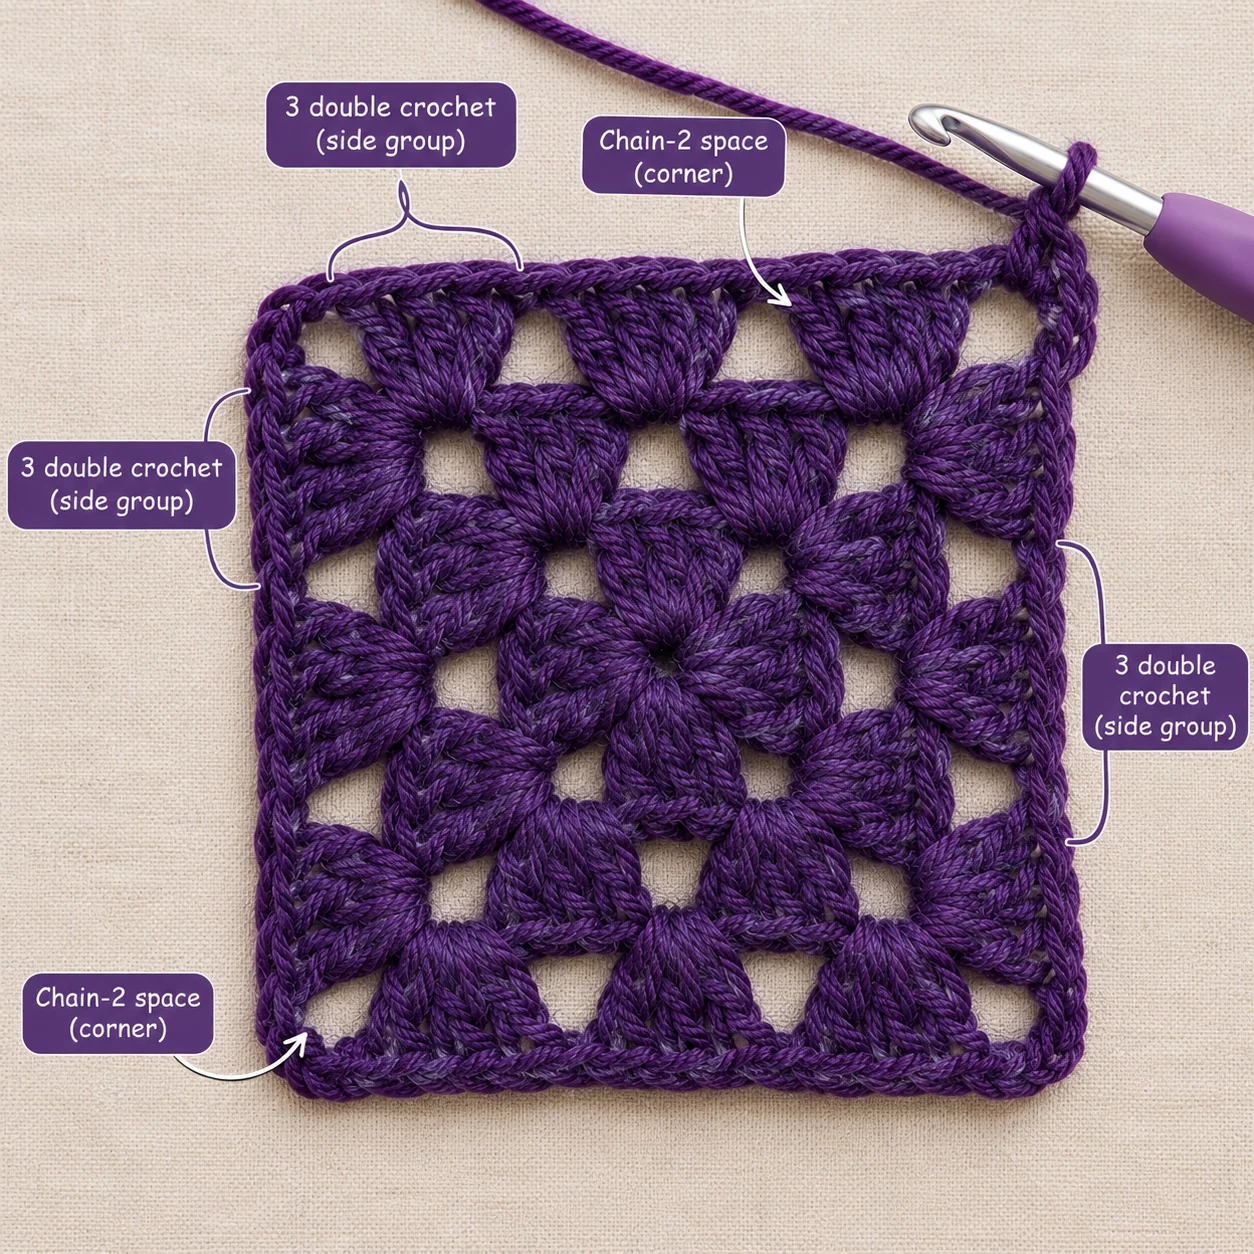
Slip stitch into the next chain-2 corner space.
-
Chain 3 and work 2 double crochets into the same space.
-
Chain 1, then work 3 double crochets into the next space.
-
Continue following the pattern’s arrangement of side groups and corner groups.
-
Work 3 double crochets, chain 2, and 3 double crochets into each corner space.
-
Join the round with a slip stitch.
Round count: 4 corners, with 3-double-crochet groups forming the sides.
Tip: Do not add extra stitches to the corners. If one side looks longer than another, check your groups before starting the next round.
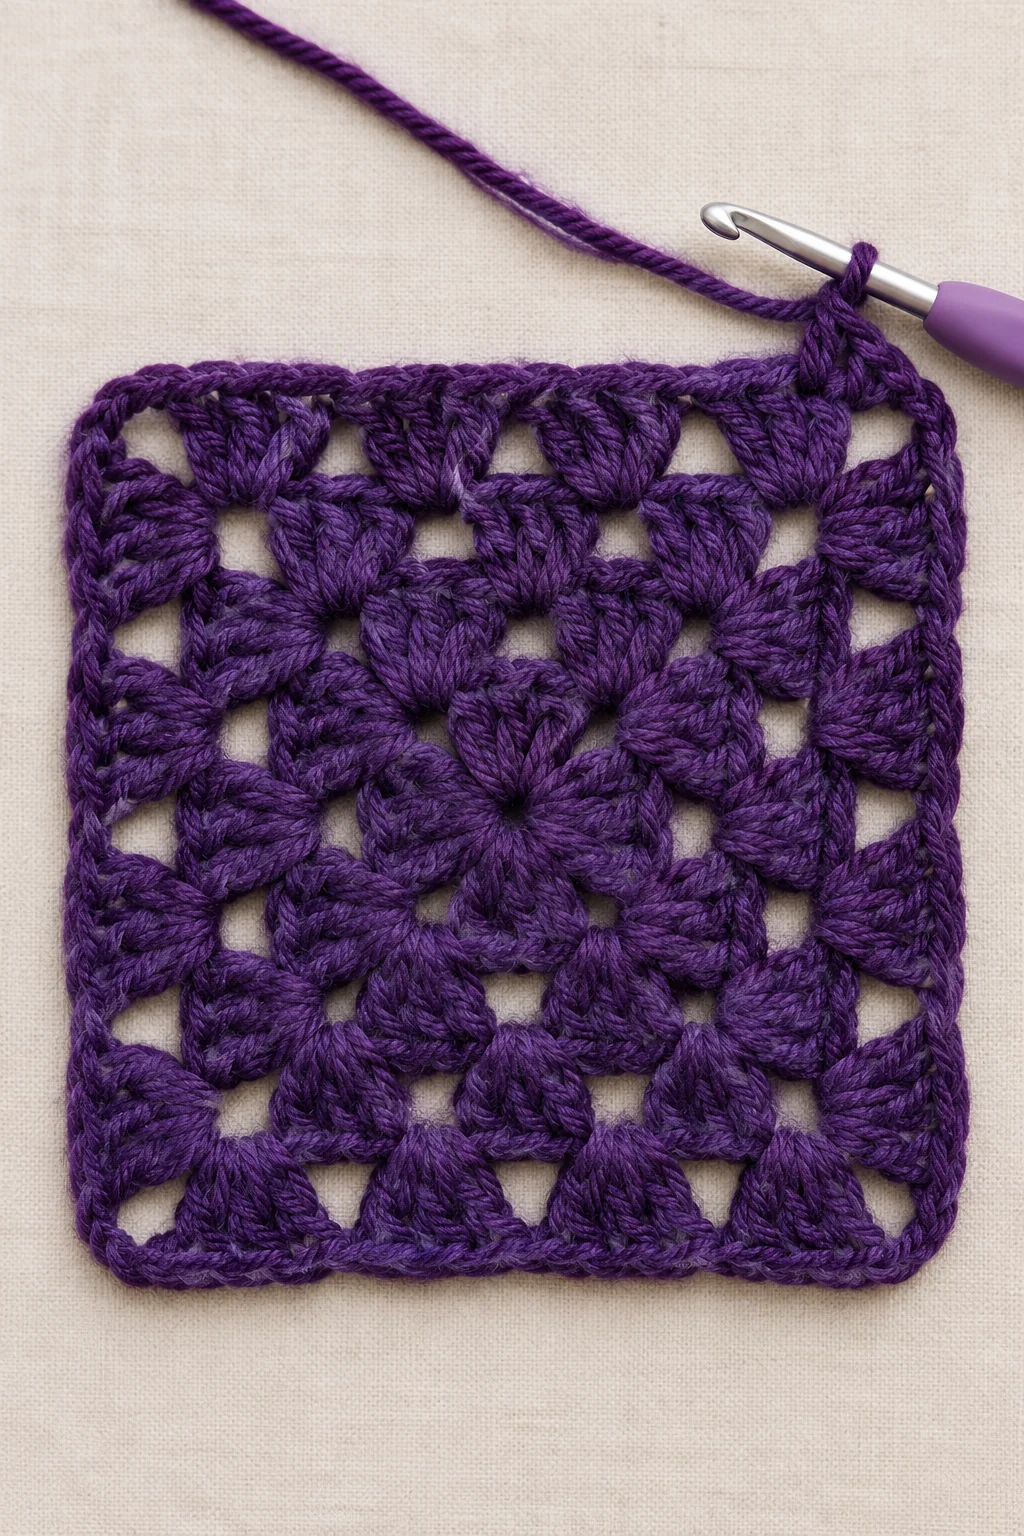
Step 4: Add the fourth round
-
Slip stitch into the next space.
-
Chain 3 and work 2 double crochets into the same space.
-
Continue working the side groups and corner groups in the sequence given in the pattern.
-
At every corner, preserve the 3-double-crochet, chain-2, 3-double-crochet arrangement.
-
Join the round.
Round count: 4 corners, with the sides extended by additional double-crochet groups.
Tip: Lay your work flat after joining. It should be becoming recognizably square rather than curling into a bowl.
Step 5: Finish the fifth round

-
Slip stitch into the next chain-1 space.
-
Chain 3 and work 2 double crochets into the same space.
-
Continue the pattern’s side and corner sequence around the square.
-
Complete all four corners evenly.
-
Slip stitch to join, then fasten off the deep purple yarn.
Finished base: Approximately 10 × 10 inches (25 × 25 cm), subject to tension and blocking.
Tip: Before making the pumpkin, check that all four sides are straight and the corners are similar in size. A neat base makes the final motif look more professional.
Part 2: Crochet the raised electric blue pumpkin
The pumpkin is worked separately in rounds, then attached to the center of the square. The early rounds create a rounded body, while the later rounds shape the top and bottom.
Step 6: Begin the pumpkin body
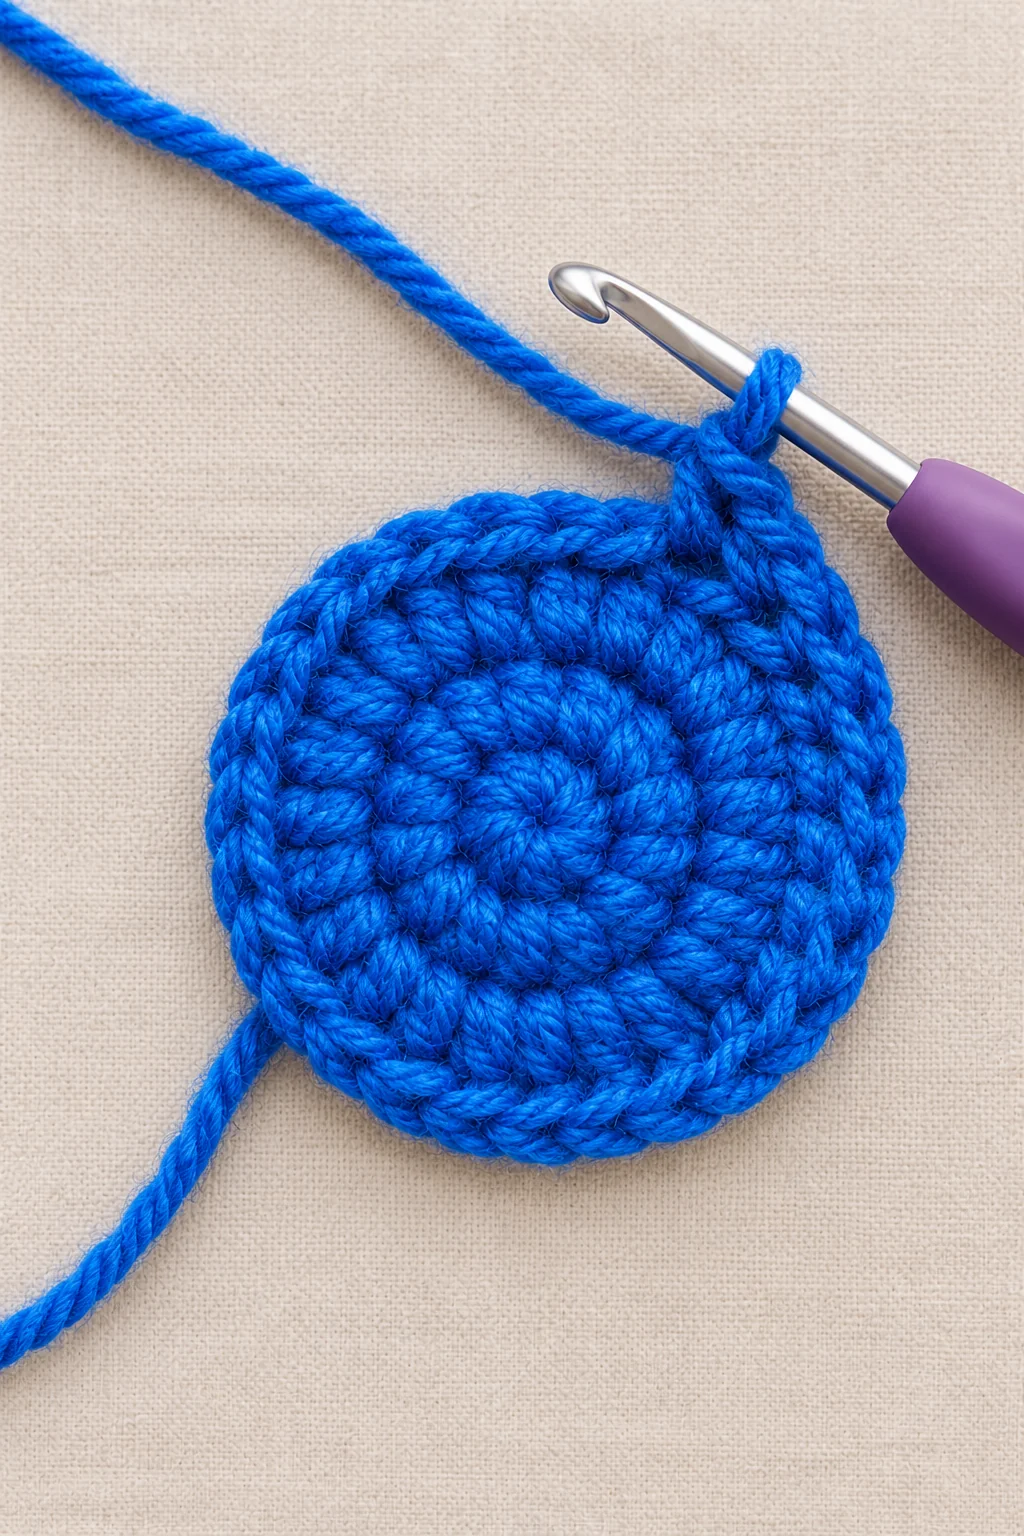
With electric blue yarn:
-
Make a magic ring.
-
Work 6 single crochets into the ring.
-
Pull the ring tight and join as directed.
Round 1: 6 single crochets.
For the following rounds, increase evenly to build a flat circle:
Round
Instructions
Stitch count
2
Increase in every stitch
12
3
Repeat single crochet, increase
18
4
Repeat 2 single crochets, increase
24
5
Repeat 3 single crochets, increase
30
6
Repeat 4 single crochets, increase
36
7
Repeat 5 single crochets, increase
42
8
Single crochet around without increasing
42
Tip: Count each round before moving forward. An extra increase can make the pumpkin lopsided, while missed stitches can affect the final shape.
Step 7: Form the raised pumpkin ribs

The next rounds use front post double crochet to create the pumpkin’s textured ridges.
-
Work the first rib round using the FPdc placement described in the pattern.
-
Continue the rib pattern around the body, keeping the stitches evenly spaced.
-
Follow the pattern’s stitch sequence for each rib round.
-
Check the shape from the front to make sure the ribs are visible and consistent.
Stitch count: The supplied pattern maintains 42 stitches through the rib rounds.
Tip: Do not pull the FPdc stitches too tightly. If the ridges are too tight, the pumpkin may lose its rounded shape. If you need to review the precise post-stitch placement, use the stitch diagrams or photos in your pattern PDF.
Step 8: Shape the pumpkin
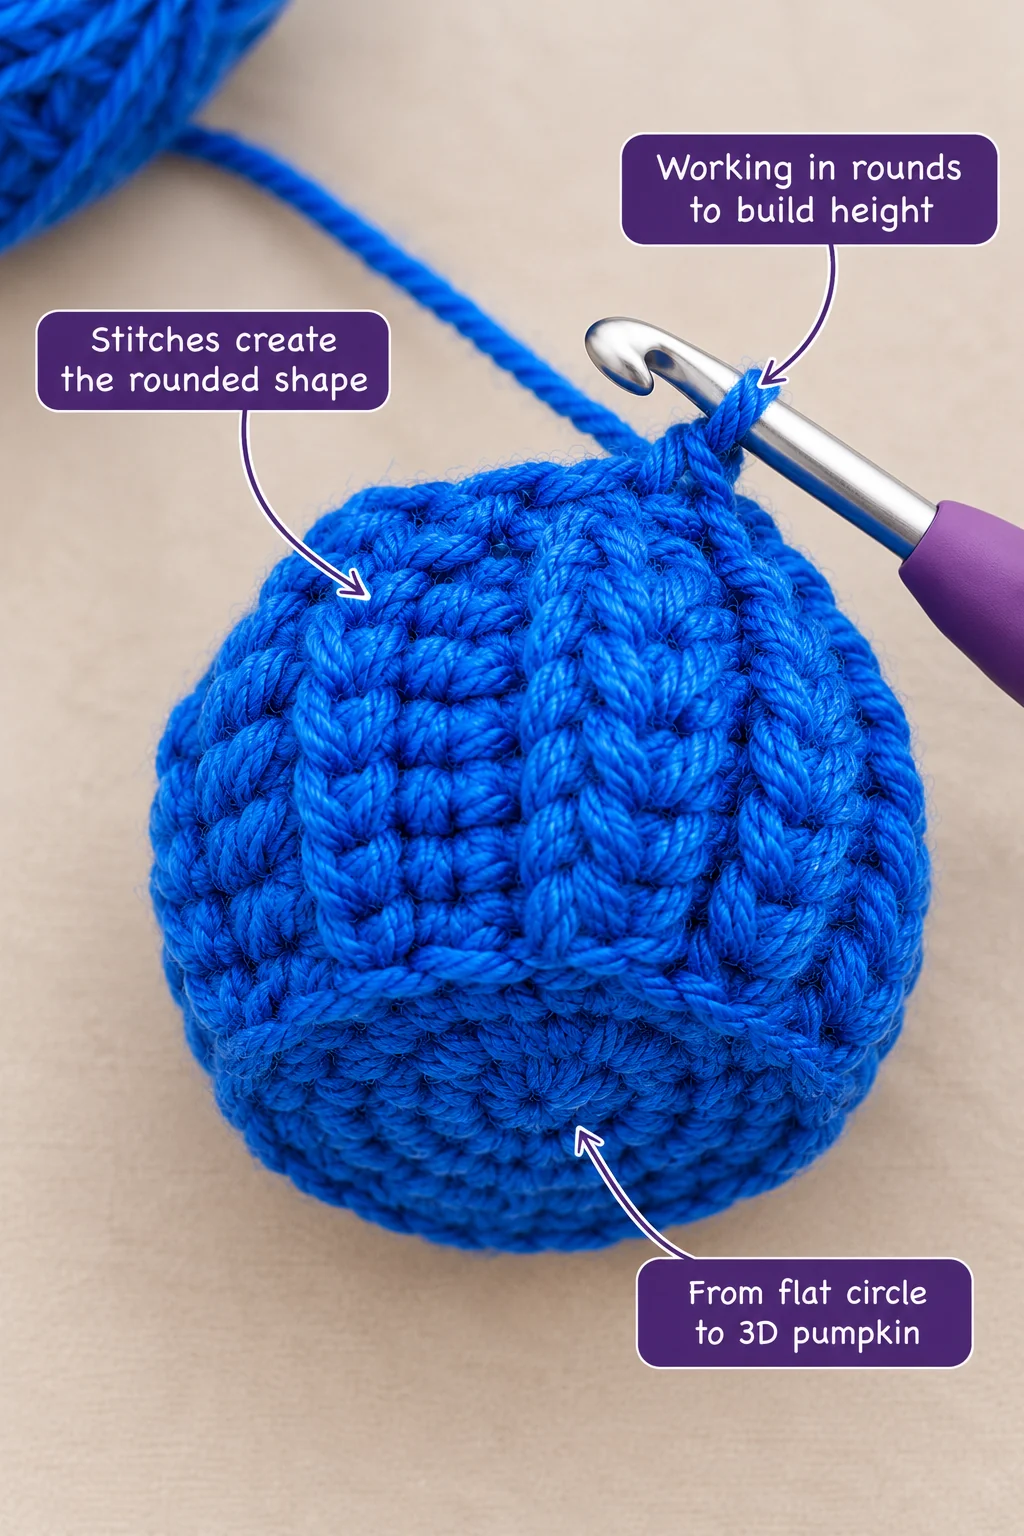
The final rounds decrease the circumference so the pumpkin closes neatly.
Round
Instructions
Stitch count
12
Repeat 5 single crochets, decrease
36
13
Repeat 4 single crochets, decrease
30
14
Repeat 3 single crochets, decrease
24
15
Repeat 2 single crochets, decrease
18
16
Repeat 1 single crochet, decrease
12
17
Decrease around
6
The decreases help round the body and create a plump, pumpkin-like shape.
Fasten off with a long tail. Use the tail and a yarn needle to close the remaining stitches as instructed in the pattern. Shape the ribs gently with your fingers.
Tip: If the pumpkin is intended to sit raised above the square, shape it before sewing it down. Avoid overstuffing or pulling the closing yarn so tightly that the ribs disappear.
Part 3: Crochet the magenta stem
Use magenta yarn for the stem.
-
Make a magic ring and work 4 single crochets into it.
-
In the next round, increase to 6 stitches by repeating single crochet and increase twice.
-
Work the next round in single crochet, using the back loops as directed for a cleaner edge.
-
Decrease to 4 stitches.
-
Work single crochet rounds to build the stem’s height, following the pattern.
-
Fasten off with a long tail.
Stem count: The pattern begins with 4 stitches, expands to 6, and tapers to 4 stitches for the upper stem.
Tip: A small amount of stuffing can help the stem stand upright. Keep it subtle; the stem should complement the pumpkin rather than become the main feature.
Part 4: Assemble and finish the square
Step 9: Attach the pumpkin

-
Place the pumpkin in the exact center of the deep purple granny square.
-
Check that the stem points toward the top edge of the square.
-
Thread a yarn needle with matching electric blue yarn.
-
Sew around the pumpkin’s edge, catching the appropriate back loops so the sewing stitches remain discreet.
-
Secure the pumpkin firmly enough that it does not shift.
Tip: Before sewing, take a photo of the placement from directly above. It is easier to spot an off-center pumpkin in a photo than when looking at the square close up.
Step 10: Block the square
-
Weave in all loose ends on the back.
-
Gently reshape the square to approximately 10 × 10 inches.
-
Lightly mist or carefully steam-block the square, considering the yarn manufacturer’s care instructions.
-
Shape the four corners and straighten the edges.
-
Let the square dry completely before using it.
Avoid applying high heat directly to acrylic yarn. Gentle blocking is usually preferable to aggressive stretching.
Photo suggestion: Add real close-up photos of the granny square rounds, the pumpkin ribs, the stem, and the final assembly. These images will make the tutorial more useful than a finished-project photo alone.
You Did It!
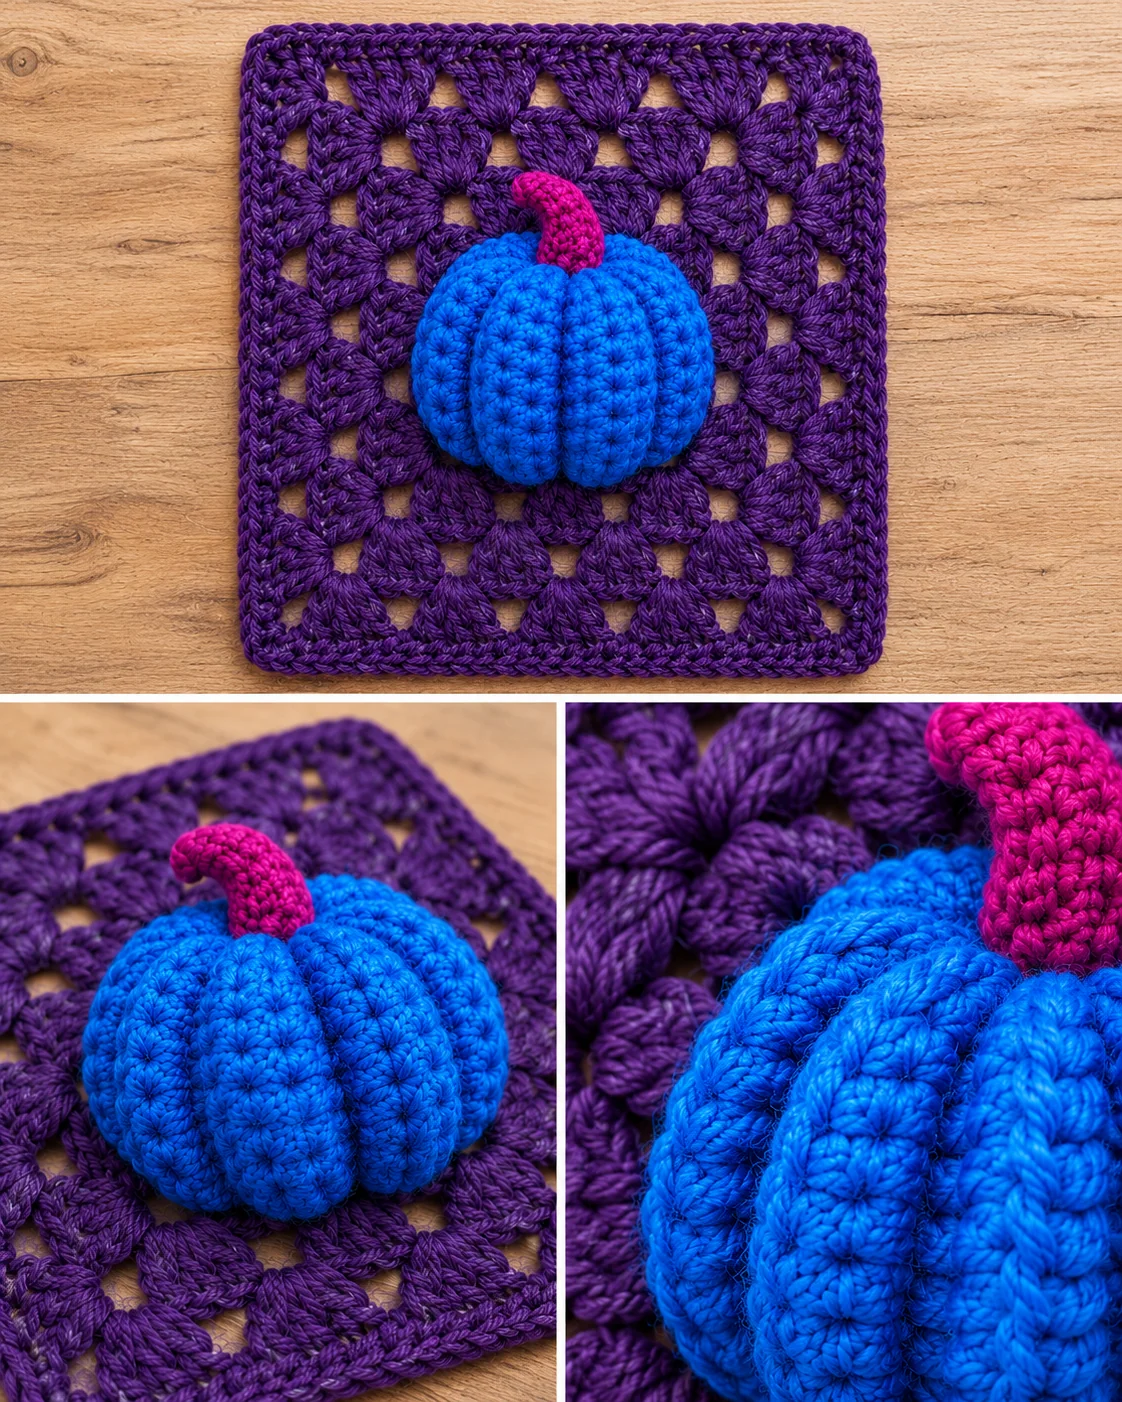
Congratulations on completing your 3D pumpkin granny square! Take a moment to look at the final photo to compare your overall shape and the close-up details of your textured motif.
Common Pumpkin Granny Square Mistakes and How to Fix Them
Even experienced crocheters occasionally need to undo a few stitches. Here are common problems to check during this project.
1. The square curls at the edges.
Check your tension and corner spaces. Missed corner stitches or uneven groups can cause the square to curl. Blocking may help, but it will not fully correct an incorrectly worked round.
2. The pumpkin looks flat.
Check that the rib stitches are positioned correctly and that the body has been shaped as directed. Gently adjust the ribs with your fingers.
3. The pumpkin is off-center.
Reposition it before sewing. Measure from the pumpkin’s edges to the square’s sides to help find the center.
4. The stem flops over.
Check the base attachment and use a small amount of stuffing if appropriate. Weave in and secure the yarn tail firmly.
5. The square is smaller than expected.
Your yarn, hook, and tension all affect the finished size. Measure before blocking and compare your work with the stated 10-inch target.
6. Loose yarn ends show on the back.
Use a yarn needle to weave each end through several stitches. Trim only after the end is secure.
Customization Ideas for Your Fall Crochet Motif
Once you understand the construction, it is easy to personalize the design.
Try different autumn colors
-
Rust electric blue and deep purple: A traditional harvest look.
-
Burnt electric blue and forest magenta: Rich colors for rustic autumn decor.
-
Mustard yellow and ivory: A warm, vintage-inspired combination.
-
Sage magenta and beige: A softer, neutral seasonal palette.
-
Dusty rose and deep purple: A gentle alternative for a modern home.
Make a blanket or cushion
Crochet multiple squares and join them together for a seasonal blanket or pillow cover. You can alternate pumpkin squares with plain granny squares to balance the texture and reduce the amount of assembly.
Change the finished size
A different yarn weight and hook can change the size of the square. For a smaller motif, try a lighter yarn with an appropriate smaller hook; for a larger motif, try a thicker yarn and a suitable hook.
Make a test square before committing to a large project, since the pumpkin and square need to remain proportionate.
Try a different border
A simple border in deep purple, brown, or magenta can give the finished square a more defined edge. Keep the border even and check that the corners remain flat.
Care Instructions for Your Finished Crochet Square
Care depends on the yarn you use, so check its label before washing.
-
Cleaning: Follow the yarn manufacturer’s washing instructions. If the yarn is machine-washable, use the recommended gentle cycle.
-
Drying: Reshape the square and dry it flat when the yarn instructions allow.
-
Storage: Keep the motif dry and away from prolonged direct sunlight.
-
Decorative display: If used as wall decor, dust it gently and keep it away from damp areas.
-
Maintaining the shape: If the square becomes uneven, reshape it gently using a method suitable for your yarn.
If the motif is attached to a frequently used bag or cushion, check the pumpkin’s sewn edges occasionally to make sure the attachment remains secure.
Pro Tips for a Neater Finish
These practical checks can save time and help your project look polished.
-
Count as you go. It is much easier to correct one round than to undo several completed rounds.
-
Use stitch markers. Marking the corners can help you identify the correct spaces.
-
Keep your tension steady. Tight stitches can make the square stiff, while loose stitches can leave large gaps.
-
Check the pumpkin placement before sewing. This is the simplest way to avoid an off-center motif.
-
Keep the back tidy. Neat yarn ends make the square easier to use in blankets, bags, and cushions.
-
Photograph each stage. If you make several squares, progress photos help you repeat the same size and placement consistently.
A useful habit is to pause after every major stage: the square base, the pumpkin body, the stem, and final assembly. A quick check at each stage prevents small problems from becoming frustrating repairs.
Frequently Asked Questions
1. Is a pumpkin granny square suitable for beginners?
Yes, for advanced beginners who know basic crochet stitches. The square uses familiar stitches, while the raised pumpkin introduces shaping and front post double crochet.
2. What yarn is best for a pumpkin granny square?
Worsted-weight acrylic yarn is a practical option. The supplied design uses deep purple, electric blue, and magenta yarn, with an 8 mm crochet hook.
3. How big is a 3D pumpkin granny square?
The supplied pattern measures approximately 10 × 10 inches (25 × 25 cm). Your finished size may vary depending on yarn, hook, tension, and blocking.
4. How do you make a pumpkin look three-dimensional in crochet?
The pumpkin is crocheted separately, shaped with increases and decreases, and textured with front post double crochet ribs. It is then sewn onto the granny square base.
5. Can I use a different yarn or hook size?
Yes. Different yarn weights and hook sizes can change the finished dimensions and texture. Make a test piece first and ensure the pumpkin remains proportionate to the square.
6. What can I make with a pumpkin granny square?
Use it for a decorative cushion, autumn blanket, wall hanging, tote bag panel, or seasonal gift. Choose a project that suits the motif’s size and raised texture.
7. Can I get a pumpkin granny square crochet pattern PDF?
A downloadable PDF can be useful if you prefer to save or print instructions and follow photo references while crocheting. Link your own illustrated pattern PDF from your Etsy shop so readers can find the exact design featured in this tutorial.
8. Is this pumpkin granny square pattern free?
This blog article provides a construction guide and practical tips. The complete illustrated PDF should be accessed through the download or purchase link you provide; do not describe the full PDF as free unless you actually offer it at no charge.
Conclusion: Make a Cozy Pumpkin Granny Square for Fall
A pumpkin granny square crochet pattern is a lovely way to combine classic crochet with raised texture and seasonal color. The deep purple square frames the electric blue pumpkin, while the magenta stem gives the motif its finishing touch.
Take your time with the stitch counts, keep the corners even, and check the pumpkin’s placement before sewing it down. Small finishing details can make a big difference to the final result.
If you try this fall crochet motif, leave a comment sharing the colors you chose or the project you plan to make with it. Save this tutorial to Pinterest so you can return to it during your next crochet session, and share it with a friend who enjoys handmade autumn decor.
Looking for the illustrated version of this design? Visit [Craftora Creative on Etsy — insert your Etsy shop link here] to find the downloadable crochet pattern PDF.
Happy crocheting!
(4) SEO Keywords List
These keywords are selected for relevance to your design, crochet audience, and seasonal search intent. Use the most relevant phrases in your headings, image descriptions, Pinterest pin, and related posts rather than repeating every keyword in every paragraph.
Primary and secondary keywords
Keyword
Suggested use
pumpkin granny square crochet pattern
Primary focus keyword
pumpkin granny square
Main topic and headings
3D pumpkin crochet pattern
Design description
crochet pattern PDF
Downloadable pattern section
fall crochet motif
Seasonal project section
easy pumpkin granny square
Beginner-focused heading
beginner crochet tutorial
Tutorial introduction
autumn crochet decor
Decorating ideas
crochet pumpkin square
Variations and FAQ
textured crochet pumpkin
Pumpkin shaping section
crochet granny square pattern
Related internal links
Halloween crochet decor
Seasonal customization
pumpkin blanket crochet
Project ideas
step-by-step crochet tutorial
Tutorial description
instant download crochet pattern
Etsy product link text
Additional long-tail keyword ideas
These are useful phrases to test in Google Search Console, Pinterest Trends, or an Etsy keyword research tool:
-
How to crochet a 3D pumpkin granny square
-
Easy pumpkin granny square crochet tutorial
-
Pumpkin granny square pattern PDF for beginners
-
Crochet pumpkin square for fall blanket
-
Textured crochet pumpkin with raised ribs
-
Autumn granny square crochet pattern
-
Pumpkin crochet motif for home decor
-
Beginner-friendly fall crochet projects
-
Electric Blue and deep purple pumpkin crochet square
-
Crochet pumpkin square step by step